Indezine Logo


MapPrez: The Indezine Review

Learn about MapPrez, a PowerPoint add-in that lets you add high quality geographical maps inside PowerPoint.


Author:

Product/Version: PowerPoint


Learn PowerPoint

Challenge to achieve: One click to close a PowerPoint Show presentation.


Introduction
Using MapPrez
Pricing and Support
Conclusion


Introduction

MapPrez is an PowerPoint add-in that enables you to insert maps, and add place locations as labels directly on inserted maps. All these actions can be done through a dedicated MapPrez tab in PowerPoint's Ribbon. All maps are sourced from Google -- and you can thus insert brilliant satellite and cartographic imagery with a click or two. In addition, MapPrez lets you superimpose vector maps on top of the inserted maps.

MapPrez is from GMARK, a company based in the UK. You can learn more about MapPrez and their other products from their site. My contact at GMARK for this review was Jamie Garroch - thank you, Jamie.

Back

Using MapPrez

Before you use MapPrez, some information about the maps and credits you need know to access these maps. All maps and place locations are provided under license from Google Inc. and require low cost credits. Your credits are deducted as you insert maps -- the trial version of MapPrez includes 10 credits, and a full license of MapPrez includes 250 credits. All credits can be topped up, as required. Vector maps are not subject to credits, and you can insert any number of these without diminishing your credit balance.

Download the installer from the link given above, run the setup routine. Even if you do not download and install MapPrez, you can follow this walkthrough to understand this add-in better:

  1. Launch PowerPoint. Most of the time, PowerPoint opens with a new slide in a presentation -- you can change the slide layout to Blank or Title Only by selecting the Home tab | Layout | Blank or Title Only. This provides a nice blank slide without much of placeholders -- an ideal canvas to place a map.
  2. Now, access the MapPrez tab of the Ribbon, highlighted in red in Figure 1. Within this tab, click the Insert button (highlighted in blue in Figure 1).
  3. MapPrez tab of the Ribbon
    Figure 1: MapPrez tab of the Ribbon
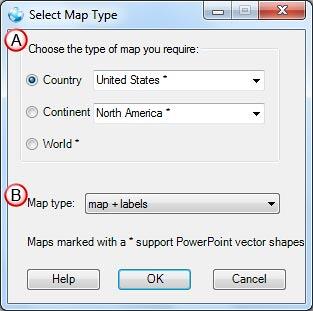
  4. This opens the Select Map Type dialog box, as shown in Figure 2.
  5. Select Map Type dialog box
    Figure 2: Select Map Type dialog box
  6. The Options within the Select Map Type dialog box are explained below:
  7. A. Choose the type of map you require

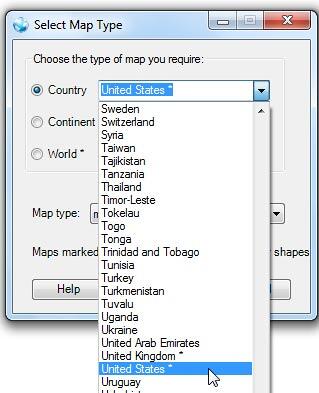
    This section provides three radio buttons which enables you to choose maps by Country, Continent, or World. For both Country and Continent, you can click the downward pointing arrow to bring up a drop-down list, as shown in Figure 3.
  8. Country drop-down list
    Figure 3: Country drop-down list
  9. Make a choice based on your requirements. Note that the Maps marked with an asterix(*) comprise a vector map (PowerPoint shape) in addition to the raster (image) map.
  10. B. Map type

    Click the downward pointing arrow to summon a drop-down list of map types, as shown in Figure 4.
  11. Map type drop-down list
    Figure 4: Map type drop-down list
  12. Once the choices are made, click the OK button.
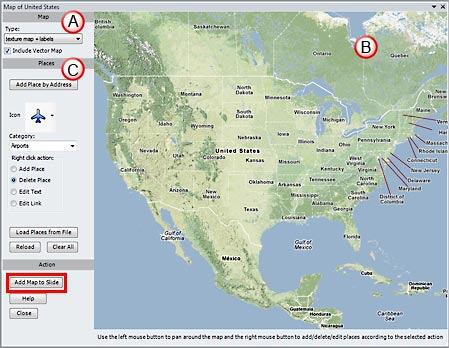
  13. This brings up the Map Editor window with your selected map opened, as shown in Figure 5.
  14. Map Editor window
    Figure 5: Map Editor window
  15. Within the Map Editor window, you can perform the following tasks:
  16. A. Change the Map Type as required. If you do not want the vector map, deselect the Include Vector Map check-box. Remember that all vector maps are native PowerPoint shapes that can be formatted with fills, outlines, and effects in PowerPoint, as required.
  17. B. Resize the window and zoom/pan the map until you see exactly what you need. Note that zoom/pan options do not work when you select the Include Vector Map check-box (see earlier point, A). This happens because zooming and panning would change the alignment between the Google map and its vector counterpart.
  18. C. You can add places to your map in one of three ways:
  19. Right-clicking on the map with your mouse,
  20. Typing an address (or partial address eg. city name, or longitude/latitude coordinates), or
  21. Loading a list from a file.
  22. Make sure you are connected online to add Places. Learn more about adding places to maps at the MapPrez site (link no longer exists). Once done, click the Add Map to Slide button (highlighted in red in Figure 5 above).
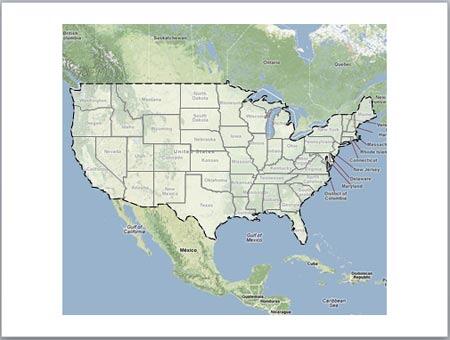
  23. Once the map is inserted on your slide (see Figure 6), you can use all the standard PowerPoint editing tools.
  24. Map added on the PowerPoint slide
    Figure 6: Map added on the PowerPoint slide
Back

Pricing and Support

MapPrez costs $199.00. Multiple licenses are available.

Support options include phone, email and online demo movies.

Back

Conclusion

MapPrez is a very extensively planned product that covers all your bases as far as inserting geographical maps is concerned. Although the interface mentions Country, Continent, and World as options, you can easily select any Country and then zoom and pan in the Map Editor to any zoom level that Google allows. In fact, we could zoom to the exact building where our office is located! And it is so cool that you can do this right within PowerPoint!

Back

You May Also Like: South America PowerPoint Templates | Adobe Presenter 7 - Page 2

Popular Posts

Pivot Tables in PowerPoint: by Kasper Langmann
One of the most commonly used features in Microsoft Excel is the Pivot Table. A Pivot Table simply allows you to make better sense of data by giving you different options of how to view that data.

Get More SmartArt Graphics
Learn how you can get more SmartArt graphic variants.

Character Spacing in PowerPoint 2013
Explore Character Spacing options in PowerPoint 2013.

Add Secondary Value Axis to Charts in PowerPoint 2013 for Windows
Learn how to add a Secondary Value axis to charts in PowerPoint 2013 for Windows.


Feature List 01 (Layout with Tabs)

The Feature List Layout comprises three sample PowerPoint presentations: one each to create a visual list for 4 features, 5 features, and 6 features. These work great when you have too much information to fit within one slide. This solution lets you use multiple slides, but the visual result is still that of one single slide!

Buy and Download Feature List 01 (Layout with Tabs) for $4.99+ (671 kb)


Microsoft and the Office logo are trademarks or registered trademarks of Microsoft Corporation in the United States and/or other countries.

Home | PowerPoint | Photoshop | PowerPoint Templates | PowerPoint Tutorials | Blog | Notes | Ezine | Media Kit | Feedback | Site Map | About Us | Contact Us

Link to Us | Privacy | Testimonials

PowerPoint Backgrounds | Christian PowerPoint Backgrounds | Business PowerPoint Presentation Templates

Plagiarism will be detected by Copyscape

©2000-2023, . All rights reserved.