Indezine Logo


Cinematize 2.03

Read the Indezine review of Cinematize 2.03.


Author:

Product/Version: PowerPoint


Learn PowerPoint

Learn how you can close linked presentations in PowerPoint.


Introduction
New Features
Using Cinematize 2.03
Pricing and Support
Conclusion


Introduction

Cinematize 2.03 is the newest Windows Vista compatible version of the product that allows you to extract audio and video clips off DVDs. These extracted movie clips can then be used in applications such as PowerPoint, QuickTime, Windows Movie Maker, Premiere, iPod, etc.

Cinematize is available in both Windows and Macintosh versions. It supports both PAL and NTSC DVDs and extracts clips as short as a fraction of a second to as long as all the chapters in your DVD.

Cinematize 2.03 is the newest version, the older version works similarly -- and you can read the review here.

Cinematize is from Miraizon, a company based in California, USA. You can learn more about their products from their site.

Back

New Features

Cinematize 2.03 is a fully compatible application for Windows Vista. This new version also offers many convenient new features as well as usability enhancements and improved handling of problematic DVDs.

Other new features are:

  • Option to keep intermediate files
  • More frame size options for MPEG-4 output
  • Support for Apple TV movie output
  • Improved extraction speed
Note: Before running the application, make sure that you have QuickTime installed on your system.
Back

Using Cinematize

Insert a DVD (Movie or Audio) in your drive, before using the application.

Follow these steps to extract a movie clip from a DVD using Cinematize 2.03
  1. Go to your Windows Start menu and choose Cinematize 2.
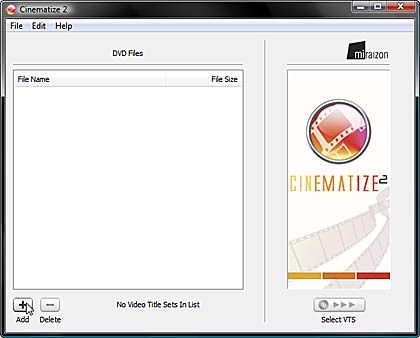
  2. This launches the Cinematize 2 interface, as shown in Figure 1.

    Adding files
    Figure 1: Adding Files

    Click on the Add button which will open a dialog box from where you can select the files under the "VIDEO_TS" directory within your DVD disc.

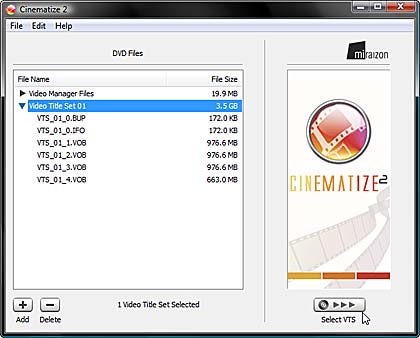
    All video data files for the DVD must be inside a directory named "VIDEO_TS" -- make sure you select all the files, and click Open. This will add all the files into the DVD Files list within the Cinematize main window as shown in Figure 2.
  3. Select the Video Title Set 01 (or similar) from the added list and click the Select VTS button, as shown in Figure 2.

    List
    Figure 2: List
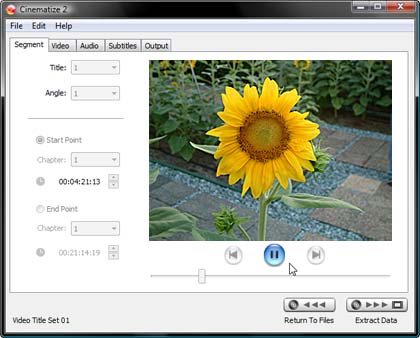
  4. This will render the selected chapter of the DVD -- which could take a while. Thereafter, you will see the main interface of Cinematize 2 with the inserted movie, as shown in Figure 3.

    Main Interface
    Figure 3: Main Interface
  5. Under Segment tab choose the Title to choose the episode you want to extract, Angle for selecting multiple camera angles. You can also use Start Point and End Point to extract a part of the movie.
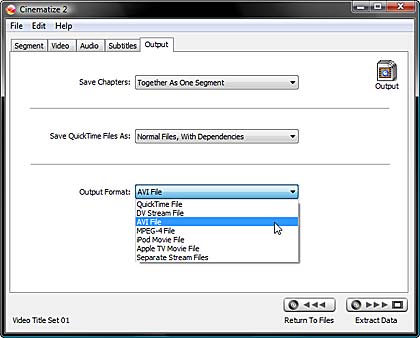
  6. When the selections are made in the Segment tab, select the Output tab as shown in see Figure 4, to choose the format for the extraction. Choose AVI if you intend to use the movie clip on a PowerPoint slide.

    Output
    Figure 4: Output
  7. Finally, click on Extract Data button, which is at the bottom right of the interface (see Figure 5).

    Extract Data
    Figure 5: Extract Data
  8. Select the location to save the extracted file. Depending upon the length of the segment and extraction option settings you choose, this process can take a while.
Back

Pricing and Support

Cinematize 2.03 costs $59.95, for the download version, whereas the boxed version costs $69.95.

Support options include e-mail, phone support, and an online FAQ.

Back

Conclusion

This new upgrade mainly features Windows Vista comaptibility, and is free for all existing Cinematize 2 users.

Cinematize simplifies a normally difficult task with the help of a wizard type interface -- and the price:performance ratio is great.

Back

You May Also Like: Lion PowerPoint Templates | Record Audio in Adobe Presenter


Popular Posts

Create Animated GIFs from PowerPoint Slides
Explore ways to create animated GIFs from PowerPoint slides.

PowerPoint Tutorials
These PowerPoint tutorials have many screen shots that show you exactly what you see in your computer!

Use Safe Fonts Available on All Systems in PowerPoint
Learn about using safe fonts in PowerPoint.

10 Tips for Pecha Kucha
Read 10 amazing Pecha Kucha tips that will help you create and deliver a better Pecha Kucha presentation.


Feature List 01 (Layout with Tabs)

The Feature List Layout comprises three sample PowerPoint presentations: one each to create a visual list for 4 features, 5 features, and 6 features. These work great when you have too much information to fit within one slide. This solution lets you use multiple slides, but the visual result is still that of one single slide!

Buy and Download Feature List 01 (Layout with Tabs) for $4.99+ (671 kb)


Microsoft and the Office logo are trademarks or registered trademarks of Microsoft Corporation in the United States and/or other countries.

Home | PowerPoint | Photoshop | PowerPoint Templates | PowerPoint Tutorials | Blog | Notes | Ezine | Media Kit | Feedback | Site Map | About Us | Contact Us

Link to Us | Privacy | Testimonials

PowerPoint Backgrounds | Christian PowerPoint Backgrounds | Business PowerPoint Presentation Templates

Plagiarism will be detected by Copyscape

©2000-2023, . All rights reserved.