Read the Indezine review of Macromedia Breeze, Page 2 of 3.
Author: Geetesh Bajaj
Product/Version: PowerPoint
The Account and the Add-in
The Wizard
A Test Presentation
Publish to Breeze
Macromedia set up a Breeze Training account for me - logging into the account provides a link to download the Breeze add-in for PowerPoint. Installing the add-in is a simple affair - and on my test system with PowerPoint 97, 2000 and 2002 installed, Breeze showed up in all the versions as a new menu option (see screenshot).
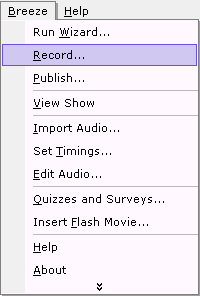
The first option on the menu is the wizard, which leads you step-by-step through the whole process in a fool proof way. Other options on the menu offer more advanced features. We'll use the wizard first.
BackBefore you even start the wizard, you'll have to decide if you want to use Breeze to record your narration - alternatively you can use existing pre-recorded narrations or record them in a professional studio before importing them in Breeze. If you need to add pre-recorded narrations, you might be better off without the wizard.
I created a simple presentation in PowerPoint with conventional title and text on each slide. Thereafter, I choose the 'Run Wizard' option within the Breeze menu in PowerPoint.
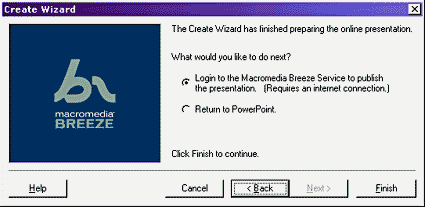
The wizard first helps you set your microphone level - after which you are led slide by slide and prompted to record a narration for each slide. Finally, you can publish your presentation along with the narrations to the Breeze Central site.
BackYou can customize Breeze to a large extent. For my test presentation, I recorded the sound into a sound editing application - thereafter, I edited the sounds with some amplification and noise reduction filters. Finally, I saved all the sounds as WAV files, ready to be imported into Breeze. You'll find links to several free and commercial sound editors elsewhere on this site:
Within PowerPoint, I choose the Breeze | Import Audio option. This opens a dialg box where I can select a separate sound file for each slide.

It's a good idea to test run the presentation now using the View Show option within the Breeze menu in PowerPoint. Once you are satisfied with the output, you can choose the Publish option.
BackPublishing a PowerPoint presentation to the Breeze Central server is easy. The Publish Presentation window first authenticates your login - then you can choose various options including password protection, access permissions, retaining outlines, adding a speaker photograph, etc.

You finally click the Finish button that uploads your presentation to the Breeze servers. Within a few minutes, you receive an email along with a URL to view the rich media presentation.
You can always log-in again and edit permissions for any presentation hosted online.
BackYou May Also Like: Continents PowerPoint Templates | PPTools Starter Set - Page 2


Microsoft and the Office logo are trademarks or registered trademarks of Microsoft Corporation in the United States and/or other countries.