As far as the content or even appearance is concerned, an individual cell within a Table in PowerPoint acts just like any other text box. Therefore, various text alignment options used for text boxes work with Table cells too apart for a few exceptions. Once a cell is selected, the Text alignment options for that cell can be found within the Table Tools Layout contextual tab of the Ribbon (highlighted in blue within Figure 1). You can find them contained within the Alignment group.
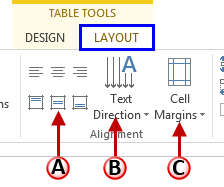
Figure 1: Alignment options for Table cell text
Let us explore these text alignment and position options in PowerPoint 2013 for Windows, as marked in Figure 1 above:
- Alignment: There are six alignment buttons (highlighted in red within Figure 2) that are responsible for the horizontal and vertical alignment of table cell content.
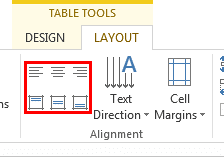
Figure 2: Text alignment buttons - The top three buttons align text horizontally to the left, center, and right of the table cell respectively. The bottom three buttons align text vertically to the top, middle, and bottom of the table cell respectively. In Figure 3 you can see all these six options applied to table text.

Figure 3: Horizontal text alignment within table cells - Do note that the way these options affect the text alignment (horizontal or vertical) depends upon the Text Direction attribute applied to the text, and that's something we discuss next.
- Text Direction: Enables you to rotate the text within the table cell. Click the Text Direction button (highlighted in red within Figure 4) to bring up the Text Direction drop-down list, as shown in Figure 4.
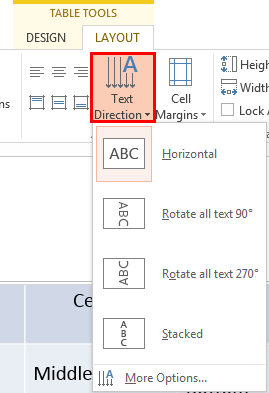
Figure 4: Text Direction drop-down list - Let us explore the text direction options one by one. Look within the icons placed in front of each option to understand how the text will be positioned if you choose that option:
- Horizontal: As the name suggests, the text is placed horizontally.
- Rotate all text 90°: Text within the table cell will be rotated 90° clockwise.
- Rotate all text 270°: Text within the table cell will be rotated 270° clockwise.
- Stacked: Stacks the text in vertical lines.
- More Options: Opens the Format Shape Task Pane along with the Text Options selected, as shown in Figure 5.
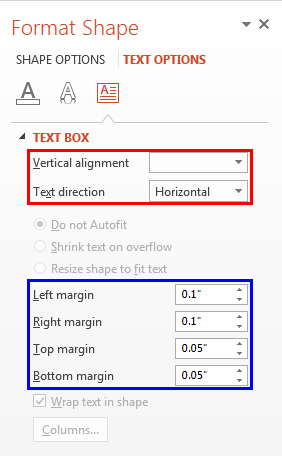
Figure 5: Text Options within the Format Shape Task Pane
- Within the Format Shape Task Pane, the options highlighted in red within Figure 5, above are the same Alignment and Direction options that you explored earlier on this page. To learn more about these Text Layout options within the Format Shape Task Pane explore our Text Layout Options in PowerPoint 2013 for Windows tutorial.
- Cell Margins: This option controls the amount of blank space between the perimeter (edge) and the actual text within the table cell. Click the Cell Margins button (highlighted in red within Figure 6) to bring up the Cell Margin drop-down list, as shown in Figure 6.
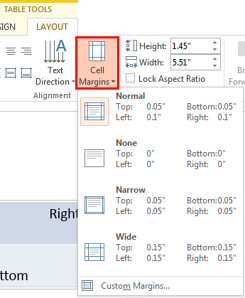
Figure 6: Cell Margins drop-down list - Do note that there are four margins: Left, Right, Top, and Bottom and these four can be individually controlled. Let us explore the margin options in the order they appear in the Margins drop-down list:
- Normal: Sets Left and Right margins to 0.1" and Top and Bottom margins to 0.05".
- None: Sets all margins to 0".
- Narrow: Sets all margins to 0.05".
- Wide: all margins to 0.15".
- Custom Margins: Opens the Cell Text Layout dialog box as shown in Figure 7. Within the Cell Text Layout dialog box, you'll find four separate boxes to enter values for the internal margins; these are Left, Top, Right, and Bottom (highlighted in blue within Figure 7). Enter the values or use the up and down arrows to change the margin value in each of these four boxes.
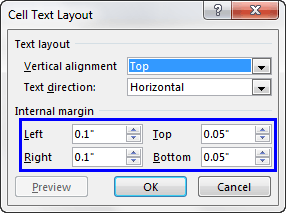
Figure 7: Cell Text Layout dialog box - Alternatively, you can format the margins within the Format Shape Task Pane as shown in Figure 5, earlier on this page. Enter the values or use the up and down arrows to change the margin value in each of these four boxes: Left margin, Top margin, Right margin, and Bottom margin
(highlighted in blue within Figure 5, earlier on this page).
- You can see all these 4 margin settings applied to Table Cells in Figure 8, below.

Figure 8: Various margin settings applied to the Table Cells
Save your presentation often.


