Indezine Logo


Creating Slide Backgrounds in Photoshop for PowerPoint

Learn how to create slide backgrounds for PowerPoint in Photoshop. Changing some Photoshop settings can make this task easier.


Author:

Product/Version: PowerPoint

OS: Microsoft Windows and Mac OS X


Learn PowerPoint

Learn how to show formatting in the Notes Pane in PowerPoint.


If PowerPoint represents something more than anything else, it is the slide—and while you can use a white slide bereft of any graphic treatment, more often than not you will want to use something else. That's because the background elements of a slide are a representation of the brand of your company, or even an expression of your personality.

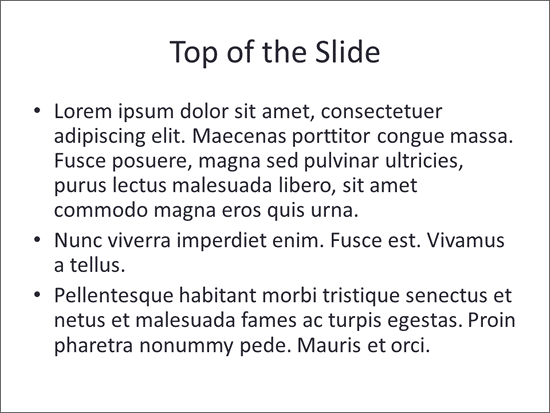
To explain this better, look at the slide in Figure 1, below. Notice that the plain text on a white background is readable, but it is certainly not memorable.
A slide bereft of branding
Figure 1: A slide bereft of branding

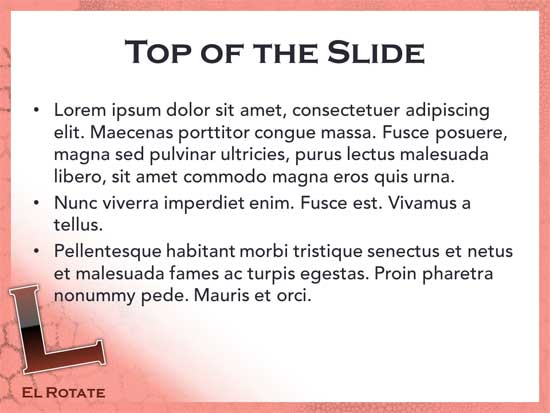
Compare what you saw in Figure 1 to the slide shown in Figure 2, below. This slide is branded for a fictitious company called El Rotate. Notice that this slide has several graphic elements. It has a background, a logo, and the name of a company. Additionally, it also uses custom typefaces and colors.
Branding can make a huge difference
Figure 2: Branding can make a huge difference

In PowerPoint parlance, the background is just one choice that you must make to create that complete appearance. You will also need to explore fonts, colors, effects, slide layouts, and more. And all of these elements must work together to create and represent a cohesive brand. We cover all these other elements elsewhere on this site—but for this tutorial, we will only explore backgrounds. And more importantly we will explore how you would create them within Adobe Photoshop. That does not mean that you cannot use another image editor; the principles of image editing are important and you are welcome to replicate them in any other program.

To begin, you must identify if your PowerPoint presentation will be in a Standard or a Widescreen resolution.

Standard or Widescreen?

Standard slides have a 4:3 aspect ratio whereas Widescreen slides sport a 16:9 aspect ratio. Read our Should You Create Widescreen Slides article to understand more.

Thereafter you can proceed with these steps. Do note that we have no recommendations for any specific version of Photoshop for this tutorial; we did however use Photoshop CS6 for the screen shots you see on this page.
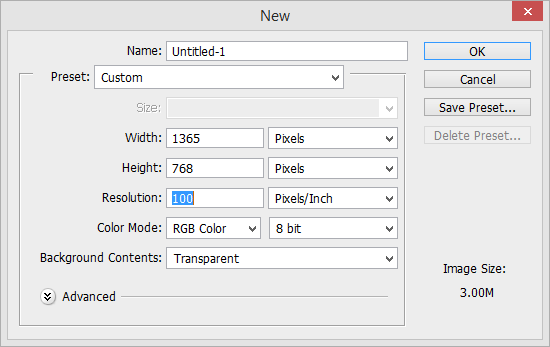
  1. Create a new image in Photoshop. If you are creating a Standard resolution background, choose 1024 x 768 pixels as the dimensions. On the other hand, choose 1365 x 768 pixels for Widescreen backgrounds. But you can also get the best of both worlds, as we will show you! To do so, type in 1365 and 768 within the Width and Height fields respectively (see Figure 3, below). We also changed the Resolution to 100 Pixels/Inch. You can match your settings to what you see in Figure 3.
  2. Create a new image in Photoshop
    Figure 3: Create a new image in Photoshop
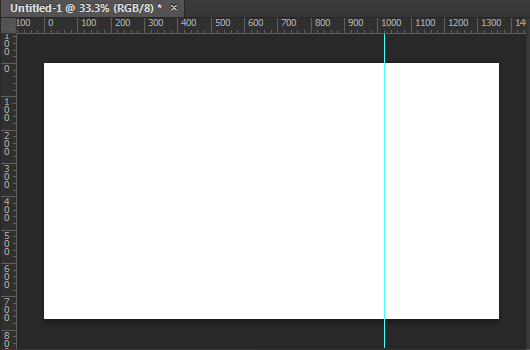
  3. Now within Photoshop, add a guide at the position where the width spans 1024 pixels (see Figure 4, below). If you are not too familiar with guides, you can download this pre-formatted Photoshop file that includes everything you need to start with—download here.
  4. Photoshop document with guide
    Figure 4: Photoshop document with guide
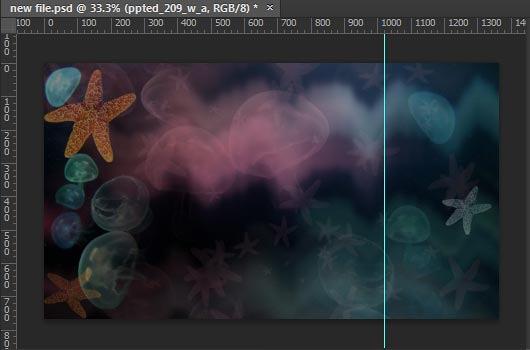
  5. Now do something: ) Use Photoshop's tools, or explore our tutorials on creating quick backgrounds. Just remember to place anything that is important within your background leftwards of the guide. Look at Figure 5, below, and you will notice that the main visual content has been placed in the larger area leftwards of the guide.
  6. Important graphic elements are placed leftwards
    Figure 5: Important graphic elements are placed leftwards
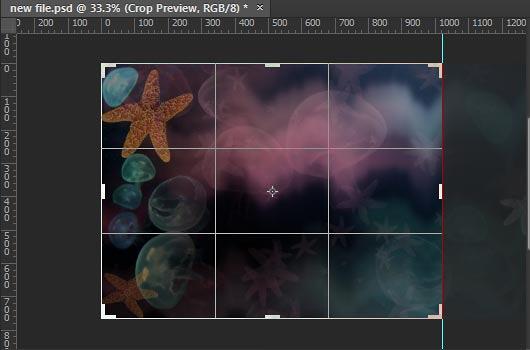
  7. Once you have created the background, you can decide whether you want this exported as a Standard or Widescreen graphic—or even both! For Widescreen, just save to a graphic file format such as JPG or PNG. However for a Standard aspect ratio, use Photoshop's Crop tool to retain all areas leftwards of the guide (see Figure 6 below).
  8. From Widescreen to Standard!
    Figure 6: From Widescreen to Standard!
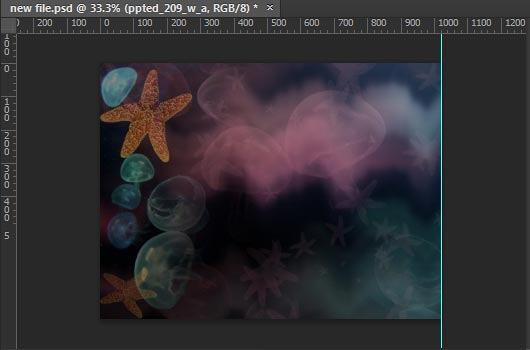
  9. Once the cropping is done, you'll be left with a Standard (4:3) aspect ratio background, as shown in Figure 7, below.
  10. Your Standard aspect ratio background
    Figure 7: Your Standard aspect ratio background
  11. Don't save your file yet! Just export as a JPG or PNG. Then undo to get your cropped areas back! Photoshop does not have a progressive Undo option like PowerPoint, but you can use the Edit | Step Backward option multiple times.
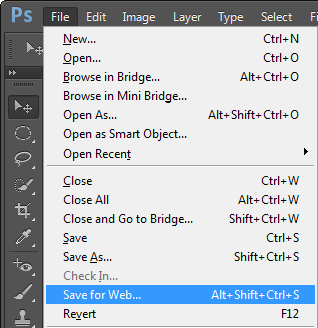
  12. Tip: Explore Photoshop's Save for Web option that exports high quality PNG and JPG graphics (see Figure 8, below). This option is to be found in Photoshop's File menu.
  13. Summon Photoshop's Save for Web option
    Figure 8: Summon Photoshop's Save for Web option
  14. Once you have exported the image as a JPG or PNG, set it as your presentation's background. Refer to our Slide Background Fills: Picture page for more info.
Need expert-prepared custom PowerPoint presentations? Contact this professional presentation writing service online!

See Also:

Other Tutorials: Creating Slide Backgrounds in Photoshop for PowerPoint (Index Page)

You May Also Like: Ten Easy Topics for Pecha Kucha | Turnip PowerPoint Templates


Popular Posts

Change the Unit of Measurement in Windows 10
Learn how to change the unit of measurement from US to Metric, and vice versa in Windows 10.

PowerPoint Tutorials, Articles and Reviews
Tutorials, reviews, articles and templates for Microsoft PowerPoint and other presentation software.

PowerPoint Templates
Find over 6000 PowerPoint templates in thousands of categories and all colors—from a trusted PowerPoint template resource for 20 years.

Create Animated GIFs from PowerPoint Slides
Explore ways to create animated GIFs from PowerPoint slides.


Ebook PowerPoint Keyboard Shortcuts

PowerPoint Keyboard Shortcuts and Sequences Ebook

PowerPoint 365, 2019, 2016, 2013, 2011, 2010, 2007 and 2003 for Windows

PowerPoint 365, 2019, 2016 and 2011 for Mac

PowerPoint for the Web on Windows and Mac

Have you ever used keyboard shortcuts and sequences in PowerPoint? Or are you a complete keyboard aficionado? Do you want to learn about some new shortcuts? Or do you want to know if your favorite keyboard shortcuts are documented?

Go and get a copy of our PowerPoint Keyboard Shortcuts and Sequences ebook.


Microsoft and the Office logo are trademarks or registered trademarks of Microsoft Corporation in the United States and/or other countries.

Home | PowerPoint | Photoshop | PowerPoint Templates | PowerPoint Tutorials | Blog | Notes | Ezine | Media Kit | Feedback | Site Map | About Us | Contact Us

Link to Us | Privacy | Testimonials

PowerPoint Backgrounds | Christian PowerPoint Backgrounds | Business PowerPoint Presentation Templates

Plagiarism will be detected by Copyscape

©2000-2023, . All rights reserved.