Introduction
Many times, we create slides with content of several types. For example, you might create a chart
on the left part of your slide and then add some supporting data for the same chart as a table on the
right side. While showing this particular slide, you may want to alternatively highlight both these
content types so that you can help focus your audience's attention to the topic you are discussing.
This sort of highlighting is possible if you design your graphics or slide content that way -- and
are prepared to use a fair amount of animation. Again that may need some sort of familiarity level from
the presenter so that he or she knows when and what to click!
Fortunately, we are reviewing an add-in for PowerPoint that achieves predictable results without graphic jugglery or added animations. MagPointer
automatically detects slide objects and enables you to interact with those objects in real time. For example, you can highlight text objects or table
components, enlarge specific objects, create frames or zoom on specific slide areas. It is a suitable add-in for content-rich presentations and very
useful for webinars, e-learning classes, and online business meetings. Of course, it is also beneficial for in-person presentations. Once installed,
MagPointer automatically launches whenever your Slide Show begins -- while keeping
all your PowerPoint animations and functionality intact.
You can learn more about the MagPointer from their site (link no longer exists). My contact at MagPointer for this review was
Yossi Pinkas -- thank you, Yossi.
Back
Using MagPointer
Download the installer, run the setup routine and follow the instructions. When installed, follow these steps:
- Open an existing presentation or create a new presentation. Play the presentation in
Slide Show mode.
- Once in the Slide Show mode, the add-in automatically gets activated -- a Smart Cursor and a floating
SmartBar (right edge of the screen) appears, as shown highlighted in red within
Figure 1. Note that PowerPoint's conventional Previous and Next arrow buttons (typically on the popup toolbar available on the
bottom left) are disabled when you use MagPointer.
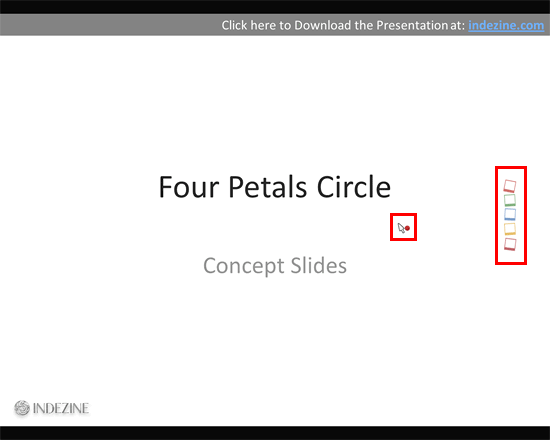
Figure 1: MagPointers Smart Cursor and SmartBar within Slide Show view
- Now, hover your mouse over the SmartBar to see some context-sensitive icons, as shown in
Figure 2. This is intuitive and useful when you are using a remote mouse controller
in face-to-face presentations.
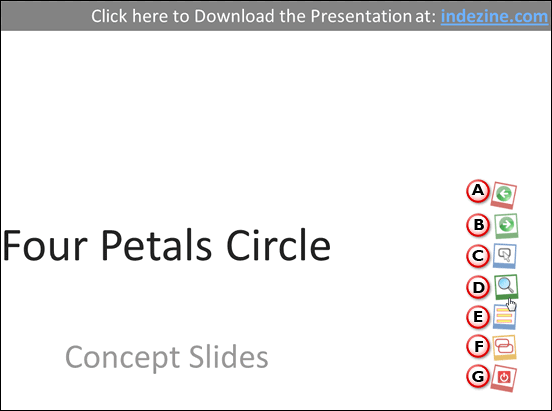
Figure 2: SmartBar displaying icons
The SmartBar icons are explained below -- starting from top to bottom, as marked in
Figure 2, above.
A. Previous Slide
This takes you to previous slide.
B. Next Slide
This icon takes you to next slide.
C. Frame
Click the frame icon, move your cursor to the slide area where you want to add focus, drag the cursor until the area is covered --
release when done to create focus on that area. Alternatively, you can just left-click and drag to draw the frame around the specific slide areas to
be focused. Frames can be freely drawn anywhere and are not related to slide objects. You can also change the frame color. Figure 3, below shows a frame created around the slide title. To remove the frame place your cursor over the SmartBar and click the Cancel
icon which is the topmost icon with a red multiplication sign (see Figure 3, again). Additionally, you can also click inside a frame
or right-click -- the latter option clears all highlights and frames.
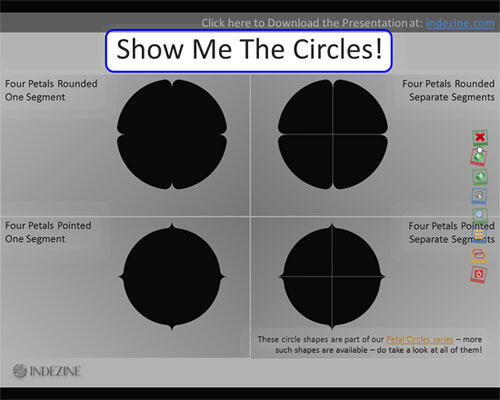
Figure 3: Frame created
D. Zoom
When this icon is selected (or you right-click and drag the cursor over
a selected area), you invoke the magnifier. The cursor in this mode is replaced by a circular
magnifying glass. The magnifier also serves as a projector -- the screen is dimmed and only the area
under the magnifier is highlighted, as shown in Figure 4. Magnification is independent
of slide objects and any area in the slide can be magnified. You can also adjust the magnifier's radius and zoom and finally you can also add
magnifier spots (“frozen” enlarged
highlighted areas).
You can click the left button of your mouse and drag or scroll the mouse wheel -- dragging up and down zooms out and in within your magnifier.
Similarly, you click the right button and drag up and down to change the magnifier size.
Press the Esc key to get out of magnifier mode. Again, you can also right-click or press Cancel icon on the
SmartBar to achieve the same result.
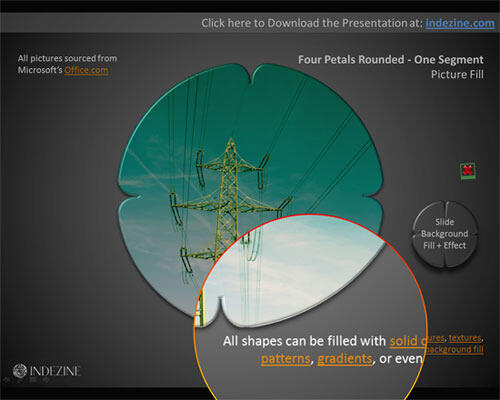
Figure 4: Zoomed slide area
E. Multiple Highlights
To create multiple highlights click on the multiple
highlights (or hold the Ctrl key while highlighting). You can highlight text,
table elements, etc. You can also change the frame colors based on your requirement.
Figure 5 shows multiple, highlighted text objects on a slide. To get out of this mode, click the single frame icon on the SmartBar.
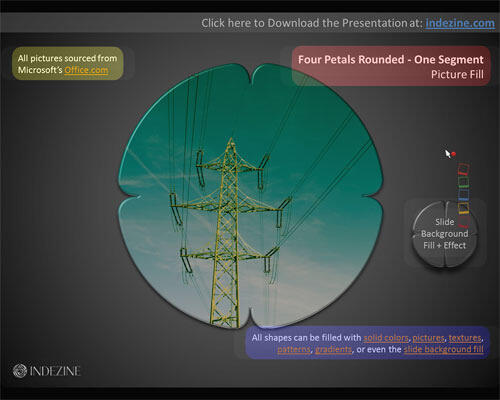
Figure 5: Multiple highlighted text on the slide
F. Multiple Frames
To create multiple frames click on the multiple frames icon on the SmartBar (or hold the Ctrl key while
framing). To get out of this mode, click the single frame icon on the SmartBar. Again, you can also change the frame colors based
on your requirement.
G. Disable MagPointer
Click this icon to disable MagPointer.
While using the frames and highlights, MagPointer builds a navigation path for all detected slide
objects automatically and enables you to traverse them by scrolling the mouse wheel -- forward for next
object or backwards for previous object. Navigation through objects is available only when a single object
is selected.
- Play around with the options -- you can also download the User Manual from the MagPointer site to learn how these options work (link no longer exists).
It's possible to customize (fine-tune) MagPointer behaviors (actions, screen dimming, etc.) in the Configuration window. To get
to Configuration window, right-click to get the PowerPoint pop-up menu and select the MagPointer Configuration
option.
Back
Pricing and Support
MagPointer costs US$9.95 for a single user license. For corporate licenses, you can contact MagPointer.
Support is through e-mail and telephone.
Back
Conclusion
MagPointer is an amazing product that lets you deliver your presentation with so much more control
and oomph. However, we will not recommend that you use MagPointer without first playing a fair bit with
the available options. You have to be in control of all the options, and practice them well before you
use it in front of a real audience. Time spent playing with MagPointer options is certainly time well
spent since some of the features provided are amazing indeed. And the cost:performance ratio is heavily
lopsided to the performance part!
Back


