Indezine Logo


Insert a Nonbreaking Space in PowerPoint for Windows

Learn how you can add non-breaking spaces in PowerPoint for Windows. These space stay inseparable with the words or characters before and after them.


Author:

Product/Version: PowerPoint for Windows

OS: Microsoft Windows


Learn PowerPoint

Five Best PowerPoint Add-ins for Everyday Use


Typing a space seems simple enough – just press the spacebar on your keyboard. However, what many people don't realize is that this action only adds a regular breaking space. Occasionally, you may require a specific type of spacing within a sentence. This spacing could be to prevent words from being split across two separate lines. In such cases, it's important to use appropriate spacing techniques that ensure the text stays legible and easy to understand. One effective way of achieving this is by using a nonbreaking space. Let us imagine that you want to type something similar to:

January 7, 1908

However, if this date happens to be near the edge of the slide or a text box, part of the date may show up in the next line, as shown highlighted in red within Figure 1, below.

Date truncates across two lines
Figure 1: Date with breaking spaces shows across two lines

There is a solution to the problem of dates or other content breaking up between two lines. By using a non-breaking space, the content can be ensured to stay in the same line. This can easily be achieved in Microsoft Word by using the keyboard shortcut Ctrl+Shift+Space for typing a nonbreaking space. However, this shortcut does not work in PowerPoint. So, users of PowerPoint need to use other options such as adjusting line spacing or manually changing text size to ensure that the spaced content remains together, and does not break up between two lines.

There are several ways to add a non-breaking dash in PowerPoint, and we will explore a few of them.

1. Copy and Paste from Word to PowerPoint

Follow these instructions to insert a nonbreaking space from Word into PowerPoint:
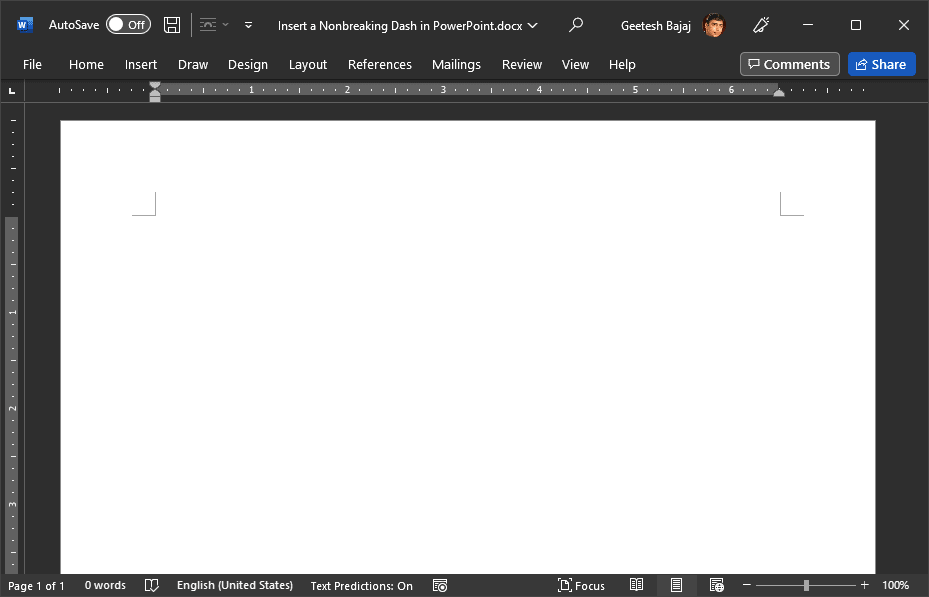
  1. Launch PowerPoint and open the presentation you want to work with or create a new presentation. Navigate to the slide where you want to insert a non-breaking dash. With PowerPoint still open, launch Word, and create a new document, as shown in Figure 2, below.
  2. Create a new Word document
    Figure 2: New Word document
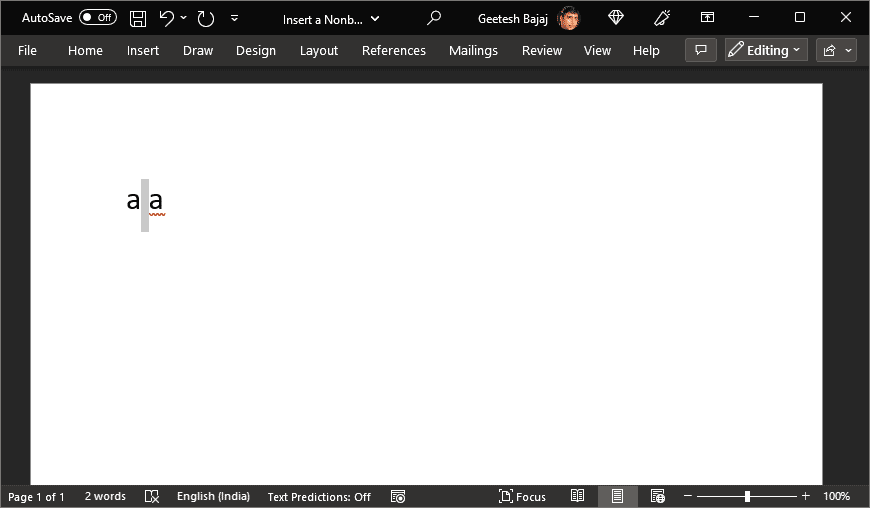
  3. In this new Word document, type any two characters. Place your insertion point between these characters and press the Ctrl+Shift+Space keyboard shortcut, and you will place a nonbreaking space at the insertion point, as shown in Figure 3, below. Now, select this space and copy it to the clipboard by pressing the Ctrl + C keyboard shortcut.
  4. Non-breaking space inserted inside Microsoft Word
    Figure 3: Nonbreaking space in Microsoft Word
  5. PowerPoint Keyboard Shortcuts

    PowerPoint Keyboard Shortcuts

    Do you want more keyboard shortcuts?

    Explore our PowerPoint Keyboard Shortcuts and Sequences Ebook that is updated for all PowerPoint versions.

  6. Back in PowerPoint, paste this nonbreaking space wherever you want, as shown in Figure 4, below. Compare these dashes with the ones shown in Figure 1, previously on this page, and you will notice that the entire date stays within one line. It's important to keep in mind that when copying content from Word into PowerPoint, the font, font-size, and font-formatting may not align with your desired presentation style. To avoid any inconsistencies or discrepancies in appearance, be sure to highlight and select all of the pasted text in PowerPoint and adjust the font type and format as needed to match your overall design theme. Don't forget that small details like font choice can make a big impact on the professionalism and clarity of your presentation.
  7. Date with nonbreaking spaces in PowerPoint
    Figure 4: Date with nonbreaking spaces

2. Use Arial Unicode

For those looking for another option to add a nonbreaking space within PowerPoint, an effective technique is utilizing the Arial Unicode font. This approach requires that you have the Arial Unicode font already installed on your computer, but if you are using Microsoft Windows or Microsoft Office, this should be readily available. Follow these steps to use this technique:
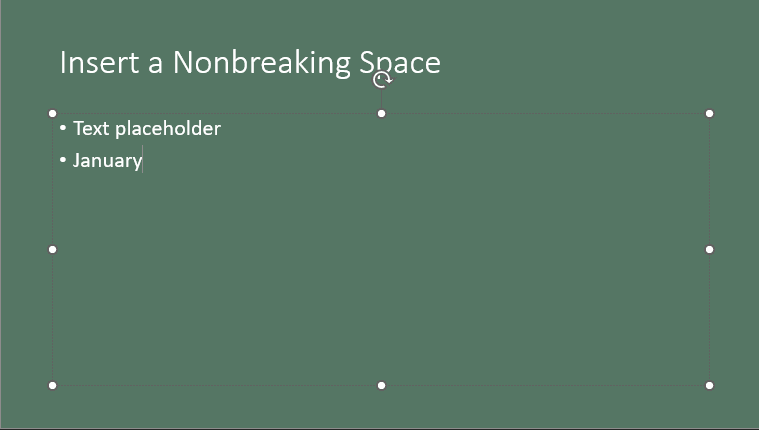
  1. Navigate to the slide where you want to insert a nonbreaking space and click where you want this dash inserted, as shown in Figure 5, below.
  2. Click to see an insertion point in PowerPoint
    Figure 5: Click to see an insertion point
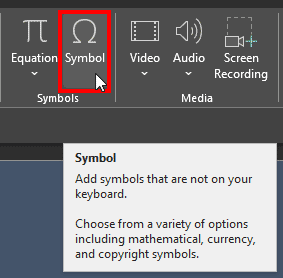
  3. Next, access the Insert tab of the Ribbon, and click on the Symbol button, as shown highlighted in red within Figure 6, below.
  4. Insert Symbol button in PowerPoint 365 for Windows
    Figure 6: Insert Symbol button
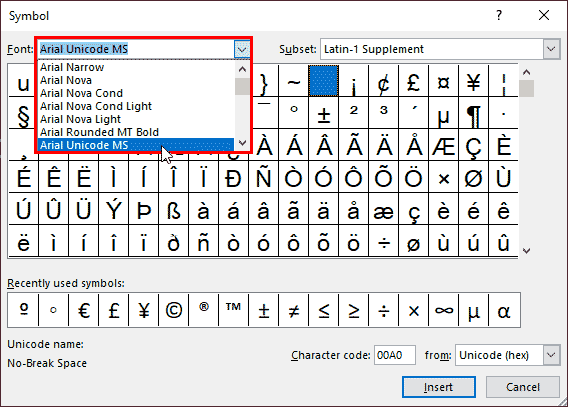
  5. In the resultant Symbol dialog box, click the Font drop-down list to see a list of installed fonts, as shown highlighted in red within Figure 7, below. Choose the Arial Unicode MS font.
  6. Choose Arial Unicode MS in the Font drop-down list in PowerPoint
    Figure 7: Choose Arial Unicode MS in the Font drop-down list
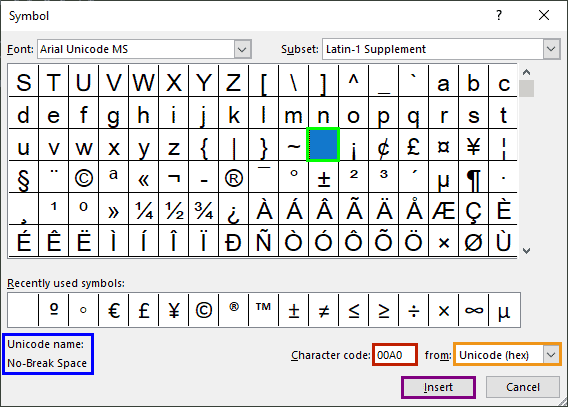
  7. Now match your settings sequentially, as shown within Figure 8, below:
  8. Change encoding to Unicode (hex), as shown highlighted in orange
    Change Character Code to 00A0, as shown highlighted in red. You will have to type in the character code, which is two zeroes followed by an A, and finally a zero
    You will notice that the Unicode name now shows as No-Break Space, as shown highlighted in blue
    You will also see a preview of the space (empty box), as shown highlighted in green
  9. Choose highlighted settings in the Symbol dialog box in PowerPoint
    Figure 8: Choose highlighted settings in the Symbol dialog box
  10. Click the Insert button, as shown highlighted in purple within Figure 8, above.
  11. Now, the Cancel button as shown in Figure 8 will change to the Close button, as shown highlighted in red within Figure 9, below. Click this Close button to dismiss the Symbol dialog box and return to your slide.
  12. Click on the Close button in PowerPoint
    Figure 9: Click on the Close button
  13. The nonbreaking space will now be placed on the insertion point, as shown in Figure 10, below. So, by using this tool, writers and editors can ensure that their text is clean and easy to read, without any awkward line separation of important words or characters.
  14. Nonbreaking spaces inserted in PowerOint
    Figure 10: Nonbreaking spaces inserted
  15. Do note that you can try to change the font to something other than Arial Unicode, but if you no longer see a nonbreaking space, you should change the font back to Arial Unicode, at least for the nonbreaking space. For more nonbreaking spaces in the same slide or presentation, you can just copy and paste this dash rather than summoning the Symbol dialog box repeatedly.
  16. Save your presentation often.

People Also Ask:

Why should you insert nonbreaking spaces and dashes in PowerPoint?

The non-breaking dash or space are important tools for writers and editors alike. Their purpose is to prevent words or characters from being separated by a line break. This is especially useful when dealing with numbers or hyphenated words that need to remain together in a sentence.

Is there a shortcut to insert a fixed or nonbreaking space in PowerPoint?

When it comes to inserting a fixed space in Microsoft PowerPoint, the process is simple. All you need to do is insert the appropriate character by using the combination of Alt key with 0160.

Is there any advantage in using a fixed space within text in PowerPoint?

The main advantage is that this approach will allow you to create consistent spacing between your text and images or other objects on your slides, improving readability and overall presentation quality. By taking advantage of this quick and easy method for adding fixed spaces, you can save time while also enhancing the effectiveness of your PowerPoint presentations.

05 05 07 - Symbols: Insert a Nonbreaking Space in PowerPoint (Glossary Page)

You May Also Like: Present a PowerPoint Without Laughing? | Wedding PowerPoint Templates

Popular Posts

Creating Semi-Circles in PowerPoint 2013
Learn how to create a semi-circle in PowerPoint 2013.

Apply Two or More Animations to One Object at the Same Time in PowerPoint
Apply multiple animations to one slide object in PowerPoint, and make all animations play together.

Flowchart Symbols: What They Represent?
Explore various flowchart symbols, and learn about what they represent.

Types of Animation in PowerPoint 2010 for Windows
Learn about different animation types in PowerPoint 2010 for Windows.


Ebook PowerPoint Keyboard Shortcuts

PowerPoint Keyboard Shortcuts and Sequences Ebook

PowerPoint 365, 2019, 2016, 2013, 2011, 2010, 2007 and 2003 for Windows

PowerPoint 365, 2019, 2016 and 2011 for Mac

PowerPoint for the Web on Windows and Mac

Have you ever used keyboard shortcuts and sequences in PowerPoint? Or are you a complete keyboard aficionado? Do you want to learn about some new shortcuts? Or do you want to know if your favorite keyboard shortcuts are documented?

Go and get a copy of our PowerPoint Keyboard Shortcuts and Sequences ebook.


Microsoft and the Office logo are trademarks or registered trademarks of Microsoft Corporation in the United States and/or other countries.

Home | PowerPoint | Photoshop | PowerPoint Templates | PowerPoint Tutorials | Blog | Notes | Ezine | Media Kit | Feedback | Site Map | About Us | Contact Us

Link to Us | Privacy | Testimonials

PowerPoint Backgrounds | Christian PowerPoint Backgrounds | Business PowerPoint Presentation Templates

Plagiarism will be detected by Copyscape

©2000-2023, . All rights reserved.