When you insert a video clip within a PowerPoint slide, you'll find it placed as a traditional rectangular shape. And that's what most users expect, as it seems safe and conventional. However, PowerPoint allows you to have your video playing in different shapes such as a circle or oval, a wave, a triangle, or any of the shapes that PowerPoint's Shapes gallery includes. However, just the fact that a video can be placed within a shape is no reason to forego the conventional rectangle. Do remember that most other shapes may crop out important parts of your video clips.
Follow these steps to constrain your video to play within a specific shape in PowerPoint 2016 for Windows:
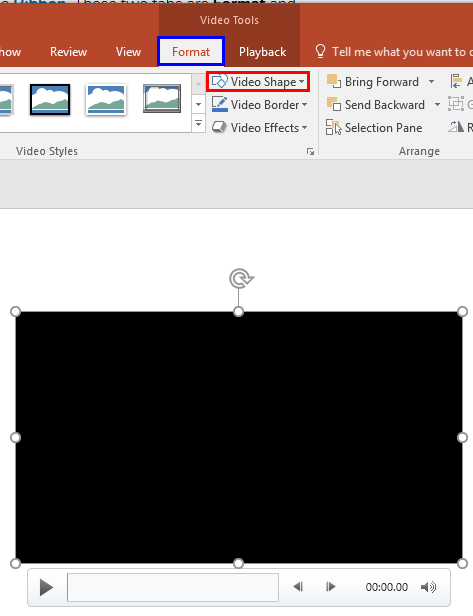
- Open your presentation, and navigate to the required slide where you have already inserted a video clip. Select or double-click the video clip to bring up the two Video Tools tabs in the Ribbon. These two tabs are Format and Playback. Click the Format tab to activate it, as shown highlighted in blue within Figure 1, below.

Figure 1: Video Tools Format tab of the Ribbon Contextual Tab
- The Video Tools Format tab is a Contextual tab. These tabs are special tabs in the Ribbon that are not visible all the time. They only make an appearance when you are working with a particular slide object which can be edited using special options.
- When you insert a video on your slide, it may display a black rectangle on the slide, as shown in Figure 1, above. If your video clip does not show a black rectangle, then directly proceed to Step 3.
- If you see the black rectangle in place of the video clip, then you will have to add a Poster Frame to your video clip, as shown in Figure 2, below. This is necessary because, when you are choosing different Video Shapes, it is good to see a Live Preview of the actual video clip being applied with those Video Shapes, rather than seeing a black rectangle.

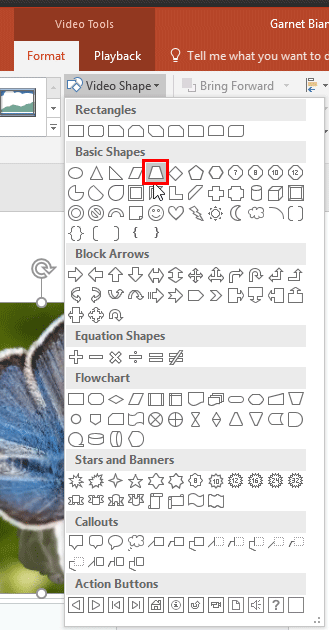
Figure 2: Video clip with a poster frame added - Within the Video Tools Format tab, click the Video Shape button, as shown highlighted in red within Figure 1, shown previously on this page, to access the Video Shape drop-down gallery, as shown in Figure 3, below.

Figure 3: Video Shape drop-down gallery
Are Video Shapes the Same as Conventional Shapes?
- The Video Shape drop-down gallery is similar to Shapes gallery in PowerPoint 2016.
- Now, select any shape from the Video Shape drop-down gallery that suits your requirements. For this tutorial, we have chosen Trapezoid, as shown highlighted in red within Figure 3, above.
- This step constrains the selected video within the Trapezoid shape. Play your video at least once to ensure that no important parts get cropped out. Figure 4, below, shows a video clip within the Trapezoid shape.

Figure 4: Video within the Trapezoid shape - Once you change the shape of the video, you can add Video Effects, Video Borders, and the Video Styles to enhance its look.
Choose Shapes Similar to a Rectangle
- Try using shapes that are similar to a conventional rectangle, as shown in Figure 5, below. This will prevent large areas of the video from being cropped out when a shape is added to the video. Even then, make sure you preview your video clip to make sure that no important areas are cropped out.

Figure 5: Shapes similar to a rectangle work good as Video Shapes
- Make sure to save your presentation.


