Recent versions of PowerPoint accept more video file formats than previous versions, and can do a lot more with videos, including trimming video clips. However, these newer versions also embed all inserted video clips by default, and this can result in huge presentations that contain large video files. This ultimately occupies oodles of disk space and may also make PowerPoint work a wee bit slower. To tackle this problem, you can explore media compression abilities built right inside PowerPoint. You no longer need any third-party media compression tool since PowerPoint's native Media Compression options make this task very easy indeed.
Video or Audio Compression?
Although the techniques explained in this tutorial pertain to video compression, they work for audio files too.
Follow these steps to learn more about video compression options in PowerPoint 2016 for Windows:
- Open a presentation where you have already inserted a video clip that you want to compress. Optionally, save your presentation as a new file if you also want to have an original, uncompressed version of the presentation.
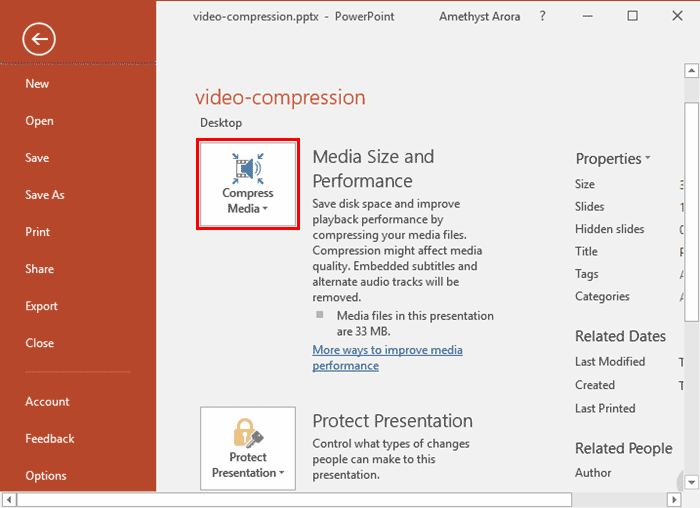
- Now, access the File menu, and choose the Info Pane, as shown in Figure 1, below. Thereafter, click the Compress Media button, as shown highlighted in red within Figure 1.

Figure 1: Compress Media button within the Info pane
Missing Compress Media Button?
- Do not see any Compress Media button? This option shows up only if you have video or audio clips inserted within PowerPoint. There are exceptions too. You will not see the Compress Media button if you used an online video. Also, if you choose to link a video clip rather than embedding it, this button will be visible, but grayed out. To learn how to link a video rather than embed it within a presentation, look at step 3 in our Insert Video (Movie) Clips in PowerPoint 2016 tutorial.
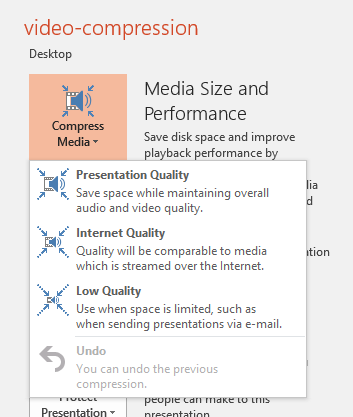
- Doing so brings up the Compress Media drop-down menu, as shown in Figure 2, below.

Figure 2: Compress Media drop-down menu - The top three options within the Compress Media drop-down menu are explained below:
Presentation Quality
- Helps save space and also at the same time maintains the overall audio and video quality.
Internet Quality
- Video quality post compression is comparable to video typically streamed over the internet.
Low Quality
- Produces video of very low quality hence can be used when file size is more important than quality.
- Click to choose any one of the compression quality levels.
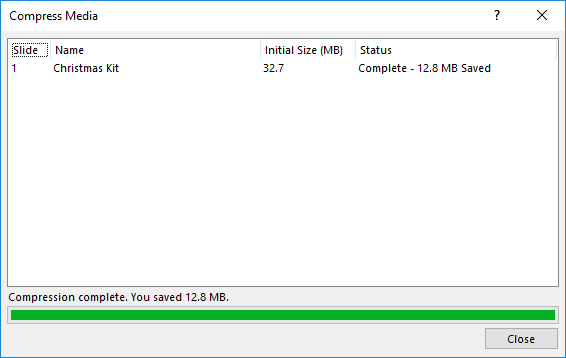
- Doing so opens the Compress Media window which shows the compression process. Once the compression is done, you can see the disk space you saved at the bottom of the Compress Media window, as shown in Figure 3, below.

Figure 3: Compress Media window - Click the Close button to get back to Backstage view.
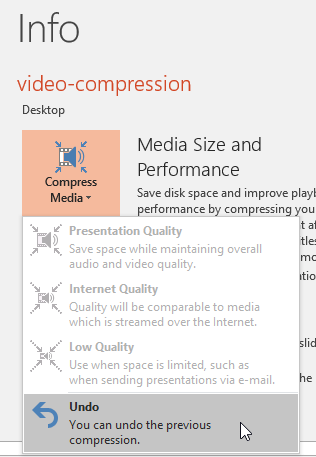
- Preview your video after compression, if you are unhappy with the compression result you can undo the compression. To do so, click the Compress Media button again, and select the Undo option from the resultant drop-down menu, as shown in Figure 4, below.

Figure 4: Undo option to revert compression
Choose Undo Before Closing the Presentation
- The Undo compression option will be available only till the presentation is open. As soon as you save and close the presentation, the compression will be permanently applied to your video clip. Close your presentation only if you are happy with the compression.
Compress, Trim, and Reset
- Compression of any type will finalize any Trim Video options you chose. After compression, all parts of the video that were trimmed away will no longer be available. Also, the Reset options will only reset the appearance of the video.
- Make sure to save your presentation often.


