We already explored how you can get started with Information Rights Management (IRM) in PowerPoint by first signing up for the Windows Rights Management (WRM) service. This service implements Microsoft's access controls for documents across Office 2010 applications such as PowerPoint, Word, Excel, etc. Once you have signed up for WRM, you can set permissions for all presentations that you need to share as long as you and all other recipients for your files fulfill these two requirements:
- All users have a Microsoft account, previously known as a Windows Live ID.
- All users have signed up for WRM using their Microsoft accounts.
Once these prerequisites are in place, follow these steps to set permissions in PowerPoint 2010 for Windows:
- Launch PowerPoint, and open any existing presentation that you want to set permissions for. If you made any changes to your slides, do save your presentation before you proceed further.
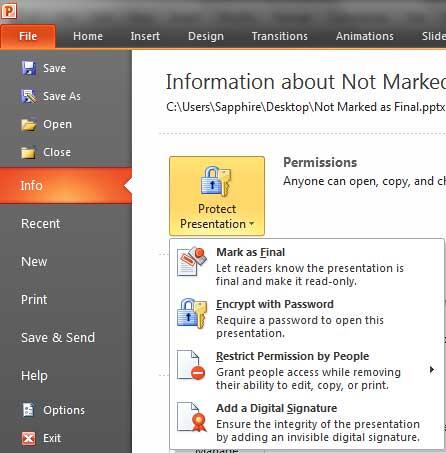
- Access the File menu, and choose the Info option to get to Backstage view, as shown in Figure 1, below. Thereafter, select the Protect Presentation option to bring up a small drop-down menu, as shown in Figure 1.

Figure 1: Protect Presentation drop-down menu- Now, click the Restrict Permission by People option to bring up a sub-menu, as shown in Figure 2, below. Select the Restricted Access option.

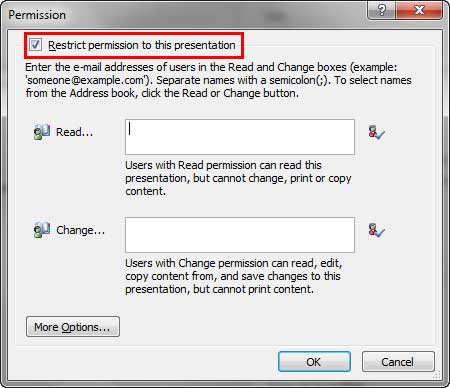
Figure 2: Restricted Access option selected- Doing so brings up the Permission dialog box, select the Restrict permission to this presentation check-box, as shown highlighted in red within Figure 3, below.

Figure 3: Permission dialog box- Note that two distinct areas within the Permissions dialog box let you add permissions for two categories of users:
- Read access: Users whose Microsoft account you enter within this area can view your presentation and programmatically access the presentation.
- Change access: Users whose Microsoft account you enter within this area have almost complete access to the presentation, they can alter the content to whichever extent they want.
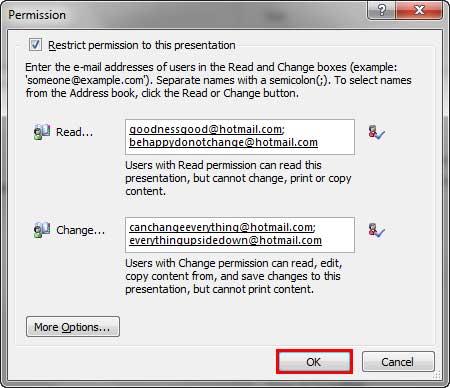
- Type in the email addresses associated with Microsoft account that you want to provide access to, as shown in Figure 4, below. Then, click the OK button, as shown highlighted in red within Figure 4.

Figure 4: Email addresses entered within the Read and Change boxes- At this point of time, you have provided permissions to the Microsoft account specified in the Read and Change boxes, at any point of time, you can revoke permissions, add new permissions, and also create custom permission levels, we will cover these topics in subsequent tutorials.


