Indezine Logo


Uploading Presentations to SlideBoom

Learn how you can upload presentations to SlideBoom PowerPoint sharing site.


Author:

Product/Version: PowerPoint

OS: Microsoft Windows and Mac OS X


Learn PowerPoint

Do you know how to use animation for individual bullets by using multiple text boxes in PowerPoint?


Archived Content

Content on this page is not recent and has been retained for historical reasons.

We already introduced you to SlideBoom and showed you how you can join as part of the SlideBoom series, we provided a brief introduction to this slide-sharing site. In this tutorial, you'll learn how you can upload your first presentation to this site.

Follow these steps to upload your PowerPoint presentation to SlideBoom:

  1. First, create a simple presentation, or use any of your existing PowerPoint presentations.
  2. Then, get to the SlideBoom site, and click the Sign In link towards the top right of the page. Doing so brings you to the sign-in page, as shown in Figure 1, below. Now, log-in with your username and password. If you have forgotten your password, click the Forgot Password option.

  3. Sign In
    Figure 1: Sign In
  4. Once you have signed in, click the Upload button from the navigation bar, as shown in Figure 2, below, to get to the Upload Presentation screen, as shown in Figure 3, further below.
  5. Upload button
    Figure 2: Upload button
  6. Click the Browse button, select the presentation you want to upload, and then get back to the web page. Thereafter, select the Options dropdown where you can choose the presentation like PowerPoint or video, and finally click the Upload button, as shown in Figure 3, below.
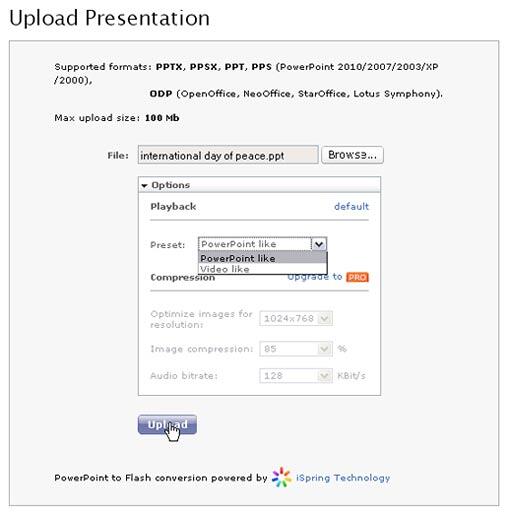
  7. Upload presentation
    Figure 3: Upload presentation
  8. You can now see an indication of your upload process, as shown in Figure 4, below.
  9. Upload in progress
    Figure 4: Upload in progress
  10. Once this upload is done, you can enter some meta info for the presentation, add a title, description, some tags, choose a topic, change the language other than Autodetect if required, and finally select the privacy options. To get an idea of the options available, as shown in Figure 5, below.
  11. Submit your presentation
    Figure 5: Submit your presentation
  12. Click the Submit button, and you should be done, and you can now click on the View Presentation button to view your presentation or you can click on Upload another button where you can upload another presentation, as shown in Figure 6, below.
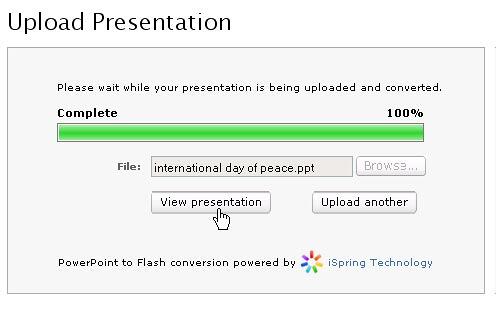
  13. Options to view the uploaded presentation and upload another
    Figure 6: Options to view the uploaded presentation and upload another
  14. Finally Uploading Presentations to SlideBoom is done, click on Play Button to view or play the presentation.
  15. Play the presentation
    Figure 7: Play the presentation

In the next tutorial in this series, we'll show you how you can share your SlideBoom presentations.


See Also:

16 12 04 - Sharing Presentations Online: Uploading Presentations to SlideBoom (Glossary Page)

About SlideBoom
Joining SlideBoom
My Account Options on SlideBoom
Privacy Options on SlideBoom
Sharing Your SlideBoom Presentations

You May Also Like: Analysis Feature in WeCompress: Conversation with Mike Power | Currency (general) PowerPoint Templates


Popular Posts

Add Secondary Value Axis to Charts in PowerPoint 2013 for Windows
Learn how to add a Secondary Value axis to charts in PowerPoint 2013 for Windows.

Ten Easy Topics for Pecha Kucha
But what are simple topics, that excite you, and are interesting to your audiences? Of course, if you already have a topic, you need not read further, but if you are still looking for ideas, here are ten easy topics that you can use for your Pecha Kucha presentations.

Drawing Arcs in PowerPoint
Explore how you can draw an Arc shape in PowerPoint.

Set Minimum and Maximum Values on Value Axis in PowerPoint 2013 for Windows
Learn how to set the Minimum and Maximum values on Value Axis of Charts in PowerPoint 2013 for Windows.


Pictures in Presentations

Is a picture is worth a thousand words? You probably have heard this adage so often that we decided not to repeat this phrase throughout this book! Now here’s some more info: the human brain uses a larger part of its area to store visual information rather than textual content. And that’s possibly because a picture describes so much more than text.

Go and get a copy of our Pictures in Presentations ebook.


Microsoft and the Office logo are trademarks or registered trademarks of Microsoft Corporation in the United States and/or other countries.

Home | PowerPoint | Photoshop | PowerPoint Templates | PowerPoint Tutorials | Blog | Notes | Ezine | Media Kit | Feedback | Site Map | About Us | Contact Us

Link to Us | Privacy | Testimonials

PowerPoint Backgrounds | Christian PowerPoint Backgrounds | Business PowerPoint Presentation Templates

Plagiarism will be detected by Copyscape

©2000-2023, . All rights reserved.