Learn about different types of points (vertexes) in PowerPoint 2010 for Windows. Did you know that there are three vertex types in PowerPoint?
Author: Geetesh Bajaj
Product/Version: PowerPoint 2010 for Windows
OS: Microsoft Windows XP and higher
Every shape in PowerPoint is a combination of segments and points (vertexes), and these segments and vertexes are only visible in Edit Points mode. We discuss more about segments in a subsequent tutorial but for now, let me help you explore the different types of vertexes (points) in PowerPoint 2010 for Windows. Essentially, these are of three types:
Follow these guidelines to see different types of points (vertexes) in PowerPoint 2010 for Windows:
Insert a shape in PowerPoint (You can use any shape, for this tutorial we have used a Rectangle) and switch to Edit Points mode (just right-click and choose Edit Points). Now place the cursor over the point, the cursor will change to a small rectangle with four directional arrows around it, as shown in Figure 1.
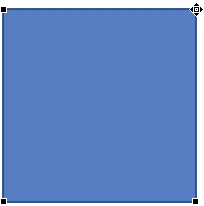
Figure 1: Place cursor over the point
Now right click to get the context menu, as you can see in Figure 2. The options which are not related to the types of points are faded out - in the resultant menu Corner Point option is activated that means the point we have selected is a corner point type (refer to Figure 2 again).
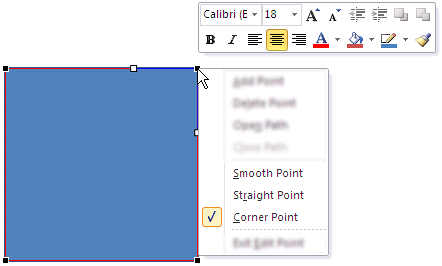
Figure 2: Corner Point type selected
As you have already learned, when any of the corner points in the Rectangle is selected, it shows up with two blue handles as shown in the example on the left side in Figure 3. Now if you move any one of these blue handles outwards the opposite handle will not move (see on the right side of the Figure 3). To make changes to the opposite side, you will have to manipulate the opposite handle separately, or change the point from a Corner Point to either a Smooth Point or Straight Point. We discuss these other Point types next.

Figure 3: Corner Point
Make sure you are in Edit Points mode (just right-click and choose Edit Points). Place the cursor over the point and right click to get a context menu, from the menu choose Smooth Point option, as shown in Figure 4.
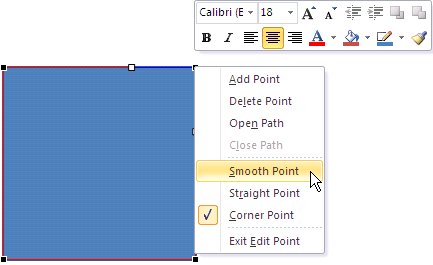
Figure 4: Choose Smooth Point type
This changes the Corner Point to a Smooth Point (shown on the left side on Figure 5). Now if you drag a handle of any one side outwards (drag further, closer, or even sidewards), the opposite side handle also moves symmetrically (see on the right side of the Figure 5)
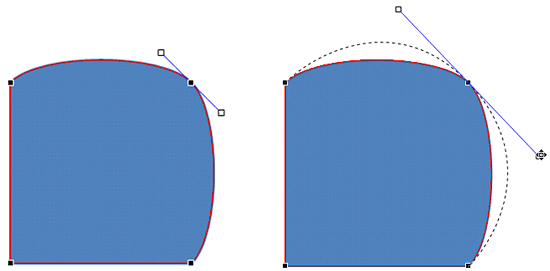
Figure 5: Corner Point changed to Smooth Point
Now we'll see how to change the Corner Point type to a Straight Point type. Select the shape and switch to Edit Points mode (just right-click and choose Edit Points). Place the cursor over the point and right click to get a context menu, from the menu choose Straight Point option, as shown in Figure 6.
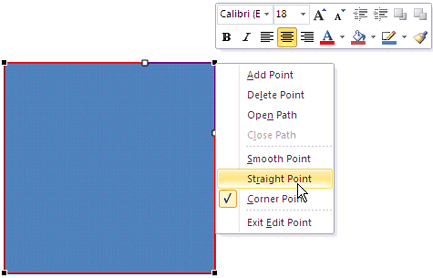
Figure 6: Choose Straight Point type
This changes the Corner Point to a Straight Point (shown on the left side on Figure 7). Now if you drag a handle of any one side outwards (drag further or closer), then the opposite handle won't move (see on the right side of the Figure 7). However if you drag it sidewards, then the opposite handle will also move proportionately.
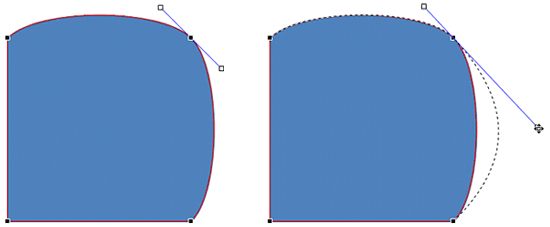
Figure 7: Corner Point changed to Straight Point
See Also:
Types of Points (Vertexes) for Shapes in PowerPoint 2016 for Windows
Types of Points (Vertexes) for Shapes in PowerPoint 2013 for Windows
Types of Points (Vertexes) for Shapes in PowerPoint 2011 for Mac
Types of Points (Vertexes) for Shapes in PowerPoint 2003 for Windows
You May Also Like: Differences in PowerPoint Usage in Microsoft Teams and Zoom: Conversation with Dave Paradi | Environment PowerPoint Templates


Microsoft and the Office logo are trademarks or registered trademarks of Microsoft Corporation in the United States and/or other countries.