Learn about different types of points (vertexes) in PowerPoint 2003 for Windows. Did you know that there are three vertex types in PowerPoint?
Author: Geetesh Bajaj
Product/Version: PowerPoint 2003 for Windows
OS: Microsoft Windows XP and higher
Every shape in PowerPoint is a combination of segments (lines) and points (vertexes), and these segments and vertexes are only visible within Edit Points mode. We won't discuss segments for now, but let us help you explore different types of vertexes (points) in PowerPoint 2003 for Windows. Essentially, these are of four types:
Follow these guidelines to learn about different types of points (vertexes) in PowerPoint 2003 for Windows:
Select the shape and switch to Edit Points mode (just right-click and from the contextual menu that appears, choose the Edit Points option). Now place the cursor over the point, the cursor will change to a small four directional arrow, as shown in Figure 1 (top-right corer).
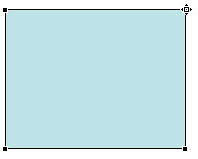
Figure 1: Place cursor over the point
Now right-click to get the contextual menu, as you can see in Figure 2 (the options which are not related to the types of points are faded out). In this menu, the Auto Point option has a tick-mark infront of it. That means the point we have selected is an Auto Point (refer to Figure 2 again). In PowerPoint 2003 whenever you add a new point to a shape, it will be an Auto Point by default.
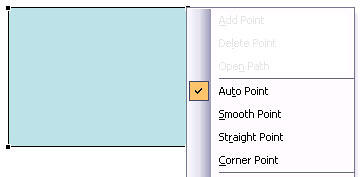
Figure 2: Auto Point option selected
Let us explore all four point types:
There are no blue handles for an Auto Point as you can see towards the left within Figure 3. So, if you drag the Auto Point outwards as shown towards right in Figure 3, you wont see any kind of curve effect on any of the two segments emerging from it.
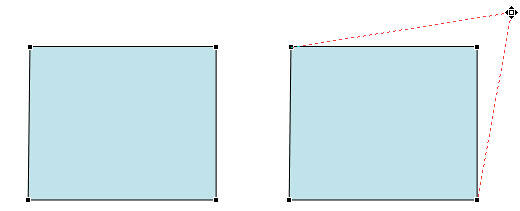
Figure 3: Auto Point
To make changes to the segments you have to change the point to a Smooth Point, a Straight Point, or a Corner Point. We discuss these other Point types next.
Make sure you are in Edit Points mode (just right-click and from the contextual menu that appears, choose the Edit Points option). Place the cursor over the point and right-click to get the contextual menu, from the contextual menu choose the Smooth Point option, as shown in Figure 4.
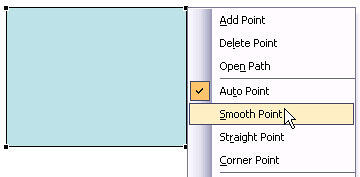
Figure 4: Smooth Point option
This changes the selected point to a Smooth Point (shown towards the left in Figure 5). You can now see two blue handles on both sides of the point. If you drag the handle on any one side outwards (drag further, closer to the point, or even towards left or right side), the opposite side handle also moves symmetrically (see towards the right side of Figure 5).
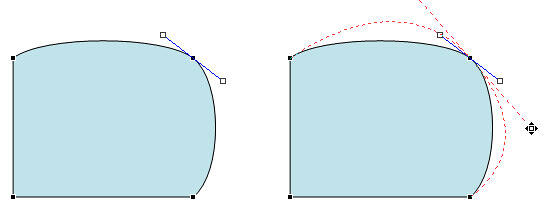
Figure 5: Selected point changed to Smooth Point
Now we'll see how to change the selected point type to a Straight Point type. Select the shape and switch to Edit Points mode (just right-click and from the contextual menu that appears, choose the Edit Points option). Place the cursor over the point and right-click to bring up a contextual menu. From this contextual menu, choose the Straight Point option, as shown in Figure 6.
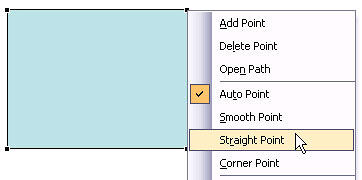
Figure 6: Straight Point option
This changes the selected point to a Straight Point (shown on the left side on Figure 7). Now you can drag a handle on any one side outwards (drag further or closer to the point), without effecting the opposite handle (see towards the right side of the Figure 7). However if you drag it towards left or right side, then the opposite handle will also move proportionately.
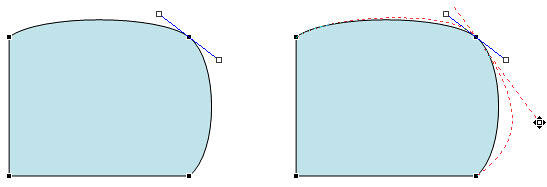
Figure 7: Selected point changed to Straight Point
To change the selected point type to a Straight Point type select the shape and switch to Edit Points mode (just right-click and from the contextual menu that appears, choose the Edit Points option). Place the cursor over the point and right-click to get a contextual menu, from this menu choose the Corner Point option, as shown in Figure 8.
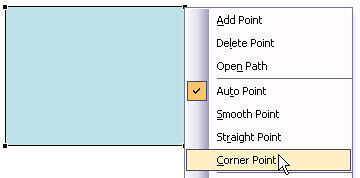
Figure 8: Corner Point option
When any of the corner points is selected, it shows up with two blue handles as shown in the example towards the left side in Figure 9. Now if you move any one of these blue handles outwards the opposite handle will not move (see on the right side of the Figure 9). To make changes to the other side, you will have to manipulate the opposite handle separately, or hold down the Ctrl key while you manipulate.

Figure 9: Selected point changed to Corner Point
See Also:
Types of Points (Vertexes) for Shapes in PowerPoint 2016 for Windows
Types of Points (Vertexes) for Shapes in PowerPoint 2013 for Windows
Types of Points (Vertexes) for Shapes in PowerPoint 2011 for Mac
Types of Points (Vertexes) for Shapes in PowerPoint 2010 for Windows
You May Also Like: Leadership Storytelling: Conversation with Ronan Dunne | Wavelength PowerPoint Templates


Microsoft and the Office logo are trademarks or registered trademarks of Microsoft Corporation in the United States and/or other countries.