The other day a friend asked me how she could add a trigger animation to a slide object, but with a difference!
She inserted a picture on a slide (let’s call this Picture 1) and then placed another picture of the exact same size over the first one (let’s call this Picture 2). She then wanted to click Picture 2 to cause a trigger animation on Picture 1. This caused Picture 1 to be revealed, almost like the example explained in our Trigger Animations in PowerPoint 2010 tutorial. However, what she wanted next was to click on Picture 1 to reveal Picture 2. So to put this in a few words, this is what she wanted:
- Click on Picture 2 to reveal Picture 1 (and hide Picture 2).
- Click on Picture 1 to reveal Picture 2 (and hide Picture 1).
You can download the sample presentation we used from here.
This clicking process should continue indefinitely, and that's a small problem! Fortunately we were able to solve this problem with what we called Toggle Between Two Visuals with Trigger Animations technique. In short, let us just call this the Twin Triggers technique.
Follow these steps to learn more in PowerPoint 2010 for Windows:
- Insert two pictures of the same size on your slide, as shown in Figure 1, below. The picture on the left is our Picture 1, and the one towards the right is our Picture 2. We sourced both pictures from the Office website.
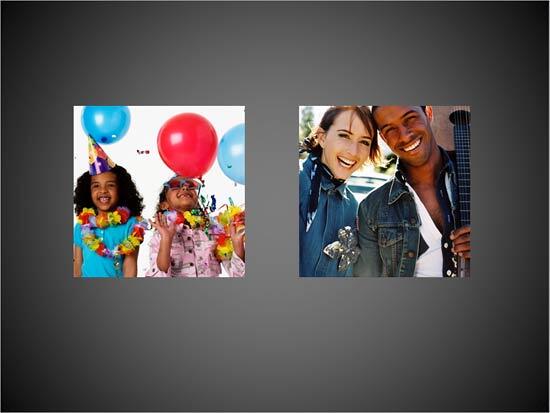
Figure 1: Slide with two pictures inserted - Select Picture 2, and apply two animations to this picture: add one Entrance animation and one Exit animation. It doesn’t matter which animation effect you choose as long as you apply one Entrance animation and one Exit animation. Your Animation Pane may look like what you see in Figure 2.
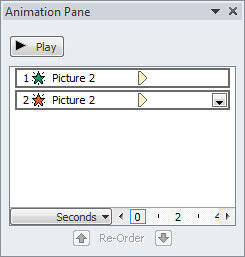
Figure 2: Applied animations listed within Animation Pane - Double-click the Entrance animation in the Animation Pane to summon an animation dialog box. Select the Timing tab in this dialog box, as shown in Figure 3, below.
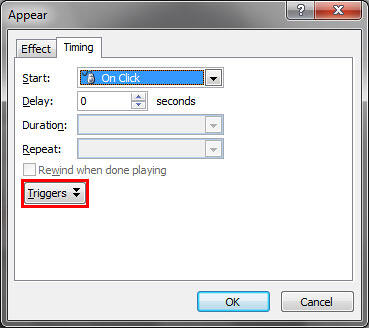
Figure 3: Animation dialog box Name of the Dialog Box
- In Figure 3 above, you can see that the dialog box is named Appear. The name of this dialog box differs based on the type of animation applied. In this case, we had applied an Appear animation, hence the name. If you had a Fade animation applied, the dialog box would read Fade rather than Appear. In any case, the options within Triggers work the same way for any animation type.
- Click the Triggers button, as shown highlighted in red within Figure 3, above. This reveals some extra Trigger options, as shown in Figure 4, below.
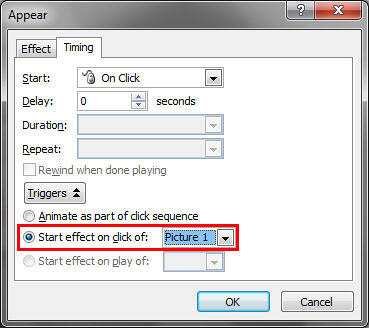
Figure 4: Extra Trigger options - Select the radio button called Start effect on click of, and then select Picture 1 in the drop-down list placed next to this radio button (radio button and the drop-down list are highlighted in red within Figure 4, above). Click the OK button to get back to your slide.
- Double-click the Exit animation in the Animation Pane to summon an animation dialog box. Select the Timing tab in this dialog box, as shown in Figure 5, below.
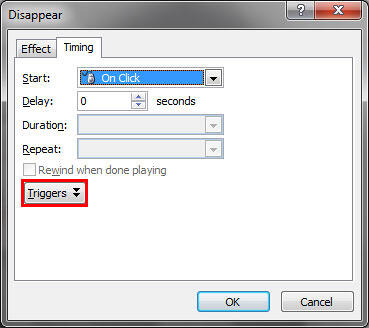
Figure 5: Animation dialog box Again, Name of the Dialog Box
- In Figure 5, above, you can see that the dialog box is named Disappear. The name of this dialog box differs based on the type of animation applied. In this case, we had applied a Disappear animation, hence the name. If you had a Fly Out animation applied, the dialog box would read Fade rather than Disappear. In any case, the options within Triggers work the same way for any animation type.
- Click the Triggers button, as shown highlighted in red within Figure 5, above. This reveals some extra Trigger options, as shown in Figure 6, below.
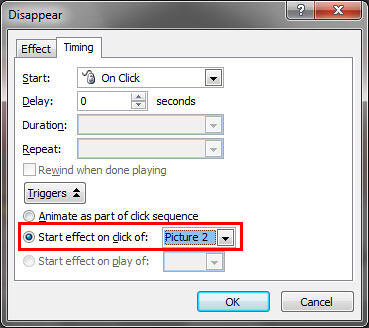
Figure 6: Extra Trigger options - Select the radio button called Start effect on click of, and then select Picture 2 (the same picture selected for the animation), radio button and the drop-down list are highlighted in red within Figure 6, above. Click the OK button to get back to your slide.
- Select both pictures and arrange them so that Picture 1 is covered entirely by Picture 2. You may also want to resize both pictures as required.
- Test the animation!
- Save your presentation often.


