You have already learned about the indent markers on the Horizontal
Ruler, and how they can influence the bulleted paragraph on your PowerPoint slide. There are three types of Indent Markers you can find on the
Horizontal Ruler: the First Line Indent Marker, the
Hanging Indent Marker, and the
Left Indent Marker. The
First Line Indent Maker, also called the Top Caret, can be found highlighted in red within
Figure 1, below. In this tutorial, let us learn how the First Line Indent Marker influences the position of the
bullets.
Note: Your
Ruler must be turned on to follow the instructions on this page.
The First Line Indent Marker determines the left most edge of the bullet character itself. If you drag the First Line Indent
Marker along the Horizontal Ruler, the bullets associated with the selected text also move accordingly. Follow these steps to learn more in
Poweroint 2013 for Windows:
- Select the bulleted paragraph or paragraphs that you wish to tweak. In Figure 1, you can see first bulleted paragraph has been
selected.
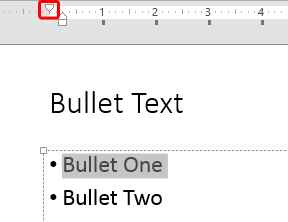
Figure 1: Bulleted paragraph selected on the slide
Note: If you want to change the position of a particular bulleted paragraph, select only that individual bulleted paragraph. If you
want the change to effect all bulleted paragraphs in the placeholder (or text box), select all the paragraphs.
- With your selection still active, you can reposition the bullet in any of the following ways:
Way 1
- If you want to move the bullet character rightwards, drag the First Line Indent Marker towards the right, as shown in
Figure 2.
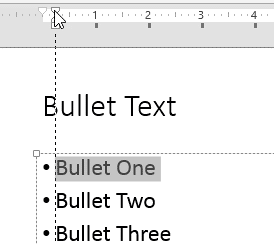
Figure 2: First Line Indent Marker being dragged rightwards
Tip: Pressing the Ctrl key while you drag the Indent Marker (Caret) will give you more control over the placement of the Caret.
- Upon dragging this Indent Marker to the new position, you will find that the bullet character associated with the selected text has moved
rightwards (see Figure 3). Compare it with the bulleted paragraphs that were not selected. As you can see, the space between the
bullet character and the paragraph following it has been decreased, and the space between the bullet and the left edge of the text placeholder has
been increased. Notice that the position of the paragraph following the selected bullet character (first bulleted paragraph) has not changed. It's
same as the paragraph position in the second and third bulleted paragraphs that were not tweaked.
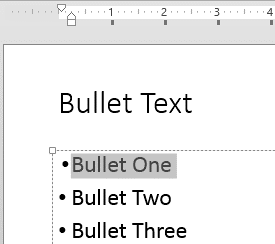
Figure 3: First Line Indent Marker’s new position after dragged towards rightWay 2
- Figure 4, shows the position of the selected bullet character when the First Line Indent Marker is dragged and placed in a
position where it overlaps the other two Indent Markers (Hanging
and Left Indent Markers) on the ruler.
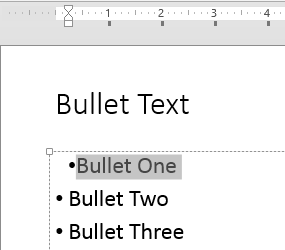
Figure 4: First Line Indent Marker overlapping the middle and bottom carets- You can also drag the First Line Indent Marker further rightwards beyond the position of the other two indent markers, as shown in
Figure 5.
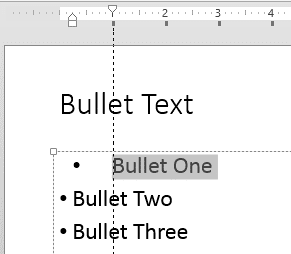
Figure 5: First Line Indent Marker being dragged beyond middle and bottom carets- This results in a different text placement, as shown in Figure 6.
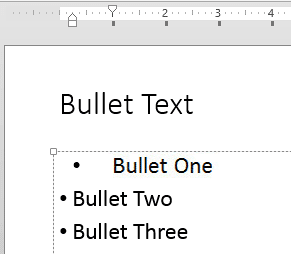
Figure 6: Bullet character's position unaffected after moving the First Indent Marker- As you can notice in Figure 6 above, the actual position of the bullet character is not at all moved beyond the Hanging Indent
Marker (Middle Caret). Instead, the paragraph has been moved to the new position of the First Line Indent Marker! Moving the First Line Indent Marker
only towards the left side of Middle Caret will show the effect on the bullet position. Thus, although you can actually drag the First Line Indent
Marker rightwards as much as you want, this only influences the text, and you cannot move the bullet any more rightwards beyond the position of the
Hanging Indent Marker (Middle Caret).
Way 3
- If your selected bulleted paragraph is part of a lower hierarchy (Bullet Level 2 or lower), as shown in Figure 7, then you can
also drag the First Line Indent Marker towards the left. Refer to Figure 7 again.
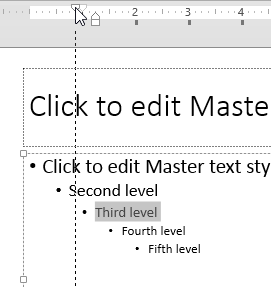
Figure 7: First Line Indent Marker being dragged leftwards- Leave the First Line Indent Marker in a new position where you want to move the selected bullet character. This moves only the selected bullet
towards left, not the paragraph following it, as shown in Figure 8. Compare the positions of selected bullet characters in
Figures 7 and 8.
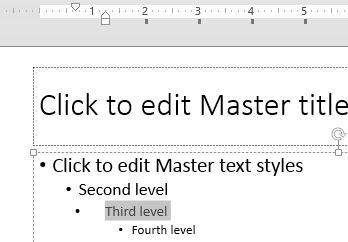
Figure 8: Bullet character moved leftwards
Note: Instead of changing position of bullet paragraphs on each and every slide in the presentation, you can access the
Slide Master view and make changes there. This way you will be
making changes just once and every slide will be effected.


