Indezine Logo


Edit Theme Fonts Set in PowerPoint 2016 for Windows

Learn how to edit Theme Fonts in PowerPoint 2016 for Windows.


Author:

Product/Version: PowerPoint 2016 for Windows

OS: Microsoft Windows 7 and higher


Learn PowerPoint

Presentation Management 27: The Humanity of Presentations, from Cave Paintings to PowerPoint and Back Again


Theme Fonts comprise a pair of font choices, one each for your slide titles (Heading font) and the other for everything else on your slides (Body font). You can use existing Theme Fonts available in PowerPoint or even create them on your own. Additionally, you can opt to edit existing Theme Font pairs (sets), as we will explore in this tutorial.

Note: It is highly recommended that you only edit Theme Font sets that you may have created or downloaded, and not edit the ones that are built-in within PowerPoint.

Follow these steps to edit existing Theme Fonts:

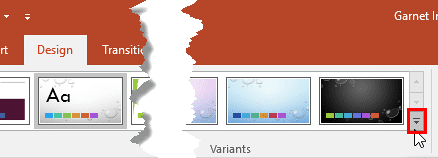
  1. Launch PowerPoint 2016. Navigate to the Design tab of the Ribbon, and within the Variants group, click the More button, as shown highlighted in red within Figure 1.
  2. More button
    Figure 1: More button
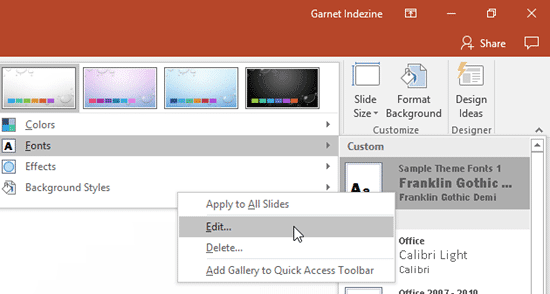
  3. This brings up the Variants drop-down gallery, as shown in Figure 2. Within the Variants drop-down gallery, choose the Fonts option to open a sub-gallery (refer to Figure 2 again). Within the Fonts sub-gallery, right-click on the Theme Font that you want to edit, as shown in Figure 2. This brings up a contextual menu -- within this contextual menu, select the Edit option (refer to Figure 2 again).
  4. Edit option
    Figure 2: Edit option
  5. Note: Do you see the Delete option in the contextual menu shown in Figure 2? Clicking this option will remove selected the Theme Font altogether. This action cannot be undone; so be careful before choosing the Delete option.
    Tip: If you use Theme Colors and Theme Fonts options often, consider customizing your Ribbon to add them in a more accessible location -- or you could even add them to your Quick Access Toolbar (QAT).
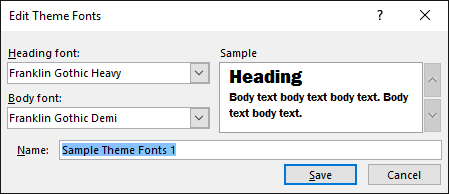
  6. This will bring up the Edit Theme Fonts dialog box, as shown in Figure 3.
  7. Edit Theme Fonts dialog box
    Figure 3: Edit Theme Fonts dialog box
  8. Using the options within the Edit Theme Fonts dialog box, you can change the Heading font, the Body font, and also the name of the selected Theme Font.
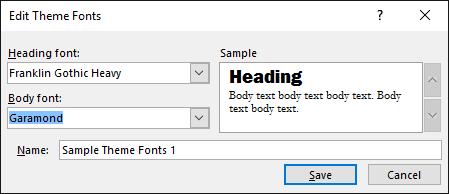
  9. To change the body font, click the down-arrow within the Body font box, as shown highlighted in red within Figure 4 This action will open a drop-down gallery with all fonts installed on your system. Just click on the font of your choice. In Figure 4 you can see Garamond is selected.
  10. New Body font being selected
    Figure 4: New Body font being selected
  11. Similarly you can change the Heading font as well, but we are leaving it unchanged. The fonts you change show within the Sample section, as shown in Figure 5. Once you are happy with the changes, click the Save button.
  12. Changes made to the Theme Font
    Figure 5: Changes made to the Theme Font
  13. This will save the changes to the selected Theme Font, and also apply it to the active presentation, as can be seen in Figure 6.
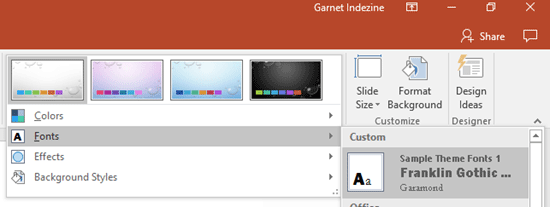
  14. Theme Font edited and applied to the active presentation
    Figure 6: Theme Font edited and applied to the active presentation

While you can make these changes within PowerPoint and also similarly in Word and Excel, you can also make more changes by editing the XML files that contain the Theme Fonts themselves, as explained in our Create Custom Theme Fonts Using XML (Windows) tutorial.


See Also:

Theme Fonts: Edit Theme Fonts Set in PowerPoint (Index Page)

Edit Theme Fonts Set in PowerPoint 2013 for Windows
Edit Theme Fonts Set in PowerPoint 2011 and 2008 for Mac
Edit Theme Fonts Set in PowerPoint 2010 and 2007 for Windows

You May Also Like: Obama Gets Back on Message | Loans PowerPoint Templates


Popular Posts

Paste in Place in PowerPoint
How can you place a copied or duplicated slide object right on top of the original object in PowerPoint?

Formatting Arrows (Arrowheads) in PowerPoint 2013 for Windows
Learn how to format arrowheads for lines in PowerPoint 2013 for Windows.

Changing Location of Slide Numbers in PowerPoint 2010
Learn how to change location of slide numbers in PowerPoint 2010.

Text Alignment within Table Cells in PowerPoint 2013 for Windows
Learn about the options for text alignment within Table cells in PowerPoint 2013 for Windows.


Night Sky Starlit Backgrounds

The ZIP file that you will download contains five Night Sky Starlit Backgrounds in three resolutions: Full Size: 4000x2250 pixels (16:9), Widescreen Size: 1365x768 pixels (16:9), and Standard Size: 1024x768 (4:3). Also included are five PowerPoint Presentations with Night Sky Starlit Backgrounds, set to work with the Morph transition. Yes, these background designs can also animate between slides using PowerPoint's Morph transition.

Go ahead and get this product! You’ll see the price on the order page


Microsoft and the Office logo are trademarks or registered trademarks of Microsoft Corporation in the United States and/or other countries.

Home | PowerPoint | Photoshop | PowerPoint Templates | PowerPoint Tutorials | Blog | Notes | Ezine | Media Kit | Feedback | Site Map | About Us | Contact Us

Link to Us | Privacy | Testimonials

PowerPoint Backgrounds | Christian PowerPoint Backgrounds | Business PowerPoint Presentation Templates

Plagiarism will be detected by Copyscape

©2000-2023, . All rights reserved.