Text in PowerPoint is usually either black or white. Sometimes, it may sport another color depending upon the Theme
applied to the presentation. While these defaults work very well most of the time, there may be instances when you want the text to convey a mood or express more than
the words it contains. Yes, you can apply a WordArt Style to your text but even
that option uses presets that you choose from, and those same presets are available to anyone who uses PowerPoint! To stand apart, you can use PowerPoint's
Text Fill options that provides you with plenty of choices that you customize. These text fill options include solid colors, gradients, textures,
and also pictures. Follow these steps to learn more in PowerPoint 2011 for Mac:
- Select the text that you want to change the fill for.
You can select individual text characters or you can also select the
entire text box or placeholder, as shown in Figure 1.
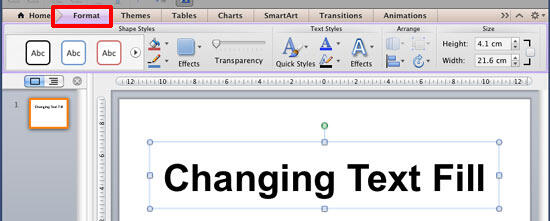
Figure 1: Format tab of the Ribbon- Alternatively, if you just want to follow this tutorial step-by-step, launch PowerPoint. You will see the
Presentation Gallery which allows you to set all attributes of
your new presentation, such as a preset Theme or template. Make selections or just click Cancel in this gallery to open a blank presentation with
a new slide. PowerPoint 2011 users can
change the slide layout of this slide to Blank by selecting
Layout | Blank within the Home tab of the
Ribbon. Insert a text box and type some text into it. You can also
change the text font to something 'blockier', such as
Arial Black (see Figure 1, above). Select the placeholder or the text as required.
- This makes the Format tab visible on the Ribbon as shown highlighted in red within
Figure 1, above. Activate this tab by clicking on it.
Note: The
Format tab is a
Contextual tab. These tabs are special tabs in the
Ribbon that are not visible all the time. They only make an appearance when you are
working with a particular slide object which can be edited using special options within these tabs.
- Within the Format tab, locate the Text Styles group. Then click the down-arrow button placed next to
Fill button that you can see highlighted in red within Figure 2.

Figure 2: Fill button within Text Styles group- This opens the Fill drop-down gallery, as shown in Figure 3.
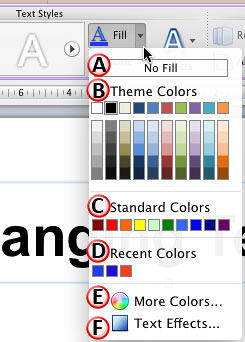
Figure 3: Fill drop-down gallery- The options within Fill drop-down gallery are explained below, as marked in Figure 3:
A. No Fill
- Choose this option to remove any fill from the selected text.
B. Theme Colors
- Here you can select any of the colors from the active Theme of the presentation. You can also select any of the 5 tints or
shades of any Theme color. Learn more about Themes here.
C. Standard Colors
- Here you can choose from any of the ten standard colors. These ten standard colors are just choices of colors that PowerPoint believes
to be widely used. You don't have to limit yourself to either the Theme Colors or Standard Colors, as you will learn in the next
options, although it's a good design idea to use Theme colors as far as possible.
D. Recent Colors
- Here you can find the colors most recently used. If you have just launched PowerPoint and created a new presentation, the
Recent Colors option may be entirely absent since you haven't selected any color recently!
E. More Colors
- This option is to summon the Mac OS X Color picker, as shown in Figure 4.

Figure 4: Mac OS X Color pickerF. Text Effects
- Selecting this option opens the Format Text dialog box as shown in Figure 5. Make sure
that the Text Fill option is selected within the sidebar (highlighted in red within Figure 5).
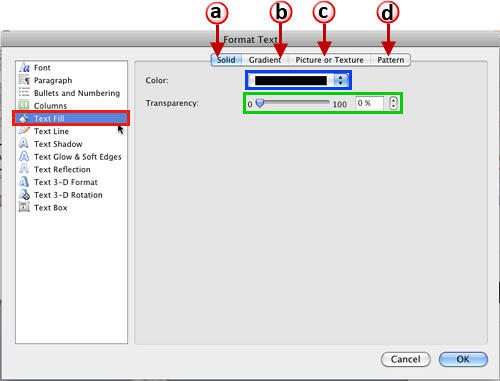
Figure 5: Text Fill options within Format Text dialog box- This dialog box includes almost all possible text editing options in addition to the options to use texture, gradient or a picture as
a fill for the selected text. Let us explore the tabs in this dialog box used for various text fill options, as marked in Figure 5:
a. Solid
- Allows you to change the text fill color and adjust its transparency. Clicking the Color selection box (highlighted in
blue within Figure 5) will open the Color gallery as shown in Figure 6.
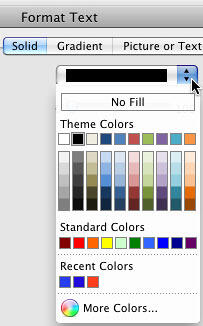
Figure 6: Color drop-down gallery- As you can see in Figure 5, the options within the Color drop-down gallery are very similar to the first
5 options within the Fill drop-down gallery that you saw in Figure 3, above. Here you can select any color of your choice. Then
adjust the fill transparency using the Transparency slider (highlighted in green within Figure 5,
above), or by typing the fill transparency in percentage values within the box next to the Transparency slider.
b. Gradient
- Using options within this tab, you can apply a gradient as text fill. To learn more, refer to our
Gradient Fill for Text in PowerPoint 2011 for Mac tutorial.
c. Picture or Texture
- This tab allows to use a picture or a texture as a fill for selected text. You need to use fairly large sized text so that picture fills
look effective. Find more information in our Picture Fill for Text in
PowerPoint 2011 for Mac and Texture Fill for Text in PowerPoint 2011
for Mac tutorials.
d. Pattern
- You can also fill your text with one of the default patterns that PowerPoint offers. Read our
Pattern Fill for Text in PowerPoint 2011 for Mac tutorial to
learn more.
- Choose and apply any fill for your text from within the Fill drop-down gallery, or Format Text dialog box
as required. As you can see in Figure 7, we just changed the color of the text from black to blue.
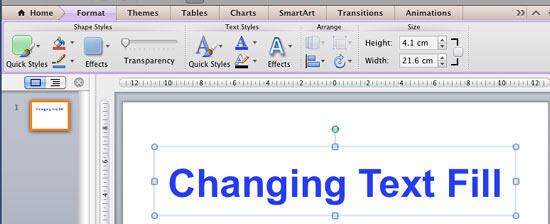
Figure 7: Text with changed fill color- Remember to save your presentation often.


