Have you seen that PowerPoint automatically reduces the size of your text when you type in too much text? Or does the text box itself
increase in size when you type in a sentence or two more than what can fit into the text box? Does this automatic hand-holding by PowerPoint
drive you crazy and want to hit your head on the wall? Well, you really don't have to worry because you can make PowerPoint behave itself, and
bend it to your will.
You can make these changes in two places, and which place you choose to make these changes will depend upon how much control you want:
- Control Autofit Options Globally: Works only on the computer where you make this change.
- Control Autofit Options for a particular Text Box or Placeholder: Works only on the particular text box or placeholder you
choose. If you want to apply this to a particular text placeholder, then don't make these changes for every individual text placeholder. Not only
will working with individual text placeholders be monotonous, but also you will loose the consistent look of successive slides. Therefore, make
these changes for text placeholders within the Slide Master.
Control Autofit Options Globally
To control the Autofit options globally in PowerPoint 2013 for Windows, follow these steps:
-
Click the File tab, and from the resultant menu choose Options. This opens the
PowerPoint Options dialog box. Make sure you choose Proofing from the sidebar of this dialog box (refer to
Figure 1).
-
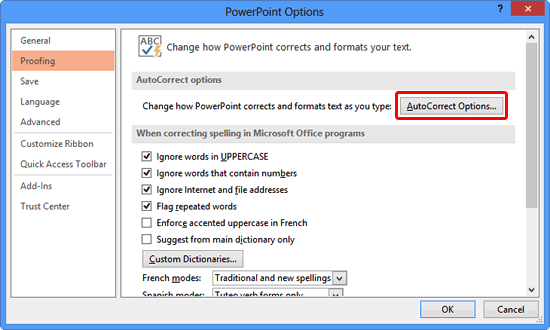
Figure 1: Proofing panel selected within PowerPoint Options dialog box
-
Now, click the AutoCorrect Options button (highlighted in red within Figure 1
above). This opens the AutoCorrect dialog box, as shown in Figure 2. Select the
AutoFormat As You Type tab (refer to Figure 2 again).
-
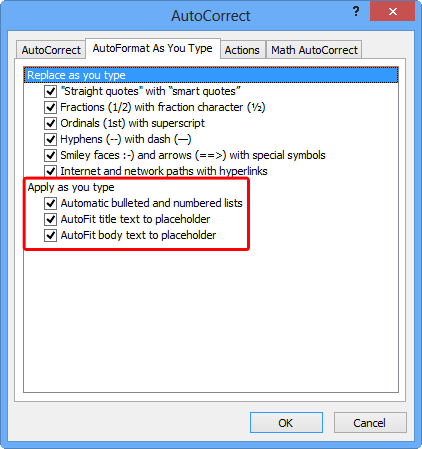
Figure 2: AutoFormat As You Type tab selected within AutoCorrect dialog box
-
Within Apply as you type section, you'll find three AutoFit options (highlighted in red within Figure 2 above).
These check-boxes may be selected or deselected, although we believe they are all enabled by default. Select or deselect these check-boxes as per your preference:
Automatic bulleted and numbered lists:
-
Automatically creates bulleted or numbered list as the text is typed. This option works mainly with text boxes rather than text placeholders because the latter almost
always already include bullets. In text boxes, you
can:
-
Type "1.", that is the number 1 followed by a period, and then start typing. The moment you hit Enter to create a new line, PowerPoint
automatically creates a numbered list.
-
Type "- ", that is a hyphen followed by a space, and then start typing, The moment you hit Enter to create a new line, PowerPoint
automatically creates a bulleted list.
AutoFit title to placeholder:
-
Automatically fits the title text within the title placeholder. If there's more
text, PowerPoint automatically reduces the font size of the text.
AutoFit body text to placeholder:
-
Automatically fits the body text within a text placeholder. If there's more
text, PowerPoint automatically reduces the font size of the text.
-
Note that the last two options mentioned above reduce the font size of the text rather than increase the size of the text placeholder. If you want that sort of control,
you should explore the options explained in the next section. For now, make your choices as required
by selecting or deselecting the check-boxes. Click the OK button in both successive dialog boxes to get back to the PowerPoint
interface.
Control Autofit Options Individually
Follow these steps to control the Autofit options for a particular text box or placeholder (or even a shape that contains text):
-
Select the particular text box (on a slide) or placeholder (within the
Slide Master) by clicking on its edge. Right-click to get the
context menu you see in Figure 3. Select the Format Shape option (highlighted in
red within Figure 3).
-
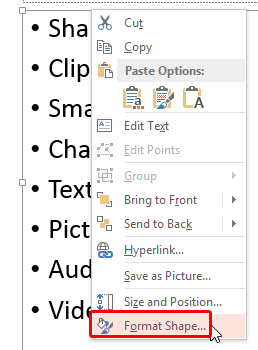
Figure 3: Format Shape option selected
-
This will open the Format Shape
Task Pane (see Figure 4). Make sure
you choose Text Options tab (highlighted in red within Figure 4). Then select the
Text Box button (highlighted in blue within Figure 4). All the options related to
text box layout are highlighted in green within Figure 4.
-
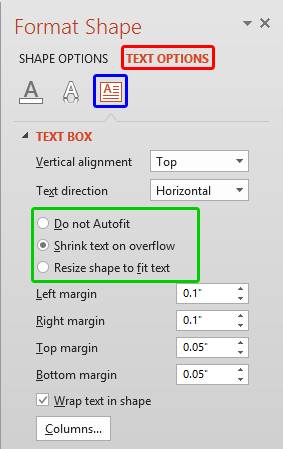
Figure 4: Format Shape Task Pane
-
Within the Format Shape Task Pane you'll find three radio buttons. You can only select one of these options, as explained below:
Do not Autofit:
-
Does not fit the text automatically within the selected text box or placeholder. If you don't
want PowerPoint to automatically reflow your text or increase the size of the text container, then choose this option to have complete control over
the location and size of your text boxes. Also, you have complete control over the font size of the text.
Shrink text on overflow:
-
Fits all the text by reducing the text's font size to keep the text fitted within the
text box or placeholder. If you have too much text, you might end up with teeny-weeny text.
Resize shape to fit text:
-
Retains the text size but increases the size of the text box or placeholder so that
the extra text can reflow itself within the resized text box or the placeholder. This also works for shapes but be very wary of using this option
for shapes. Be aware that even if you choose the Lock Aspect Ratio check-box within the Shape Options tab |
Size option of the Format Shape Task Pane as shown in Figure 5, the shape will only resize
itself vertically rather than both vertically and horizontally!
-
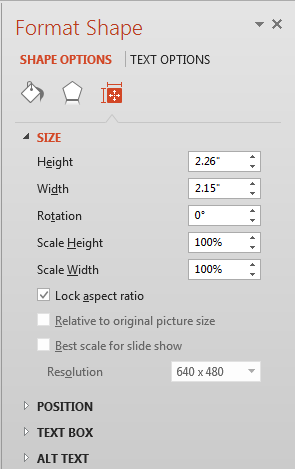
Figure 5: Lock Aspect Ratio check-box selected within the Format Shape Task Pane
-
Make your choices, and save your presentation often.
Tip: If you want all text placeholders in your presentation to not autofit, make sure you do these changes in the
Slide Master. Note that a Slide Master may have several
Slide Layouts contained. You will also need to change the autofit settings for every
single text placeholder (and title placeholders too, if you want) within the multiple Slide Layouts.


