Do you need to frequently add subscript and superscript formatting to text in PowerPoint, or even in other Microsoft Office programs such as Word, Excel, and Outlook? Quite often, this formatting may take a while, and we will explore easier and faster ways to add subscripted and superscripted text. We will also look at keyboard shortcuts that make these tasks even easier.
First, let us look at some samples of subscripted and superscripted text, as shown highlighted in green within Figure 1, below.

Figure 1: Subscript and Superscript text
As you can see in Figure 1, above, subscripted text is the text that's smaller in size than the preceding text. However, it is also placed lower, below the baseline, as you can see in Figure 2, below. Similar to subscripted text, superscripted text is also smaller than the preceding text, but it's placed higher, above the X-height of normal text, as shown in Figure 2.

Figure 2: Position compared to baseline and X-Height
There are three ways to add subscripted and superscripted text in PowerPoint and other Microsoft Office programs. Follow these steps to add subscripted and superscripted text in PowerPoint 365 for Windows:
1. Use the Font Dialog Box
To get started with the Font dialog box, follow these steps:
- Type in the text to add subscripts, as shown in Figure 3, below. This is the chemical formula for Sodium Sulfate, but as you can see, it really does not look like a formula because the subscripts are missing.

Figure 3: Text to add subscripts - Select the text to be subscripted. We selected the character, 2, as shown in Figure 4, below.

Figure 4: Select character to be subscripted - Now, access the Home tab of the Ribbon, and locate the Font group, shown in Figure 5, below. Click the dialog launcher in this group, as shown highlighted in red within Figure 5. Alternatively, press the Ctrl + Shift + F keyboard shortcut.
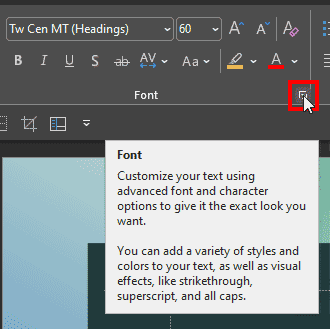
Figure 5: Click the dialog launcher - Either way, you bring up the Font dialog box, as shown in Figure 6, below. By default, the Font tab, highlighted in red within Figure 6 will be active in this dialog box.
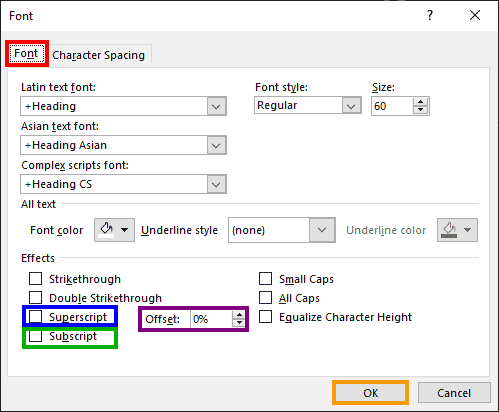
Figure 6: Font tab of the Font dialog box - To format as subscript, select the Subscript check-box, highlighted in green within Figure 6, above. To format as superscript, you can similarly select the Superscript check-box, highlighted in blue within Figure 6. Do note that you cannot select both check-boxes. When done, press the OK button, highlighted in orange in Figure 6.
- Figure 7, below, shows the result of applying Subscript formatting to some characters. Compare with Figure 3, shown previously on this page. You apply Superscript formatting in a similar way.

Figure 7: Text formatted as Subscript
Offset Values for Subscript and Superscript
- Depending on whether you choose Subscript or Superscript, the Offset box, shown highlighted in purple within Figure 6 will sport different values. The default for Subscript is -25%, and the default for Superscript is +30%.
- A value of zero for Subscript indicates that the subscripted text is on the baseline. Figure 8, below shows some samples of how different offset values work for both Subscript and Superscript.
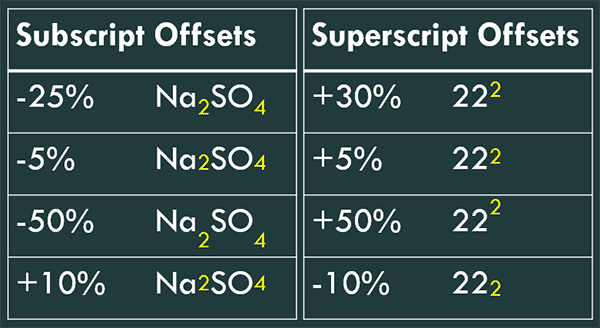
Figure 8: Offset values for Subscript and Superscript text - Do note that the Offset option is only available in PowerPoint, and not within Word, Excel, and Outlook.
2. Use the Quick Access Toolbar
Follow these steps to use the Quick Access Toolbar to add subscripts and superscripts:
- Unlike in Word, the Subscript and Superscript buttons are not found in the Home tab of the Ribbon in PowerPoint. You can of course, customize the Ribbon tabs and add these buttons, or you can add these buttons to the Quick Access Toolbar. To do so, first right-click on your Quick Access Toolbar and choose the Customize Quick Access Toolbar option, as shown highlighted in red within Figure 9, below.
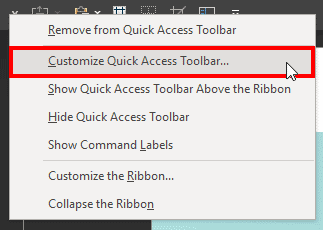
Figure 9: Customize Quick Access Toolbar
No Quick Access Toolbar?
- Cannot see any Quick Access Toolbar, or QAT in your version of PowerPoint on Windows? The QAT may be hidden. To see the QAT, right-click anywhere on the Ribbon and click the Show Quick Access Toolbar option in the resultant contextual menu, as shown highlighted in red within Figure 10, below.
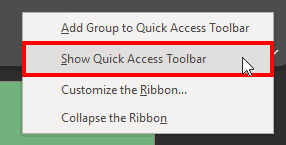
Figure 10: Show Quick Access Toolbar option
- As explained in our Customize Quick Access Toolbar in PowerPoint tutorial, add the Subscript and Superscript buttons to the QAT, as shown highlighted in red within Figure 11, below.

Figure 11: Subscript and Superscript buttons on the QAT - Select the text on your slide, and click either the Subscript or Superscript buttons on the QAT, as needed. Both these buttons are toggle options, so you can click again to remove the subscript or superscript formatting, if needed.
3. Use Keyboard Shortcuts
Follow these steps to add subscripts and superscripts to text using keyboard shortcuts:
- Select the text on your slide that you want to subscript or superscript, as shown in Figure 12, below.

Figure 12: Select character to be superscripted - Press the Ctrl + Shift + = keyboard shortcut to superscript your text. The result can be seen in Figure 13, below. For subscripting, you can use the Ctrl + = keyboard shortcut. Both these keyboard shortcuts are toggle options, so pressing the same keyboard shortcut again changes superscripted or subscripted text to normal.

Figure 13: Text formatted as Superscript
Offset Values for Subscript and Superscript Using Keyboard Shortcuts
- Use the Ctrl + Shift + Alt + > and the Ctrl + Shift + Alt + < keyboard shortcuts to alter the offset values for both subscripted and superscripted text. The former keyboard shortcut moves the offset upwards, whereas the latter keyboard shortcut will move the offset downwards. Press these keyboard shortcuts several times, and you can change a subscript to a superscript, and vice versa.
As you can see, it's easy to add subscripts and superscripts to text in PowerPoint and other Microsoft Office programs using options explained on this page.


