If your slides contain text, and most slides do, then there is a chance that some words may be misspelled! Yes, you can do
a manual check by proof-reading all your slides one by one. Alternatively, you can run a spell check on the entire presentation,
and make corrections based on suggestions provided by PowerPoint. However there are some caveats associated with this automated
spell checking, and this does not have anything to do with PowerPoint. The main caveat is while PowerPoint is good at finding
spelling mistakes, it won't find any wrong words you have used as long as the spelling is correct! As far as PowerPoint is
concerned, "dear" are "deer" both are valid spellings. So, "Deer Dairy" is acceptable when you may
have meant "Dear Diary"! So always do skim your slides even after you do a spell check. Having said that, here's how
you can do a spell check in PowerPoint:
- Open your presentation in PowerPoint 2011 for Mac. The
presentation you open should be in a fairly finished stage because there's no sense in running a spell check on a presentation
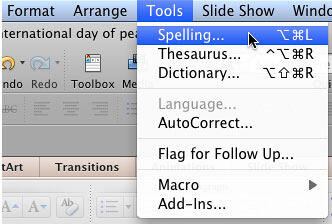
with incomplete slides! Now select the Tools | Spelling menu option, as shown in
Figure 1.
-

Figure 1: Select Tools | Spelling option
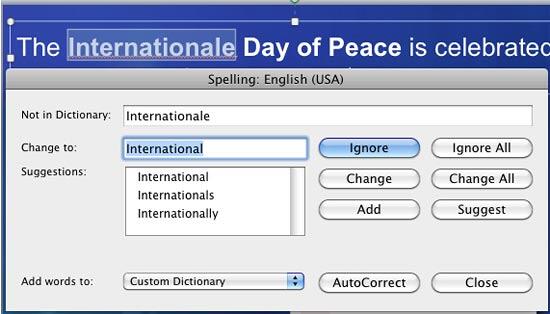
- This starts a spell check. As soon as the first spelling mistake is encountered, the Spelling
dialog box appears along with suggested corrections, as shown in Figure 2.
-

Figure 2: Spelling dialog box
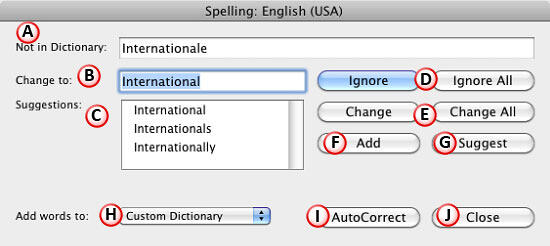
- Figure 3 shows the spelling mistake and the possible corrections suggested. In addition,
you can see all other options available within the Spelling dialog box. You can choose any of these options,
and then PowerPoint will highlight the next misspelled word.
-

Figure 3: Options within the Spelling dialog box
- All options within the Spelling dialog box are explained below, as marked in
Figure 3 above:
A. Not in Dictionary
- This is the word that PowerPoint indicates as a spelling error.
B. Change to
- This is the first word in the list of correct words PowerPoint suggests for the misspelled word.
C. Suggestions
- More change suggestions, including what you see in the Change to: text box. If
there are too many suggestions, you can scroll down to find more alternative spelling suggestions.
D. Ignore/Ignore All
- Click the Ignore button to ignore the currently highlighted word and continue
spell check for the rest of the presentation.. You choose this option when you know the word is spelled correctly. If this
word is used often in your open presentation, you can click the Ignore All button so that PowerPoint does not
highlight it as a spelling mistake during the present spell check session.
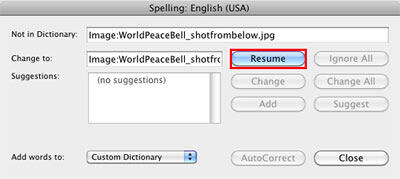
Tip: Did you just move away from PowerPoint to another program? Once you get back, you will no longer see the
Ignore button, or even most of the other buttons we mention in this tutorial. Instead you will see the
Resume button, as shown highlighted in red within Figure 4.
Press this button to start the spell check process again.
-

Figure 4: Resume button within the Spelling dialog box
E. Change/Change All
- Click the Change button to accept PowerPoint's suggestion in the
Change to text box. To change all instances of this misspelled word in the presentation, click the
Change All button. Sometimes, PowerPoint may get stumped and offer no suggestions. In that case, just
type the correct spelling in the Change to text box. You can type in a correct spelling in the
Change to dialog box even if PowerPoint offers suggestions.
F. Add
- If you think your original word is spelled just fine, click the Add button to add
the word to the Custom dictionary that you select within the Add words to: section (marked as
H within Figure 4, above). This will save the word into the custom dictionary that can be used
by PowerPoint and also other Microsoft Office programs including Word and Excel. Thus, this word will no longer show up as a
spelling mistake even in those programs.
G. Suggest
- If you scroll down the Suggestions list, and once again want to know what PowerPoint's
original suggestion for the highlighted, misspelled word, then click the Suggest button.
H. Add words to
- This section provides you with the list of Custom dictionaries available, as shown in
Figure 5.
-

Figure 5: List of Custom Dictionaries
I. AutoCorrect
- This button, when clicked, adds the highlighted misspelled word as an AutoCorrect entry. It also, uses the suggested word as its corrected spelling. The next time you type that misspelled word in PowerPoint (or any other
Microsoft Office program), it will be automatically corrected (that's what AutoCorrect means) to the new, correct spelling.
J. Close
- Click this button if you want to stop the spell check process.
- As soon as you finish checking all spelling errors in the presentation, PowerPoint will prompt you with a
message window which indicates that your presentation is free of spelling errors (see Figure 6). Click
OK button to dismiss this message window.
-

Figure 6: PowerPoint message window
- Save you presentation often.
Tip: Did your first spelling error you encounter show up in slide 6 or 7 rather than your first slide? No
worries, because this just means that all your earlier slides were marked as spelled correctly! PowerPoint always starts spell
checking from slide 1 even if you were on slide 6 when you summoned the Spelling option.


