Once you make gridlines visible on your slide in PowerPoint, you may wonder if there's really any benefit using the gridlines other than the obvious benefit of possessing a visual grid that lets you place slide objects. The answer is both yes and no. Yes, because that's all you may believe happens on the surface, and No because you should know about how the Snap to Grid option works, this option is not active by default! The Snap to Grid option helps to get the proper position of the slide objects. Other than making this option active, you can change the grid settings, such as changing the spacing in between the gridlines.
To access the Snap to Grid option, and to make changes to the way it works, follow these steps in PowerPoint 2013 for Windows:
- Open a Blank Presentation in PowerPoint and make the gridlines visible. Figure 1, below, shows the gridlines visible on a PowerPoint slide.

Figure 1: Gridlines made visible on PowerPoint slide
Shortcut Key
- Click the Shift + F9 shortcut key to toggle the visibility of gridlines in PowerPoint 2013 for Windows.
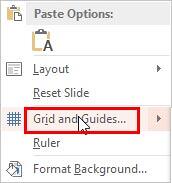
- Now, right-click anywhere on an empty area of the slide to bring up the context menu, as shown in Figure 2, below. Select the Grid and Guides option from this menu, as shown highlighted in red within Figure 2.

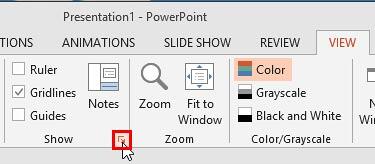
Figure 2: Grid and Guides option within context menu- Alternatively, access the View tab of the Ribbon, and click the dialog launcher button, as shown highlighted in red within Figure 3, below.

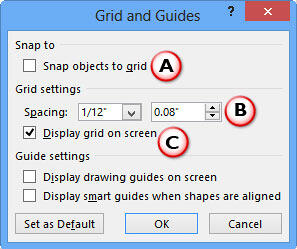
Figure 3: Dialog launcher button within View tab- Either of these options summon the Grid and Guides dialog box, as shown in Figure
4, below.

Figure 4: Grid and Guides dialog box- This dialog box includes options for working with both the grid and guides. Options pertaining to the grid settings and slide object snapping are explained below:
A. Snap objects to grid
- Select this check-box to snap objects to the gridlines as soon as they move fairly close to them. You can also turn on this option even without accessing the Grids and Guides dialog box by using the (Ctrl + Shift + F9) shortcut key. Turn off the option by pressing the same keyboard shortcut.
B. Spacing
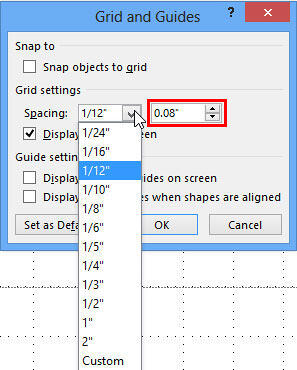
- Under the Grid settings section, click within the Spacing selection box to get a drop-down list, as shown in Figure 5, below, and choose any of the default grid spacing values available. You can also type in the spacing value or use the up and down arrows to set the custom spacing for gridlines, as shown highlighted red within Figure 5.

Figure 5: Spacing drop-down listC. Display grid on screen
- Select or deselect the Display grid on screen check-box to show/hide the gridlines on the slide. You can also turn on this option even without accessing the Grids and Guides dialog box by using the Shift + F9 shortcut key. Again, this keyboard shortcut is a toggle option.
Set as Default
- If you want the settings you changed to be the default settings for all presentations you create from now onwards, click the Set as Default button, as shown in Figure 4, previously on this page. Do note that the changed settings will apply for your active, current presentation and for any other new presentations you create hereafter on your installed version of PowerPoint. All settings may not work for existing presentations created previously on the same system or for presentations you have received from others, which have been created on other installations of PowerPoint. This setting is therefore a PowerPoint installation-specific change and not a PowerPoint file-specific change.
- When done, click the OK button to apply the changes. Do remember that any changes you make in this dialog box are relevant to the active presentation.
- Save your presentation often.


