Office 2013 programs such as PowerPoint 2013 work with their own Accounts
system. Many options within PowerPoint show up or change depending upon which Account you are signed into, and these include
your Recent Files list, your connected services,
and even the interface color for your
program.
While these customizations show up irrespective of whether you are running PowerPoint 2013 on Windows 8 or Windows 7, the process in which
you sign in and switch Accounts differs a little in both these Windows versions. That's because Windows 8 or newer versions also integrate
with Microsoft Accounts on their own, and PowerPoint 2013 uses the same Account information seamlessly. For more details, refer to
our Sign Out and Switch Accounts in PowerPoint 2013
on Windows 10 and 8 tutorial.
Windows 7, however, does not provide its own Microsoft Account integration in the same way. In this tutorial, you'll explore the Account
management for PowerPoint 2013 within a Windows 7 environment.
Sign In and Switch Accounts
Note that to run PowerPoint 2013 or any other Office 2013 program on Windows 7, you need not have to be signed in to a Microsoft Account.
You can start working on the application straight away. So why would you sign in to Office 2013 in Windows 7? By signing in to Office 2013,
you can save your Office files online to get to them almost anywhere and share it with anyone whenever and wherever you want. You can also
get to your themes, customizations, and settings anytime you sign in.
Now to find out whether you are signed in into your Microsoft account, just look for a name at the top right corner of any Office programs
such as PowerPoint 2013, as shown in Figure 1. If you see a Sign in hyperlink (highlighted in
red within Figure 1 below), that indicates you are not signed in.
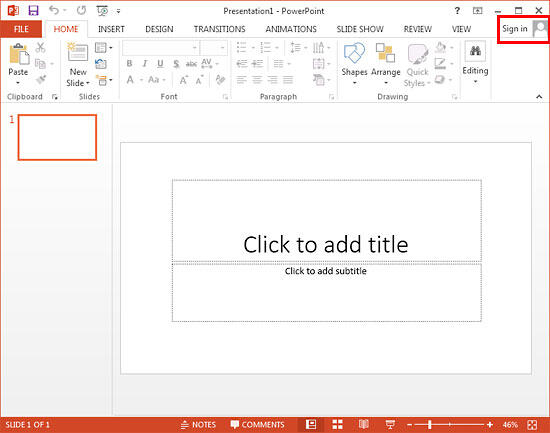
Figure 1: Find out whether you are Signed in or not
We will first learn how you can sign in and switch Accounts. Thereafter, we will explore how you can sign out from the account. Follow
these steps to learn more:
- Within the PowerPoint 2013 interface, locate and
click the Sign in hyperlink (highlighted in red within Figure 1 above).
- This opens the Sign in to Office window, as shown in Figure 2. Here you will find two options:
a. Microsoft Account
- This is the account you use for a Microsoft product/service such as Hotmail,
OneDrive Xbox Live,Outlook.com, etc. Learn more on our
Microsoft Account page.
b. Organizational Account
- This account is typically provided by your work or school, and is connected to an Office 365 account.
- Since we are only exploring Microsoft Accounts in this tutorial, do choose that option.
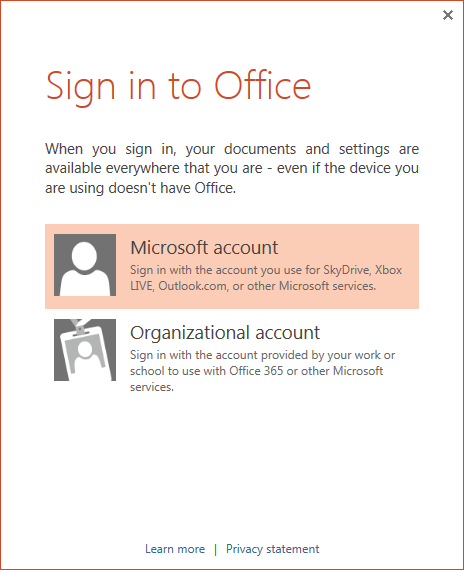
Figure 2: Sign in to Office window- This brings up the Sign in window (see Figure 3) from where you can sign in into your Microsoft
account. Just type in your Microsoft Account email address and password. Then click the Sign in button to proceed.
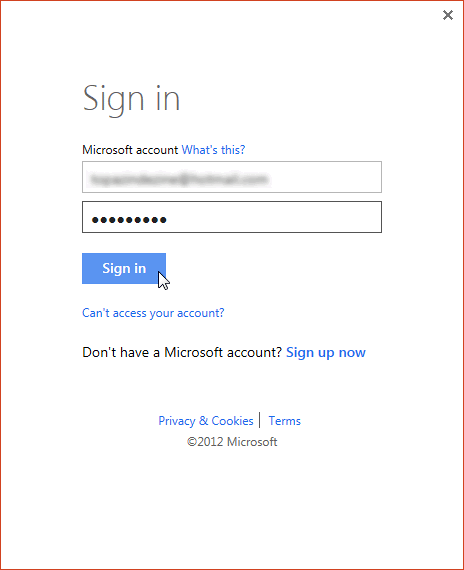
Figure 3: Sign in to Microsoft account window- This will immediately sign in to the account within PowerPoint 2013. You can see the signed-in account mentioned at the top-right corner
of the PowerPoint interface, as shown highlighted in
red within Figure 4.
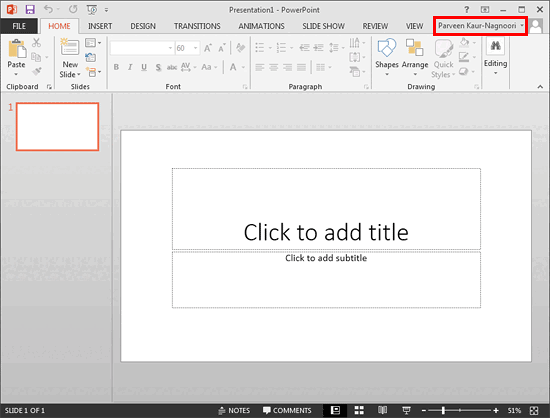
Figure 4: Signed in to Microsoft account- Note that as soon as you are signed in to your Microsoft account, the
interface color may change (compare
Figures 4 and 1). This happened because these customizations were saved into the Microsoft account you
signed in to.
- Now, click the downward pointing arrow next to the signed in account, as shown highlighted in red within
Figure 5. This brings up the drop-down menu shown in Figure 5. Now choose the
Switch account option from this menu (highlighted in blue within Figure 5).
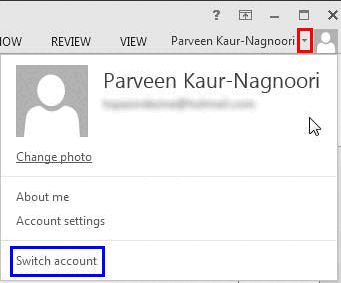
Figure 5: Signed in account drop-down menu- This will again bring up the Sign in window (refer to Figure 3 above). Just type in your other account
email address and password. Then click the Sign in button to proceed.
- PowerPoint will sign you into this new account, and you can see the changed account name at the top-right corner of the
PowerPoint interface, as shown highlighted in
red within Figure 6 (compare with Figure 4).
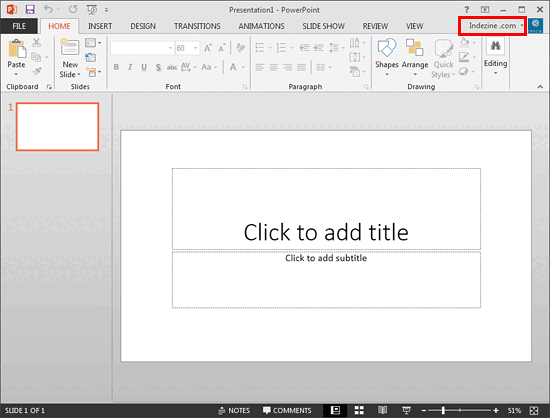
Figure 6: Changed account- Now, if you again click the Switch account hyperlink (highlighted in blue within
Figure 5 shown earlier on this page), you'll see the Accounts window, as shown in Figure 7.
Note that the Accounts window displays the Current account (where you are signed in) and a list of
Other Accounts available to sign in to (you can click on any other available account to sign in).
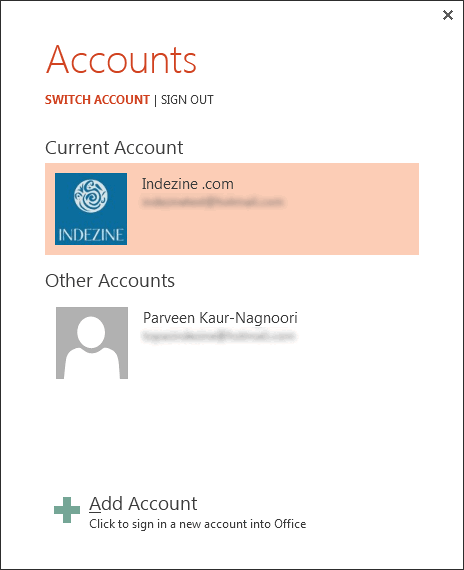
Figure 7: Accounts window- Also, you can add another Microsoft account by clicking the Add Account button (refer to Figure 7 again).
This brings up the same Sign in window that you saw in Figure 3 earlier on this page. You can thus switch
between different Microsoft accounts.
Sign Out or Remove Account
In this section, we'll explore how to Sign out of an account, or remove it altogether:
- Locate the signed in account and click the downward point arrow next to the signed in account, as shown highlighted in
red within Figure 8. This brings up the drop-down menu shown in Figure 8. Now
choose the Account settings option from this menu (highlighted in blue within
Figure 8).
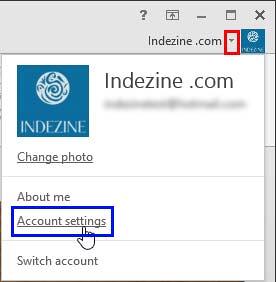
Figure 8: Account settings option- This opens the Account options within
Backstage view, as shown in Figure 9. Note that you can also get to this screen using the File | Account
menu option.
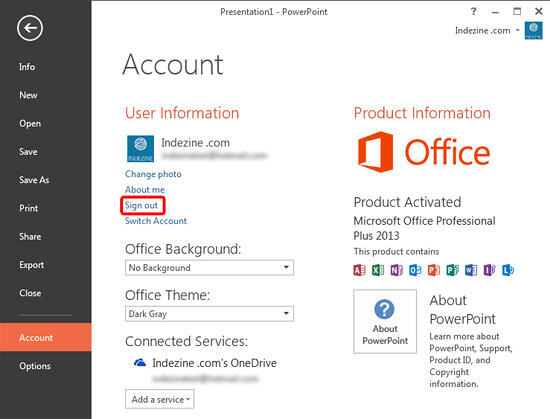
Figure 9: Account options within the Backstage view- Now, within the Account window, click the Sign out hyperlink (highlighted in
red within Figure 9). This will open the message window, as shown in
Figure 10. Click Yes to sign out/remove the account.

Figure 10: Remove Account window- Note that if you signed in to more than one account on a particular system without signing out, then you immediately gain access to the other account. To make sure this does not happen, ensure that you remove (sign out) of all accounts in the same way as explained above.


