Learn how to show file extensions in:
Windows 10 / 8
Windows 7
Windows Vista
Windows XP
To perform some tasks within Windows, you must be able to see all files and the folders. However, there are chances that some of your files or folders may be hidden. This may not be so obvious and fortunately it's easy to overcome this limitation. By default, all versions of Windows hide at least some files and folders. In this article, we'll show you how you can unhide these files or folders within Windows 10, 8, 7, Vista, and XP.
Show Hidden Files and Folders in Windows 10 / 8
Follow these steps to show the hidden files and folders in Windows 10 / 8:
- Within Windows 10 or 8, press the Windows + E shortcut key. Doing so brings up the Explorer window, as shown in Figure 1.
- Within the Explorer window select the View tab (highlighted in red within Figure 1). Locate to the Show/Hide group. Here, you can see the Hidden Items check-box is deselected (highlighted in blue within Figure 1).

Figure 1: View tab within the Explorer window - To make the hidden files and folders visible, make sure you select the Hidden Items check-box, as shown highlighted in blue within Figure 2.

Figure 2: Hidden Items check-box selected
Show Hidden Files and Folders in Windows 7
Follow these steps to show the hidden files and folders in Windows 7:
- Launch any Explorer window (or, press the Windows + E shortcut key). Choose Tools | Folder options, as shown in Figure 3.
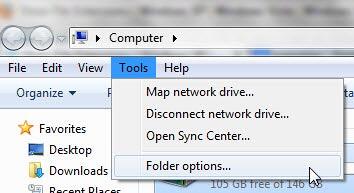
Figure 3: Folder options to be selected - This opens the Folder Options dialog box, as shown in Figure 4. Here, select the View tab, and scroll down the Advanced Settings list. Within the Hidden files and folders option, make sure that the Show hidden files, folders, and drives radio button is selected, as shown highlighted in red within Figure 4. When done, click the OK button.
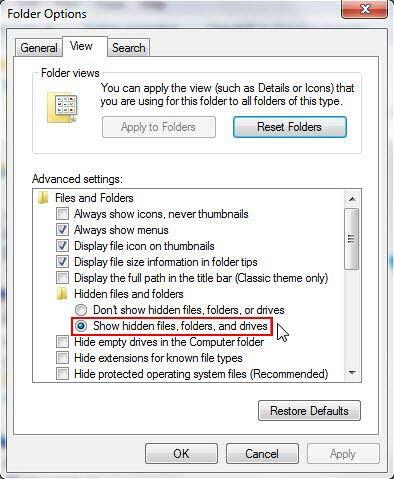
Figure 4: Folders Options dialog box
Show Hidden Files and Folders in Windows Vista
Follow these steps to show the hidden files and folders in Windows Vista:
- Go to My Computer, or you can also press the Windows + E shortcut key to bring up an Explorer window. Then, choose Organize | Folder and Search Options, as shown in Figure 5.
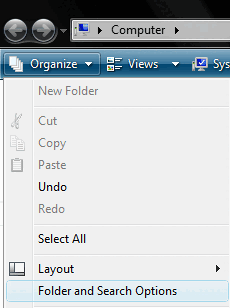
Figure 5: Folder and Search Options - This opens the Folder Options dialog box (see Figure 6). Select the View tab, and scroll down the Advanced Settings list. Within the Hidden files and folders option, make sure that the Show hidden files, folders and drives radio button is selected, as shown highlighted in red within Figure 6. When done click the OK button.
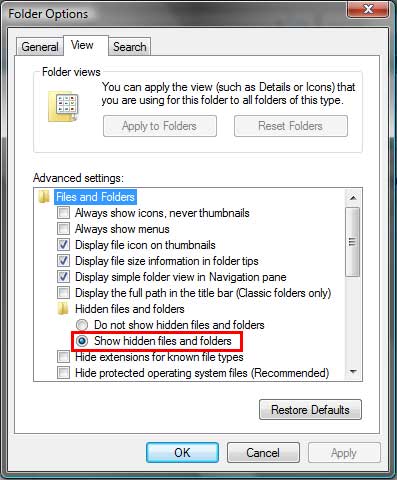
Figure 6: Selected Show hidden files and folders radio button
Show Hidden Files and Folders in Windows XP
Follow these steps to show the hidden files and folders in Windows XP:
- Go to My Computer and choose Tools | Folder Options, as shown in Figure 7.
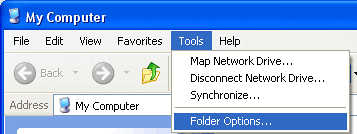
Figure 7: Folder Options - This opens the Folder Options dialog box that you can see in Figure 8. In this multi-tabbed dialog box, select the View tab (again, refer to Figure 8). Scroll down the Advanced Settings list, and make sure the Show hidden files and folders radio button (highlighted in red within Figure 8) is selected. Click the OK button when done.
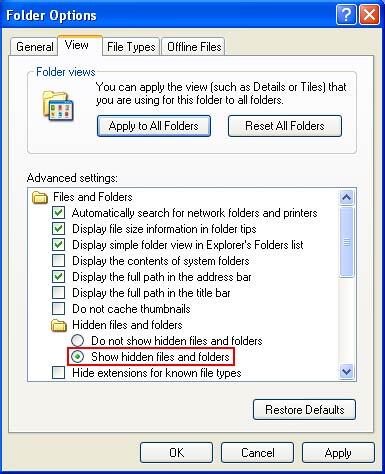
Figure 8: Selected Show hidden files and folders radio button


