Unlike in PowerPoint versions on Windows, you cannot access Share options in Backstage view within PowerPoint 365 for Mac. Instead, all share options are accessed via conventional menu options. These options share the current presentation through the cloud via OneDrive. You can also email the presentation as an attachment, a link, or a PDF.
Follow these steps to learn more about Share options in PowerPoint 365 for Mac:
- Open a presentation to be shared and click the File menu, and choose the Share option. This opens a flyout menu with options, as shown highlighted in red within Figure 1.
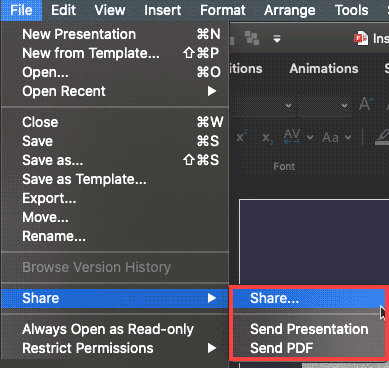
Figure 1: Share options in File menu - We will now explore these three options:
Share
- If you are working on a local file (or any other file that's not opened from your OneDrive or SharePoint drive), clicking the Share option brings up a message window asking you to move or copy the presentation file to a Place, which is a Microsoft name for an online cloud location, typically your OneDrive or SharePoint accounts. This message window, shown in Figure 2, below, provides some options you should choose carefully.
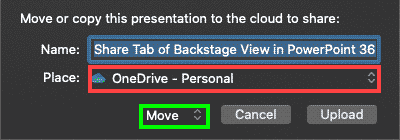
Figure 2: Share options - To change the cloud location where you want to save the presentation file, click the Place drop-down list, highlighted in red within Figure 2, above. Doing so brings up a list with cloud locations. If you have set more cloud locations, you will see an alternative location, as shown in Figure 3, below. You can also click the Other option, which will allow you to add more OneDrive and SharePoint cloud locations.
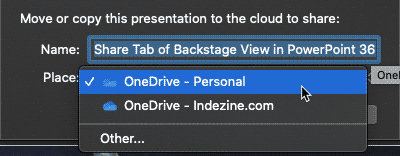
Figure 3: Choose a Place - You can also choose whether you want to copy the existing file or move it within the Move or Copy drop-down list, highlighted in green within Figure 2, shown previously on this page. The default option in this list is Move (see Figure 4), and that's probably a good idea if you need to make further edits to a file you will share. The Copy option is best suited if you want to share a presentation file without sharing any further edits you make.
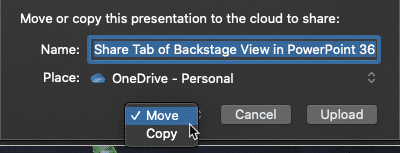
Figure 4: Move or Copy drop-down list - Once you have made choices, click the Upload button.
- Once you upload your file, or if you open a file from your OneDrive or SharePoint location, the Share flyout in the File menu changes, as can be seen highlighted in red within Figure 5, below (compare with Figure 1).
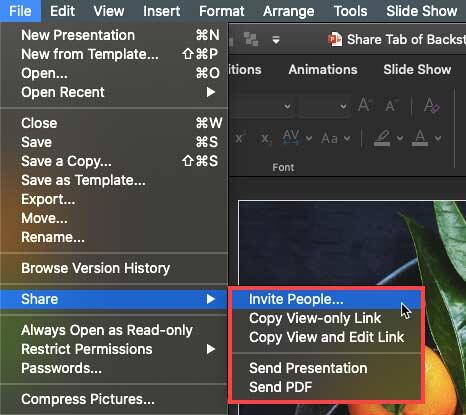
Figure 5: Share options for files on OneDrive or SharePoint - We will now explore the following three options: Invite People, Copy View-only Link, and Copy View and Edit Link.
A. Invite People
- Clicking this option brings up the screen shown in Figure 6, below.
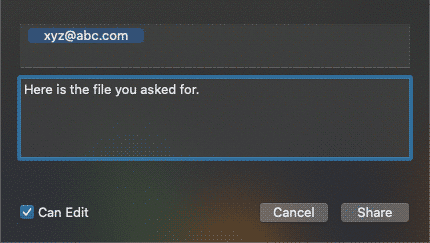
Figure 6: Invite people to view and edit - You can type in one or more email addresses and a message to the recipient of the share. Additionally, you can check the Can Edit option that allows recipients to edit the PowerPoint presentation. If you do not want them to be able to edit, make sure that this option is not checked. Once you have made your choices, click the Share button.
B. Copy View-only Link
- This option copies a view-only (read-only) link to the clipboard so that you can share the link via email, chat, or any other messaging platform. You may see a Loading share link notification, shown in Figure 7, below, for a moment before the link is available on the clipboard.

Figure 7: Loading share link notification C. Copy View and Edit Link
- This option copies an edit-enabled link to the clipboard so that you can share the link via email, chat, or any other messaging platform. You may see a Loading share link notification, as shown in Figure 7, above, for a moment before the link is available on the clipboard.
Send Presentation
- Selecting this option opens a new email in your default mail application, with a copy of the PowerPoint file attached.
Send PDF
- Exports your presentation as a PDF file, that attaches to a new email in your default mail application.
- Using options explained, you can share your PowerPoint presentation as an editable or non-editable file, or even as a PDF.


