Tables in PowerPoint help you to make your numerical data or other content look organized. They also make it easy for your audience to quickly comprehend the data. You can make this task even more effective by selecting particular cells in the table, or the entire table, and then changing their shading and applying some effects to them so that they are highlighted.
Follow these steps to learn how you can alter the look of your PowerPoint tables using Shading and Effects options in PowerPoint 2013 for Windows:
Apply Shading to the Table (or Selected Cells):
- Select the entire table or just the rows/columns that you want to change the fill for. Access the Table Tools Design contextual tab (highlighted in red within Figure 1) of the Ribbon. Then, locate the Shading button and click the down-arrow (highlighted in blue within Figure 2). This opens the Shading drop-down gallery that you see in Figure 1, below.
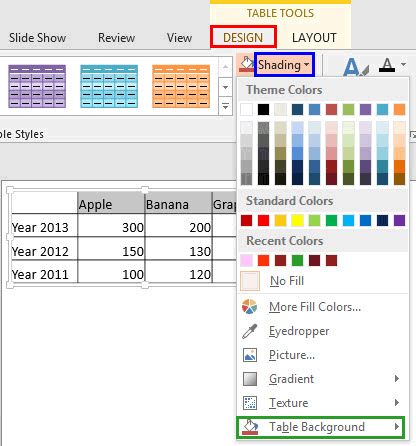
Figure 1: Shading drop-down gallery - Within the Shading drop-down gallery, you will find various options to change the fill of selected table (or cells). To learn more about the top nine options, refer to the points 3-A to 3-I in our Add Solid Fills to Shapes in PowerPoint 2013 tutorial. Even though the linked tutorial explains various fill options for shapes, the options work similarly with table cells.
- Selecting the Table Background option (highlighted in green within Figure 1, above) opens another sub-gallery containing only the same top seven options as within the Shading drop-down gallery, as shown in Figure 2.
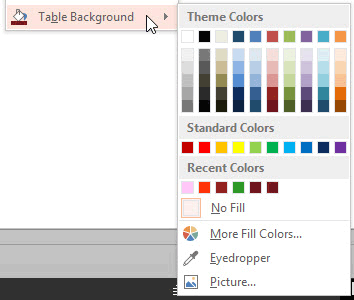
Figure 2: Table Background sub-gallery - Even though the top seven options within the Shading drop-down gallery and the Table Background sub-gallery look similar (compare in Figures 1 and 2), they act differently when you try to apply any of them on only a set of few cells within a table as shown in Figure 1, above. The difference is:
- Options within the Shading drop-down gallery get applied to only the selected cells within a Table.
- Options within the Table Background sub-gallery get applied to the entire Table, even though you have selected only a few cells within the Table.
Note: If you choose any of the Table Background options for a table that is already filled with a color, gradient, picture etc., then you won't be able to see the changes. To make the changes visible, you need to select the entire table and then select the No Fill option within the Shading drop-down gallery.
- Select any of the Shading options to recolor the selected cells within your table, as shown within Figure 3.
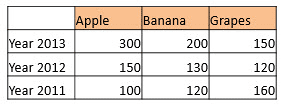
Figure 3: Table cells applied with a fill color - Save your presentation often.
Apply an Effect to the Table (or Selected Cells):
- Select the entire table or just the rows you want to apply an effect to. Access the Table Tools Design contextual tab (highlighted in red within Figure 4) of the Ribbon. Then, click the Effects button (highlighted in blue within Figure 4). This opens the Effects drop-down gallery that you see in Figure 4.
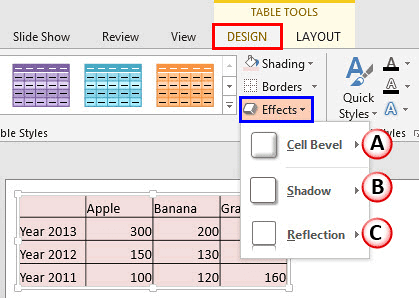
Figure 4: Effects drop-down gallery - Let's explore the options within the Effects drop-down gallery, as marked in Figure 4, above. For more info on these options, refer to the tutorials linked. Even though the linked tutorials explain effects applied to shapes, the options work similarly with table cells.
A. Cell Bevel
- Select this option to apply Bevel effects to the table cells. Even though you have selected the entire table, the Cell Bevel effect gets applied to each and every cell within the selected table. To learn more about this option refer to our Apply Bevel Effects to Shapes in PowerPoint 2013 tutorial.
B. Shadow
- This option is used to apply a shadow effect to the selected table. Even though you have selected few cells within table, the Shadow effect gets applied to the entire table. For more info, refer to our Apply Shadow Effects to Shapes in PowerPoint 2013 tutorial.
C. Reflection
- Adds a reflection to the selected table. Again, even though you have selected few cells within table, the Reflection effect gets applied to the entire table. Refer to our Apply Reflection Effects to Shapes in PowerPoint 2013 tutorial to learn more about this option.
- Select any Effect option for your table (cells). Figure 5 shows how a shadow effect has been applied to the selected table.
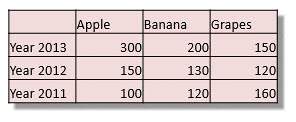
Figure 5: Table applied with shadow effect - Save your presentation often.


