Sometimes while working in PowerPoint it may so happen that you know a particular word is misspelled, but
PowerPoint's spell check doesn't seem to think so! This may be because your word is in all CAPS, or it may contain some
numbers. In these cases, and in number of other instances, PowerPoint just ignores any misspellings. Fortunately, you
can turn off the options that instruct PowerPoint to ignore these misspellings. Remember though that changing these
options will apply to all Microsoft Office applications you have installed on your computer—including Word, Excel,
and Outlook.
Note: Many of the editing tasks related to spell check cannot be done
within PowerPoint. In fact, you need to do these tasks in Word. Fortunately though, any changes made within Word
reflect within PowerPoint as well. Most techniques explained in this page therefore pertain to both PowerPoint and
Word.
Follow these steps to set up spell check options in PowerPoint 2011 for Mac
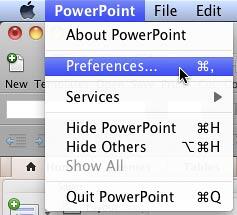
- Launch Word 2011 and choose the Word | Preferences menu option, as shown in
Figure 1.

Figure 1: Choose PowerPoint | Preferences
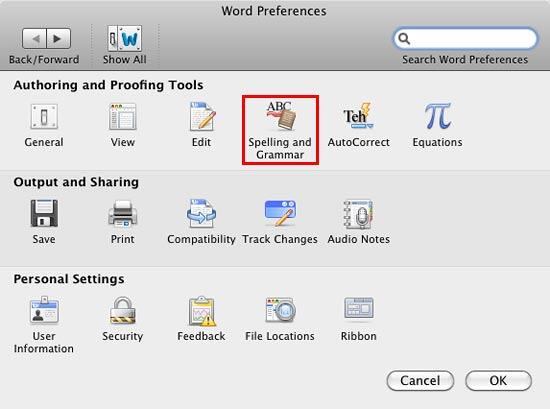
- This opens the Word Preferences dialog box. Select the Spelling and Grammar
option that you can see highlighted in red within Figure 2.

Figure 2: Spelling and Grammar option within Word Preferences dialog box
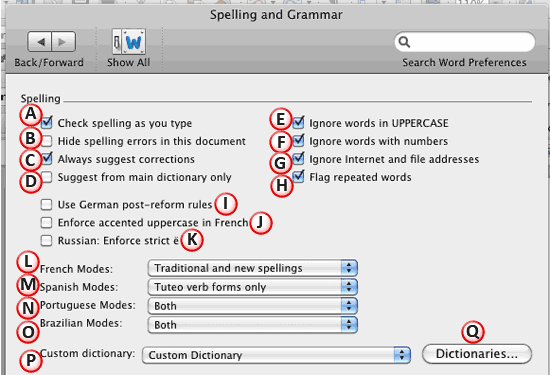
- This opens the Spelling and Grammar dialog box in which the Spelling section
includes various spell check options as shown in Figure 3.

Figure 3: Set spelling options within Spelling and Grammar dialog box
All the Spelling options within the Spelling and Grammar dialog box are explained
below, as marked in Figure 3, above. Select or deselect them as required:
Check spelling as you type
- Enables AutoCorrect
to do an automatic spell check while you type.
Hide spelling errors in this document
- Disables the red wavy underlines that automatically appear underneath misspelled words.
Always suggest corrections
- Automatically displays a list of suggested spellings for misspelled
words during a spelling check.
Suggest from main dictionary only
- Ignores any other
loaded custom spelling dictionaries.
Ignore words in UPPERCASE
- Prevents the spell checker from flagging acronyms or any other words typed in ALL CAPS.
Ignore words with numbers
- Ignores spelling errors for words that contain digits, such as license
plate numbers or model numbers.
Ignore Internet and file addresses
- Prevents the spell checker from flagging web or e-mail
addresses, network paths, and file paths.
Flag repeated words
- This marks second and subsequent instances of the same word in a row, for
example preventing you from writing "the the".
Use German post-reform rules
- When the language is set to German, flags non-accented uppercase
characters as spelling errors during a spell check.
Enforce accented uppercase in French
- This is option is only applicable when the editing language
is French, and suggests accents for uppercase letters as appropriate.
Russian: Enforce strict ë
- When the language is set to Russian, enforced the use of ë (e-umlaut).
French Modes
- Use this selection list to fine-tune spell check options for French.
Spanish Modes
- Use this selection list to fine-tune spell check for Spanish.
Portuguese Modes
- Specify whether to use post-reform, pre-reform or both spellings when the
language is set to Portuguese.
Brazilian Modes
- Specify whether to use post-reform, pre-reform or both spellings when the
language is set to Brazilian.
Custom Dictionary
- This selection list is used to change the default custom dictionary. But do
remember that this change will not implement in PowerPoint since PowerPoint always considers only the
Custom Dictionary file located within the user's Library folder as its default custom dictionary.
Dictionaries
Clicking this button opens the Custom Dictionaries dialog box,
- where you can make changes to custom dictionaries. Learn more in our
Edit Custom Dictionaries
tutorial.
- When done, click the OK button to close the Spelling and Grammar dialog box. Any
changes you made will be applicable immediately in Word itself. In other Microsoft Office programs installed on your
computer, you may want to restart the program for these changes.


