There are many applications, including PowerPoint that allow you to record your voice using a connected microphone. Such recorded voice-overs work amazingly well as slide narrations. However, if your connected microphone does not work using recording options in PowerPoint or another application, then you may have to first ascertain if the microphone hardware was detected or not by your Windows operating system. Also if detected, has it been selected as the default recording device? In this tutorial, we will discover how you can take care of these concerns in various versions of Windows:
Windows 8 or 7
Windows Vista
Windows XP
Windows 8 or 7
Follow these steps to set a recording audio device in Windows 8 or Windows 7. You will first need to bring up the Sound dialog box:
- Windows 8: Open the Metro interface by pressing the Windows key. Start typing "Manage audio devices" without the quotes to automatically bring up the Search box, as shown highlighted in red within Figure 1.
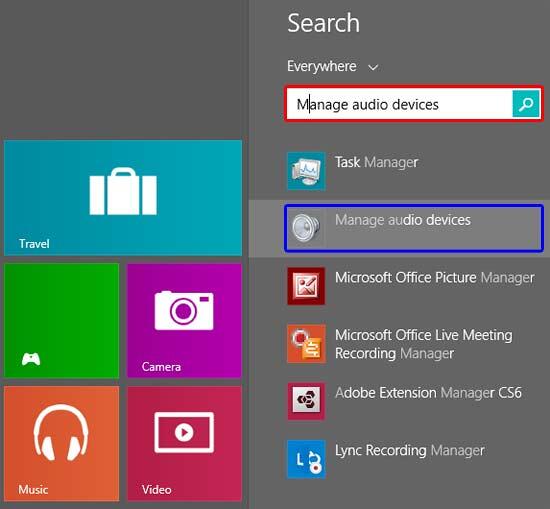
Figure 1: Manage audio devices typed within the search box in Windows 8 - Windows 7: Click on the Start button. In the search box within the resultant Start Menu, type "Manage audio devices" without the quotes, as shown highlighted in red within Figure 2.
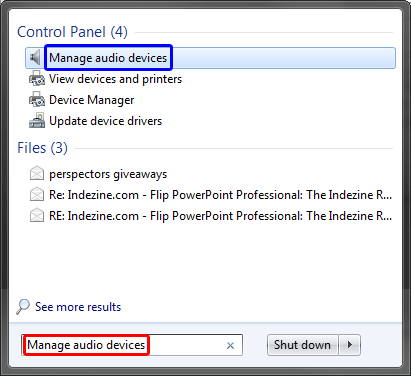
Figure 2: Manage audio devices typed with the search box in Windows 7 - In either of the results, click on the link with the same "Manage audio devices" name, as shown highlighted in
blue within both Figures 1 and 2, above.
- Doing so opens the Sound dialog box, as shown in Figure 3. Within the Sound dialog box select the Recording tab, as shown highlighted in blue within Figure 3. Here you can see connected recording devices. Make sure your connected microphone is listed. If not, access the support options available for your microphone, such as the support section of the microphone manufacturer's website.
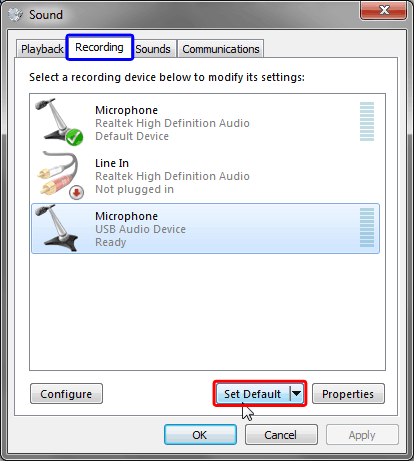
Figure 3: Attached recording devices within the Sound dialog box - If your microphone is indeed connected, but not selected, then you can select it so that PowerPoint uses this microphone for recording. If you always want the same microphone to be used for recording, select the microphone and click the Set Default button, as shown highlighted in red within Figure 3, above.
- This will set the selected microphone as default. This default is indicated by a green tick mark, as shown in Figure 4.
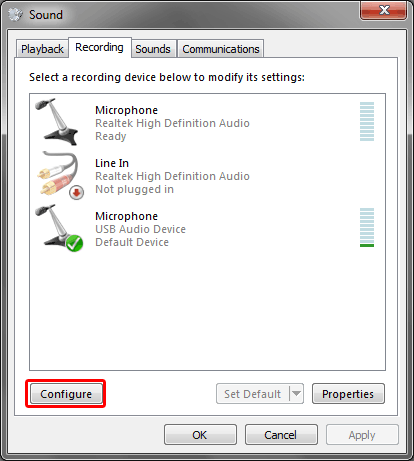
Figure 4: Microphone set as default - You can configure the microphone by clicking the Configure button (highlighted in red within Figure 4, above). The configuration options will differ from microphone to microphone.
- After making the changes click the OK button to apply changes.
Back
Windows Vista
Follow these steps to explore and set a recording audio device in Windows Vista:
- Click on the Start button. Within the resultant Start menu, select the Control Panel option, as shown in Figure 5.
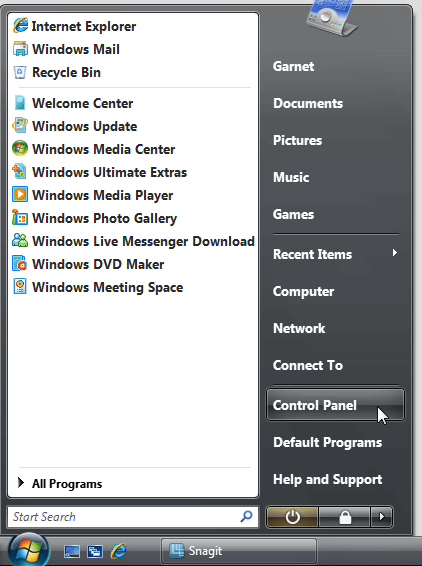
Figure 5: Control Panel option in Windows Vista - Alternatively, bring up the Run dialog box, and type in "control " without the quotes. Then press the Enter key.
- This opens the Control Panel window, as shown in Figure 6 below. Note that what you see here is Control Panel's Category view. Click on the Classic View option highlighted in red within Figure 6.
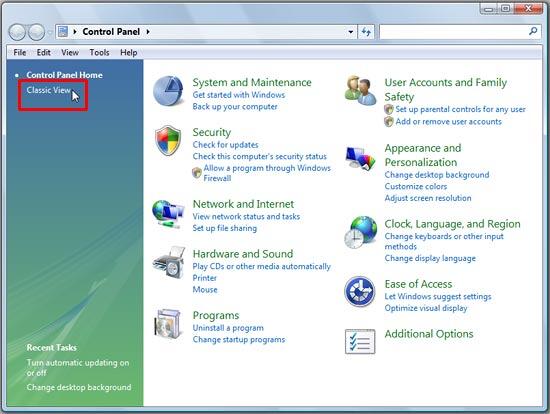
Figure 6: Control Panel's Category view in Windows Vista - If you already are in Classic View, skip this step and proceed further.
- Now within the Classic View window, double-click the Sound icon, as shown highlighted in red within Figure 7.
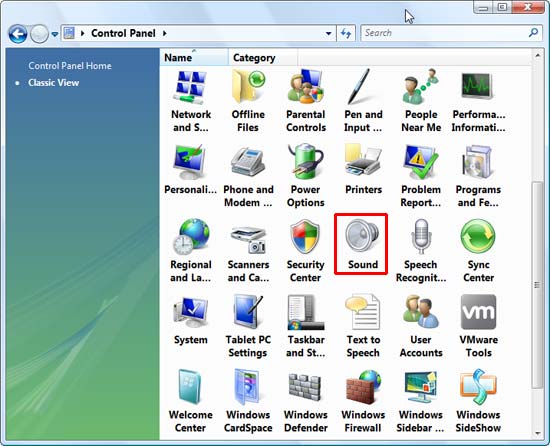
Figure 7: Sound icon - This opens the Sound dialog box, as shown in Figure 8. Within the Sound dialog box, select the Recording tab, as shown highlighted in red within Figure 8. Here you can see connected recording devices. Make sure your connected microphone is listed. If not, access the support options available for your microphone, such as the support section of the microphone manufacturer's website.
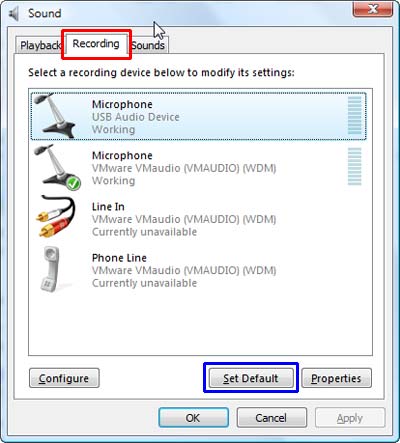
Figure 8: List of attached recording devices in Windows Vista - If your microphone is indeed connected, but not selected, then you can select it so that PowerPoint uses this microphone for recording. If you always want the same microphone to be used for recording, select the microphone and click the Set Default button as shown highlighted in blue within Figure 8, above.
- This will set the selected microphone as default. This default is indicated by a green tick mark, as shown in Figure 9.
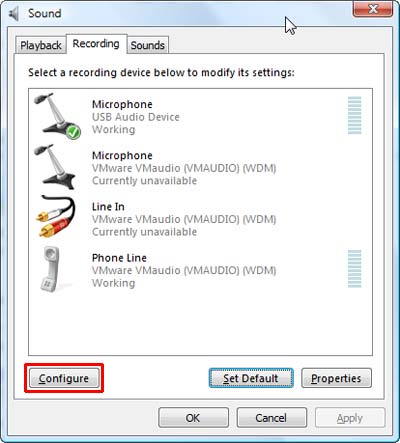
Figure 9: Microphone set as default - You can configure the microphone by clicking the Configure button (highlighted in red within Figure 9, above). The configuration options will differ from microphone to microphone.
- After making the changes click the OK button to apply changes.
Back
Windows XP
Follow these steps to explore and set a recording audio device in Windows XP:
- Click on the Start button. Within the resultant Start menu, select the Control Panel option, as shown in Figure 10.
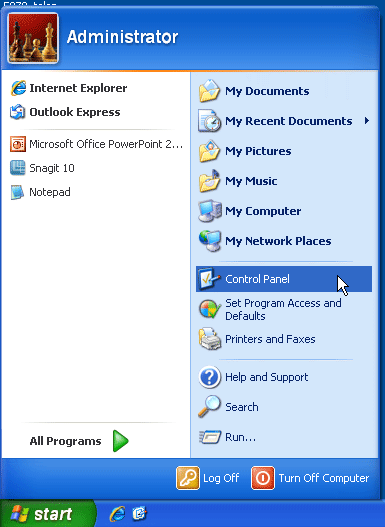
Figure 10: Control Panel option in Windows XP - Alternatively, bring up the Run dialog box, and type in "control" without the quotes. Then press the Enter key.
- This opens the Control Panel window, as shown in Figure 11 below. Note that what you see here is Control Panel's Category view. Click on the Switch to Classic View option highlighted in red within Figure 11.
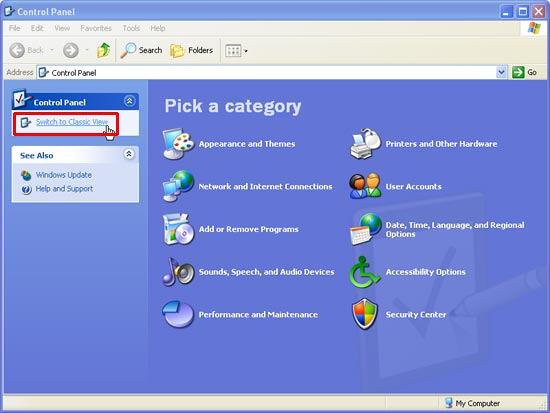
Figure 11: Control Panel's Category view in Windows XP - If you already are in Classic View, skip this step and proceed further.
- Now within the Classic View window, double-click the Sounds and Audio Devices icon, as shown highlighted in red within Figure 12.
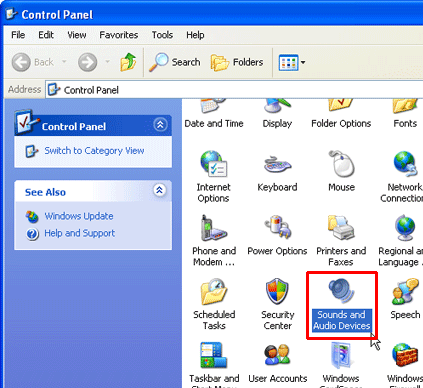
Figure 12: Sounds and Audio Devices icon - Doing so opens the Sounds and Audio Devices Properties dialog box, as shown in Figure 13. Select the Audio tab (highlighted in red within Figure 13). Within the Audio tab, locate the Sound recording section (highlighted in blue within Figure 13). In this section, click the down-arrow (shown highlighted in green within Figure 13) to open the list of connected recording devices.
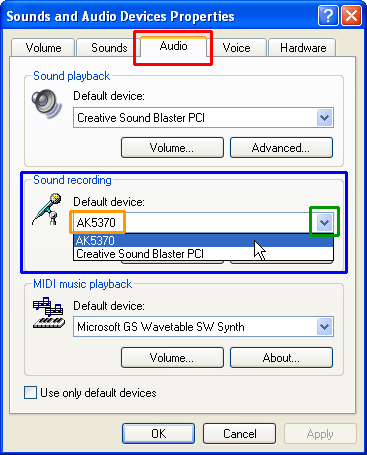
Figure 13: Select microphone to set as default device in Windows XP - Make sure your connected microphone is listed. If your microphone is indeed connected, but not selected, then click its name so that PowerPoint uses this microphone for recording. In Figure 13, above you can see that the microphone 'AK5370' is selected (shown highlighted in orange within Figure 13).
- After making the settings, click the OK button to save the changes.
Back


