Indezine Logo


Setting Proofing Language for Text in PowerPoint 365 for Windows

Learn how to set proofing language for selected text containers in PowerPoint 365 for Windows. Setting languages separately for text containers can be helpful if the same presentation has content in multiple languages.


Author:

Product/Version: PowerPoint 365 for Windows

OS: Microsoft Windows 10 and higher


Learn PowerPoint

Presentation Management 13: Better Storytelling


Do you have a presentation that contains text that needs to be spell-checked in more than one language? Or do you and your client or colleague work with different localized versions of Microsoft PowerPoint? It may be that you use English (US) and color is a perfectly valid spelling, but someone else in another part of the world uses English (UK) and their spell checker suggests that the word color be changed to colour. Or if they use the French version of PowerPoint, then both spellings of color/colour would be flagged as incorrect. They use the term couleur. You first need to have proofing tools installed for all or any of the languages that you need to work within PowerPoint.

Next, follow these steps to set proofing language of selected text in PowerPoint 365 for Windows:
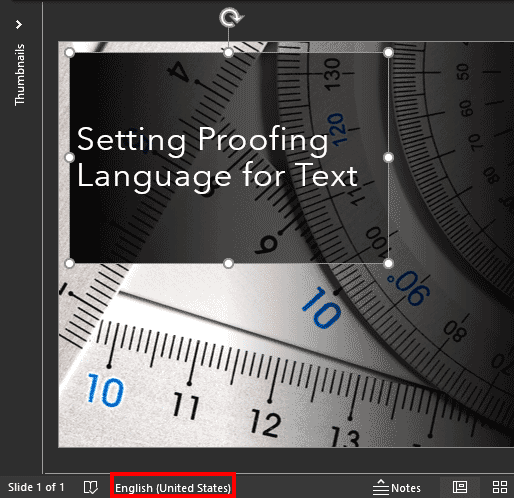
  1. Select the text container you want to alter the proofing language for, as shown in Figure 1, below.
  2. Text container selected in PowerPoint 365 for Windows
    Figure 1: Text container selected
  3. What's a Text Container?

  4. A text container is any of these three slide objects that can include text: text placeholders, text boxes, and shapes.
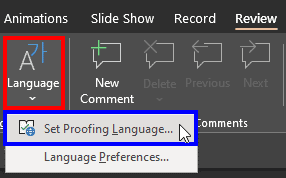
  5. Access the Review tab of the Ribbon, and click the Language button, as shown highlighted in red within Figure 2, below. Doing so brings up a small drop-down menu. Choose the Set Proofing Language option, as shown highlighted in blue within Figure 2.
  6. Set proofing language in PowerPoint 365
    Figure 2: Set proofing language
  7. Alternatively, click the Language option on the Status Bar, as shown highlighted in red within Figure 1, previously on this page.
  8. No Language Option on the Status Bar?

  9. Cannot see the Language option on the Status Bar. See our Language Options on the Status Bar in PowerPoint 365 for Windows tutorial.
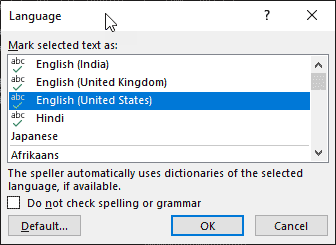
  10. Either way, you bring up the Language dialog box, as shown in Figure 3, below.
  11. Language dialog in PowerPoint 365 for Windows
    Figure 3: Language dialog in PowerPoint
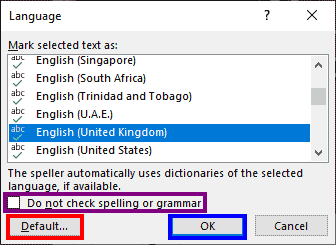
  12. Scroll down to select an installed Editing Language. Installed languages can be recognized by the check-mark icon preceding them, as shown in Figure 4, below. Choose the language you want to use for your selected text container. Thereafterm click the OK button, as shown highlighted in blue within Figure 4.
  13. PowerPoint’s Language dialog box in PowerPoint 365 for Windows
    Figure 4: PowerPoint’s Language dialog box
  14. There are more options within this dialog box, explained below:
  15. Do not check spelling or grammar

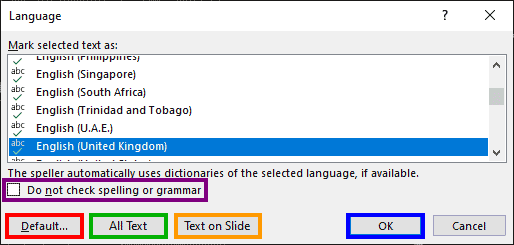
  16. You may want to select this check-box, as shown highlighted in purple within Figure 4, to disable checking of spelling or grammar for text containers. This is a significant setting if these text containers contain specialized words that PowerPoint may mark as misspelled with red squiggly lines, or with poor grammar, marked with blue squiggly lines.
  17. Default

  18. Clicking this button, as shown highlighted in red within Figure 4, brings up the message window, as shown in Figure 5, below. It asks you if you want to change the default language within PowerPoint for this and future presentations to the language you selected. You must have a compelling reason to make this change by clicking the Yes button, as shown highlighted in blue within Figure 5. For most other scenarios, you will press the Cancel button, as shown highlighted in red within Figure 5, to make no changes.
  19. Do you want to change the default language in PowerPoint 365?
    Figure 5: Change the default language
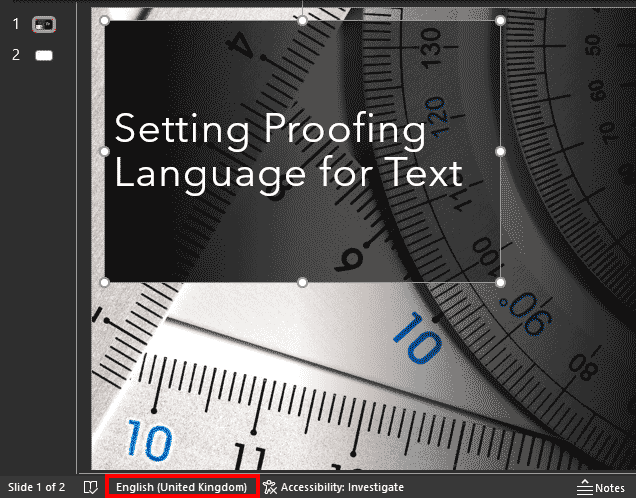
  20. You will see that the Language option on the Status Bar has now changed, as shown highlighted in red within Figure 6, below. Compare with Figure 1, shown previously on this page.
  21. Proofing language changed in PowerPoint 365
    Figure 6: Language option changed on the Status Bar
  22. Similarly, change the language for any other text containers within your presentations. Save your presentations often.

Now when you spell check your slides, the text in the containers will be proofed for the language set for proofing.

Language Dialog Box with think-cell

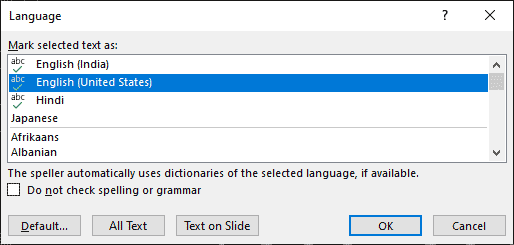
If you have think-cell installed, your Language dialog box will look different with some extra options, as shown in Figure 7, below.
Language dialog box in PowerPoint 365
Figure 7: Language dialog box

These extra options are All Text and Text on Slide, and these are highlighted in Figure 8, below. The remaining highlighted options have been already explained previously on this page.
Check mark denotes the installed language in PowerPoint 365
Figure 8: Check mark denotes the installed language

All Text

Click this button, as shown highlighted in green within Figure 8, above, to change the proofing language for all text in your presentation.

Text on Slide

Click this button, as shown highlighted in orange within Figure 8, above, to change the proofing language for all text in your active slide.


See Also:

05 08 19 - Spelling, AutoCorrect, and Reference Tools: Setting Proofing Language for Text in PowerPoint (Glossary Page)

Setting Proofing Language for Text in PowerPoint 2013 for Windows
Setting Proofing Language for Text in PowerPoint 2011 for Mac
Setting Proofing Language for Text in PowerPoint 2010 for Windows

You May Also Like: Morph in PowerPoint: Conversation with Lauren Janas | United Kingdom Flags and Maps PowerPoint Templates


Popular Posts

Paste in Place in PowerPoint
How can you place a copied or duplicated slide object right on top of the original object in PowerPoint?

Formatting Arrows (Arrowheads) in PowerPoint 2013 for Windows
Learn how to format arrowheads for lines in PowerPoint 2013 for Windows.

Changing Location of Slide Numbers in PowerPoint 2010
Learn how to change location of slide numbers in PowerPoint 2010.

Text Alignment within Table Cells in PowerPoint 2013 for Windows
Learn about the options for text alignment within Table cells in PowerPoint 2013 for Windows.


Organic Shapes with Brush Edges

You get 8 shape types plus lines as part of this Organic Shapes collection. Each of these 8 shape types have 10 variants. So you end up with 80 hand-drawn shape options! Again each of these 80 shapes have 12 brush stroke styles! Plus you get the lines and arrows in 12 brush stroke styles too. Combine all variations to end up with more than 3000 possibilities.

Buy and Download for $99+ (83 MB)


Microsoft and the Office logo are trademarks or registered trademarks of Microsoft Corporation in the United States and/or other countries.

Home | PowerPoint | Photoshop | PowerPoint Templates | PowerPoint Tutorials | Blog | Notes | Ezine | Media Kit | Feedback | Site Map | About Us | Contact Us

Link to Us | Privacy | Testimonials

PowerPoint Backgrounds | Christian PowerPoint Backgrounds | Business PowerPoint Presentation Templates

Plagiarism will be detected by Copyscape

©2000-2023, . All rights reserved.