When your text paragraphs comprise multiple bulleted levels, you can just use the defaults that PowerPoint provides. This
takes care of all paragraph indentation issues. However, to have more control you have to use your own indentation values. This
option makes your text look consistent and clear, as per your needs.
Indent Markers visible on the
Ruler are probably the easiest way to achieve such
structured results. However, this method does not let you precisely position the indentation since you just drag and pull the
Indent Markers rather than setting them up via an exact numerical value. Fortunately, you can also set indentation using set
numerical values. For this you need to access the Paragraph dialog box.
Before we proceed, let's refresh our knowledge about the three Indent Markers available in PowerPoint to manipulate text:
First Line Indent Marker
determines the beginning position of the bullet character (or the number in a numbered list).
Hanging Indent Marker
adjusts the spacing between the bullet character (or number) and the subsequent, following paragraph.
Left Indent Marker
essentially links the First and Hanging Indent Markers that we have already explained in the preceding paragraphs.
Do note that the Paragraph dialog box only lets you manipulate the First Line and Hanging indent. You may
think that you cannot control the Left indent but that's also possible although the term Before text is used in
this dialog box to signify what essentially is the Left Indent setting.
Follow this process to explore how you can set text indentation using numerical values numerical values in
PowerPoint 2013:
- Select the text level for which you want to change the indentation.
-
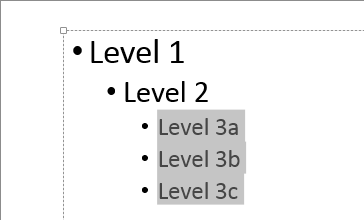
Figure 1: Bulleted paragraphs selected
- Summon the Paragraph dialog box following any of the two ways explained below:
- i. Right-click the selected text. From the context menu, select the Paragraph
option, as shown in Figure 2.
-
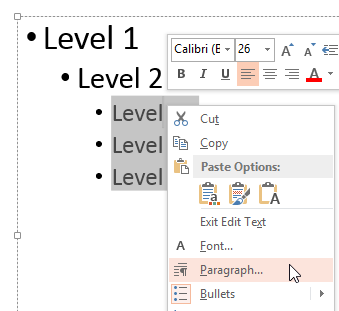
Figure 2: Paragraph option selected within the context menu
- ii. Alternatively, click the Paragraph dialog launcher within Home
tab of the Ribbon as shown highlighted in
red within Figure 3.
-

Figure 3: Paragraph dialog launcher within Home tab
- Either way, you will summon the Paragraph dialog box as shown in Figure 4. Also,
make a note of all the default Indentation values (highlighted in red within
Figure 4).
-
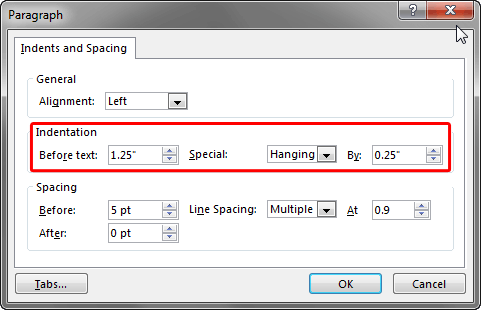
Figure 4: Indentation options within Paragraph dialog box
- There are essentially 3 Indentation values:
- i. Before text,
- ii. Hanging (By), and
- iii. First line (By)
- Let us explore the effect of changing each of these values on the selected text. Start with the
Before text option. Enter the required value within the box next to Before text and click the
OK button. In Figure 5, you can see that we have changed the Before text value
to 3.25 (highlighted in red). Figure 5 also shows the change in the position of the
selected text.
-
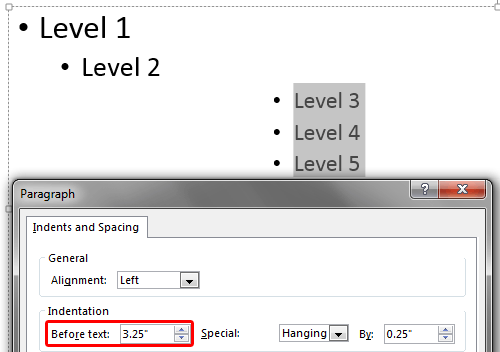
Figure 5: Before text value changed
Note: Unfortunately, PowerPoint 2013 does not show the
Live Preview of any changes you make to the
Indentation values within the
Paragraph dialog box. You can see the actual result on the
selected text only after you click the
OK button.
Figure 5 above shows both the changed value,
and the result on the selected text just because we wanted you to see the changed value and its effect on the selected text
together. It's not the live preview.
- Figure 6 below shows the change in the position of the selected text when we changed the
By value to 1.25, with the First line option selected (highlighted in
red), keeping the Before text value at default.
-
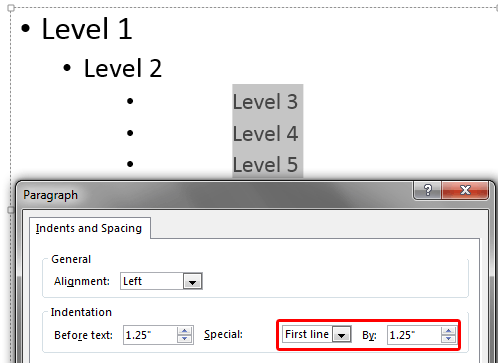
Figure 6: By value changed with First Line option selected
- Now, look at Figure 7, where we changed the By value to 1.25, with the
Hangingoption selected (highlighted in red), keeping the
Before text value at default.
-
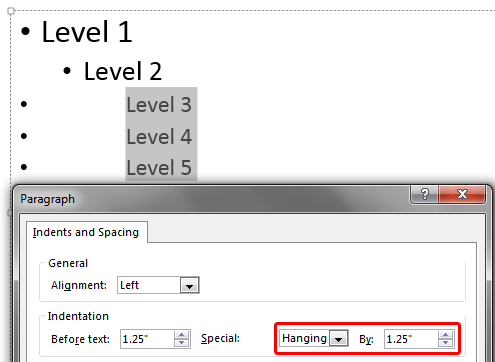
Figure 7: By value changed with Hanging option selected
- Once the Indentation values are set as required, click the OK button within the
Paragraph dialog box to apply the changes and get back to your slide. For most practical purposes, it does not
matter if you choose the Hanging or the First line indents if you only want to alter the
Before text values. Both nearly get the same results. The main differences stem when the value of
By option is changed. We changed this value to 1.25 while using both the First line and
Hanging indents. While the former retained the bullet characters at almost the same position while altering the
position of the text paragraphs (see Figure 6 above), the latter retained the position of the text paragraphs and
altered the position of the bullet characters (see Figure 7 above).
- Having said so, we still believe that changing indents using the Ruler is a far more
intuitive way of setting indents unless you want to match indents from some existing text.
Note: Instead of changing position of bullet paragraphs on each and every slide in the presentation, you can
access the
Slide Master view and make changes
there. This way you will be making changes just once and every slide will be effected.


