Indezine Logo


Set as Default Text Box in PowerPoint 2013 for Windows

Learn how to set a formatted text box as your default text box in PowerPoint 2013 for Windows. Thereafter, any new text box you add inherits the same formatting.


Author:

Product/Version: PowerPoint 2013 for Windows

OS: Microsoft Windows 7 and higher


Learn PowerPoint

Learn how to show formatting in the Notes Pane in PowerPoint.


Imagine this scenario: you place a text box on your slide. Then you change the color of the font, reduce or increase the font size, set autofit options, tweak the margins, etc. At this point in time, you are happy with your settings. Then you add another text box in the next slide, and you realize that this new text box needs to look the same as the text box you created earlier! No, you do not have to change all settings again. There are two ways of making the new text box possess the same settings as the older one:

Firstly, you can use the Format Painter option to copy attributes from the original text box to the new text box. This option works great as long as you only need to insert one or two more text boxes since it does involve repeated clicks. Look at our Format Painter tutorial to learn more. This tutorial uses shapes as an example, but the same technique works with text boxes as well.

Even better, you change the defaults within the active presentation so that any new text box you insert has the format abilities you want; that's exactly what you will learn in this tutorial.
  1. Insert a text box on a slide and make all formatting changes as required in PowerPoint 2013 for Windows. Alternatively navigate to a slide that contains a text box that has the formatting attributes you want to set as default. You might want to make changes to your text box by altering some attributes as explained in these tutorials. Of course, this is purely optional:
  2. Text Layout Options
  3. Text Box Autofit Options
  4. Internal Margin Options
  5. Columns within Text Boxes
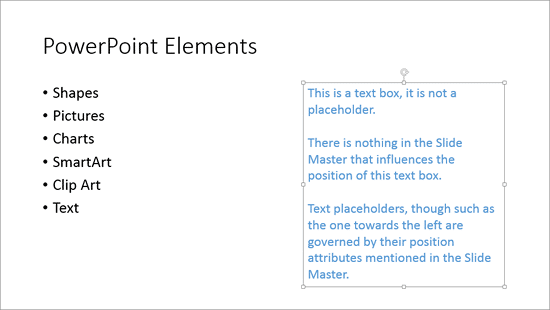
  6. Click on the edge of this text box so that it shows a solid line with selection handles on its perimeter (see Figure 1).
  7. Text box selected
    Figure 1: Text box selected
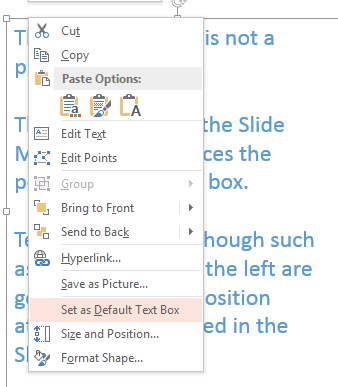
  8. Now, carefully right-click on the solid line to bring up the the context menu shown in Figure 2. From this menu, select the Set as Default Text Box option, refer to Figure 2 again.
  9. Set as Default Text Box option
    Figure 2: Set as Default Text Box option
  10. Tip: Cannot find the Set as Default Text Box option? Make sure you did not select some text in the box before you right-clicked. You must select the edge of the text box so that the entire text box is selected without selecting any individual text. If you still do not get the Set as Default Text Box option in the right-click menu, then you may have selected a text placeholder rather than a text box. Read our Text Boxes vs. Text Placeholders tutorial to understand how they are different.
  11. This will set the selected text box as default text box. From now onwards, all new text boxes that you insert within this particular presentation will possess the format attributes of the text box that you just set as default.
Tip: If you want to set a default text box for all new presentations, you will have to make these changes within your default template (POTX) or Theme (THMX) file. Learn more within our Themes, Templates, Masters, and Layouts section.

See Also:

Set as Default Text Box in PowerPoint 2013 for Windows
Set as Default Text Box in PowerPoint 2011 for Mac

You May Also Like: iSpring Converter’s PowerPoint to HTML5 Conversion: Conversation with Yury Uskov | X- Ray PowerPoint Templates


Popular Posts

Applying Slide Masters to Individual Slides in PowerPoint 2010
Learn how to apply Slide Masters to individual slides in PowerPoint 2010.

Copy and Remove Highlighting for Text in PowerPoint 2013
Learn how to copy and remove highlighting for text in PowerPoint 2013.

Add Headers and Footers to Slides in PowerPoint 2016 for Windows
Learn how to add Headers and Footers to slides in PowerPoint 2016 for Windows.

Text Box Autofit Options in PowerPoint 2016 for Windows
Learn about Text Box autofit options in PowerPoint 2016.


Gears for PowerPoint (Series 01)

All these gears are native PowerPoint shapes. You can recolor them, add effects, and do more, all inside PowerPoint. Results which would have taken hours to achieve now take less than a minute! Have fun using the gear graphics, and make your audience take notice! All these gears can be rotated and resized, as required. Since they are essentially pictures, all types of edits that you can do with pictures work with them too!

Get this complete kit now, you’ll save so much time that you can use doing something else!


Microsoft and the Office logo are trademarks or registered trademarks of Microsoft Corporation in the United States and/or other countries.

Home | PowerPoint | Photoshop | PowerPoint Templates | PowerPoint Tutorials | Blog | Notes | Ezine | Media Kit | Feedback | Site Map | About Us | Contact Us

Link to Us | Privacy | Testimonials

PowerPoint Backgrounds | Christian PowerPoint Backgrounds | Business PowerPoint Presentation Templates

Plagiarism will be detected by Copyscape

©2000-2023, . All rights reserved.