Indezine Logo


Select, Deselect, View, and Hide Shapes Using the Selection Pane in PowerPoint 2016 for Mac

Learn how to select, deselect, view, and hide shapes using the Selection pane in PowerPoint 2016 for Mac. The Selection Pane can also be used to deselect, view, and hide shapes and other slide objects.


Author:

Product/Version: PowerPoint 2016 for Mac

OS: Mac OS X


Learn PowerPoint

Learn how you can use presets in Shape Styles in PowerPoint and Microsoft Office.


To format any slide object in PowerPoint, you must select it. There are a couple of ways to select any slide object, as explained in our Select and Deselect Shapes in PowerPoint 2016 for Mac tutorial. Other than the obvious way of clicking the slide object to select, you can also use the Selection Pane. The Selection pane makes it easy to select slide objects that are difficult to locate, such as overlapping slide objects or objects placed behind a larger object in busy, populated slides.

Follow these steps to select shapes and other slide objects using the Selection Pane in PowerPoint 2016 for Mac:
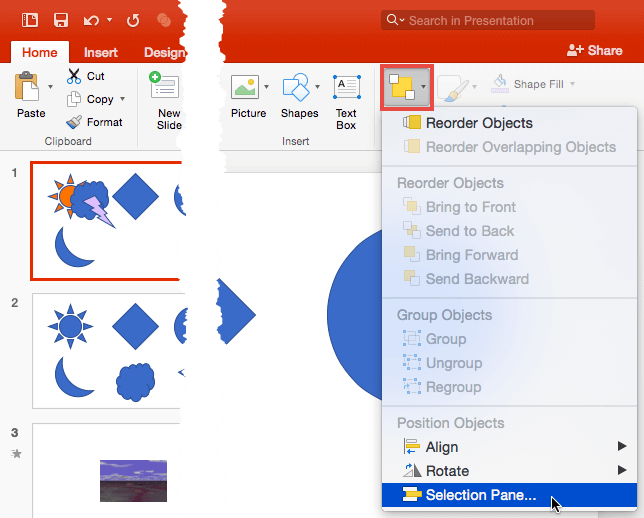
  1. Select the Home tab of the Ribbon, and within the Drawing group click the Arrange button as shown highlighted in red within Figure 1, below, to bring up the Arrange drop-down menu. From this drop-down menu, choose the Selection Pane option, that, as shown in Figure 1.
  2. Selection Pane option
    Figure 1: Selection Pane option
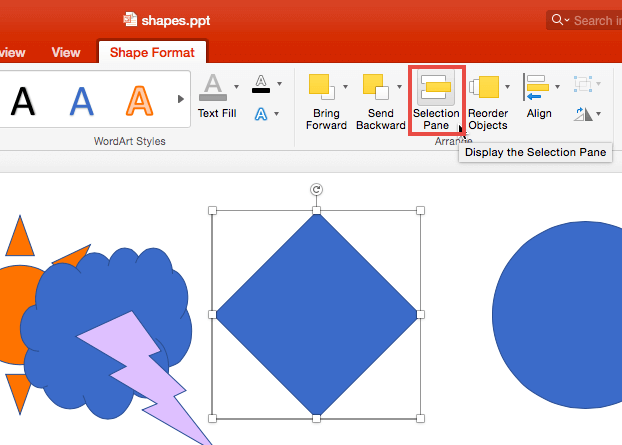
  3. Alternatively, select any object on the slide such as a shape, a picture, or a video, and click the resultant Format contextual tab in the Ribbon. This tab can be Shape Format, Picture Format, or Video Format etc., based on your selection. Within the Format contextual tab, click the Selection Pane button, as shown highlighted in red within Figure 2, below.
  4. Selection Pane option
    Figure 2: Selection Pane option
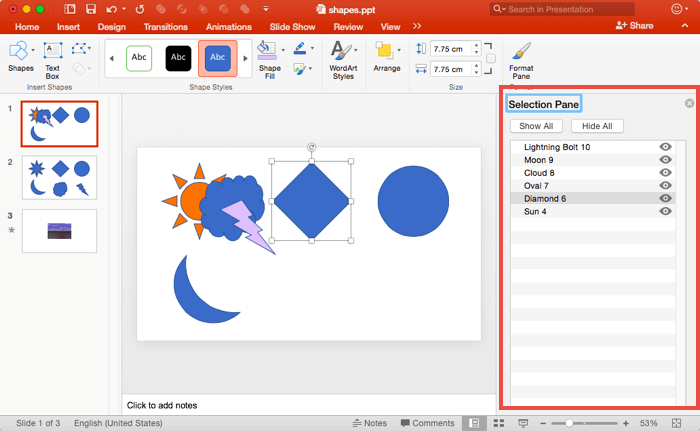
  5. Either way, you summon Selection Pane, as shown highlighted in red within Figure 3, below.
  6. Selection Pane
    Figure 3: Selection Pane
  7. The Selection Pane lists every single object on the active slide including shapes, WordArt, sound, movies, and more. If any particular object on the slide doesn't show up in the Selection Pane, that object must be part of either the Slide Master or the slide background.
  8. Follow these guidelines to use the Selection Pane:
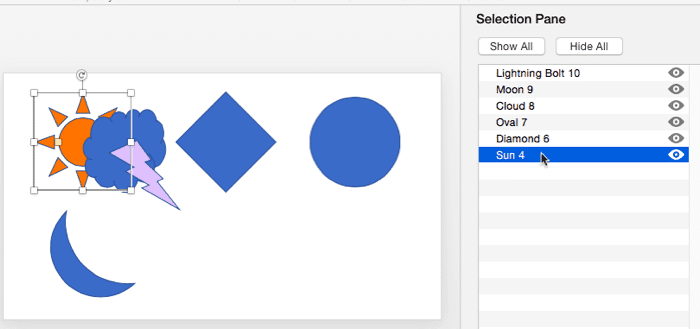
  9. Click the shape in the Selection Pane to select it on the slide. Figure 4, below, shows the Sun 4 shape selected in the Selection Pane as well as on the slide.
  10. Shape selected in Pane and on the slide
    Figure 4: Shape selected in Pane and on the slide
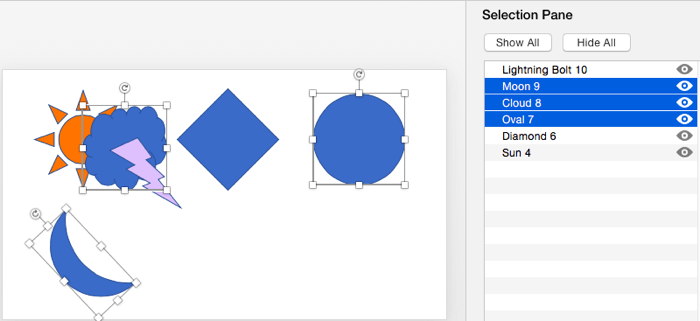
  11. + click to select more shapes in the Pane (and on the slide). See Figure 5, below, with three shapes selected in the Pane and on the slide.
  12. Two shapes selected in Pane and on the slide
    Figure 5: Two shapes selected in Pane and on the slide
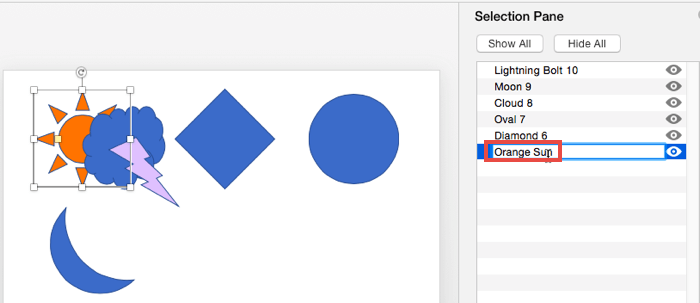
  13. Click any shape twice (not quickly) in the Pane. This enables you to rename the shape. Just type the new name, as shown highlighted in red within Figure 6, below.
  14. Rename shape(s)
    Figure 6: Rename shape(s)
  15. Reorder any selected shape(s) in the Pane by dragging them to the new position within the Selection Pane. In Figure 7, below, you can see the Cloud shape being dragged to the position below the Sun shape.
  16. Reorder shape(s)
    Figure 7: Reorder shape(s)
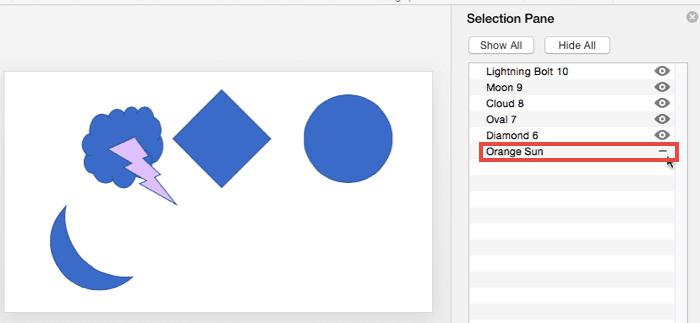
  17. Click the eye icon next to a shape(s) listing on the Pane to make it invisible, as shown highlighted in red within Figure 8, below. Click it again to toggle the visibility.
  18. Hide/show the shape in the Pane
    Figure 8: Hide/show the shape in the Pane
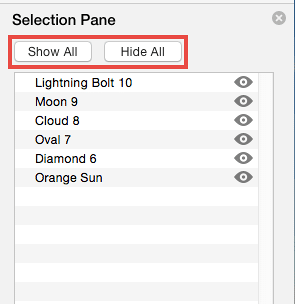
  19. Click the Show All/Hide All buttons located at the top-left of the list within the Selection Pane, as shown highlighted in red within Figure 9, below, to show/hide all the shapes on a slide.
  20. Show All/Hide All buttons
    Figure 9: Show All/Hide All buttons

See Also:

06 03 02 - Selecting Shapes: Select, Deselect, View, and Hide Shapes Using the Selection Pane in PowerPoint (Glossary Page)

Select, Deselect, View, and Hide Shapes Using the Selection Pane in PowerPoint 2016 for Windows
Select, Deselect, View, and Hide Shapes Using the Selection Pane in PowerPoint 2013 for Windows
Select, Deselect, View, and Hide Shapes Using the Selection Pane in PowerPoint 2010 for Windows

You May Also Like: Articulate Storyline 2: Conversation with Tom Kuhlmann | Vacation PowerPoint Templates


Popular Posts

10 Tips for Pecha Kucha
Read 10 amazing Pecha Kucha tips that will help you create and deliver a better Pecha Kucha presentation.

Creating Slide Backgrounds in Photoshop for PowerPoint
Learn how to create slide backgrounds for PowerPoint in Photoshop.

Formatting Arrows (Arrowheads) in PowerPoint 2016 for Windows
Learn how to format arrowheads for lines in PowerPoint 2016 for Windows.

Creating Semi-Circles in PowerPoint 2013
Learn how to create a semi-circle in PowerPoint 2013.


Pictures in Presentations

Is a picture is worth a thousand words? You probably have heard this adage so often that we decided not to repeat this phrase throughout this book! Now here’s some more info: the human brain uses a larger part of its area to store visual information rather than textual content. And that’s possibly because a picture describes so much more than text.

Go and get a copy of our Pictures in Presentations ebook.


Microsoft and the Office logo are trademarks or registered trademarks of Microsoft Corporation in the United States and/or other countries.

Home | PowerPoint | Photoshop | PowerPoint Templates | PowerPoint Tutorials | Blog | Notes | Ezine | Media Kit | Feedback | Site Map | About Us | Contact Us

Link to Us | Privacy | Testimonials

PowerPoint Backgrounds | Christian PowerPoint Backgrounds | Business PowerPoint Presentation Templates

Plagiarism will be detected by Copyscape

©2000-2023, . All rights reserved.