While working with tables in PowerPoint, you will always need to select some particular part of the table to work upon. For example, you may have to select an individual table cell, or even separate rows and columns while performing various tasks such as populating tables with content, or adding and removing table rows or columns, or even merging and splitting table cells. Sometimes you will also need to select contiguous cells in both rows and columns, or even the entire table itself.
Follow these guidelines to learn how to select the entire table, an individual row, a column, a cell, or even contiguous cells in PowerPoint 2013 for Windows:
Select the Entire Table
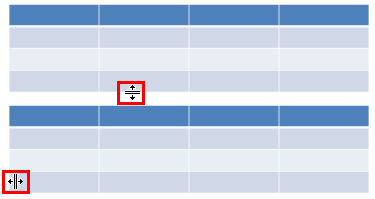
- To select the entire table on your slide, hover your cursor on the table and you'll see the cursor changing to a bidirectional arrow (either horizontal or vertical), as you can see on the two tables shown in Figure 1 (highlighted in red). Click when this bidirectional arrow appears.

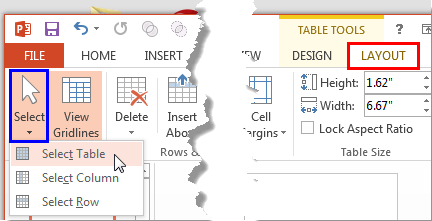
Figure 1: Cursor changed to a bidirectional arrow - Alternatively, click on any of the table cells and access the Table Tools Layout contextual tab of the Ribbon (highlighted in red within Figure 2). Click the Select button (highlighted in blue within Figure 2). This opens a drop-down menu. In this drop-down menu, click on the Select Table option as shown in Figure 2.

Figure 2: Select Table option to be selected- Both of these options result in your entire table being selected.
Select the Table Row
- To select a table row, hover your cursor on the Slide Area near the table towards either left or right of the table row to be selected. The cursor will change into an arrow pointing the row, as shown highlighted in red within Figure 3. Click when this arrow appears.

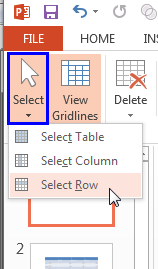
Figure 3: Cursor changed to an arrow pointing the row - Alternatively, click within any of the cells in the table row to be selected and access the Table Tools Layout contextual tab of the Ribbon (highlighted in red within Figure 2, earlier on this page). Click the Select button (highlighted in blue within Figure 4). Doing so opens a drop-down menu. In this drop-down menu, click on the Select Row option as shown in Figure 4.

Figure 4: Select Row option to be selected - Any of these actions will select the row entirely, as shown in Figure 5.

Figure 5: Table Row selected
Select the Table Column
- To select a table column, hover your cursor on the slide area near the table towards either top or bottom of the table column to be selected. The cursor will change to an arrow pointing the column, as shown highlighted in red within Figure 6. Click at this point.

Figure 6: Cursor changed to an arrow pointing the column - Alternatively, click within any of the cells in the table column to be selected and access the Table Tools Layout contextual tab of the
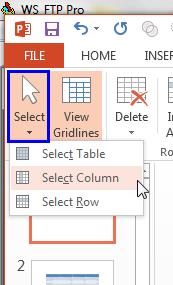
Ribbon (highlighted in red within Figure 2, earlier on this page). Click the Select button (highlighted in blue within Figure 7). Doing so opens a drop-down menu. In this drop-down menu, click on the Select Column option as shown in Figure 7.

Figure 7: Select Column option to be selected - Any of these actions will select the required column entirely, as shown in Figure 8.

Figure 8: Table Column selected
Select a Cell or Contiguous Cells
- To select a particular table cell, just click within it.
- To select contiguous cells, select the starting cell. Then hold the Shift key and then press the Up, Down, Left, and Right arrow keys to extend your selection.


