Indezine Logo


Screen Recording in PowerPoint 2016 for Windows

Learn about the screen recording option in PowerPoint 2016 for Windows. This recording is not limited to PowerPoint slides alone.


Author:

Product/Version: PowerPoint 2016 for Windows

OS: Microsoft Windows 7 and higher


Learn PowerPoint

Yes, there is a method. Change Case Cycles: How They Work?


Have you worked with the Screenshot option in previous versions such as PowerPoint 2010 and PowerPoint 2013? This option allowed you to add a screenshot from within PowerPoint. PowerPoint 2016 for Windows goes a step further with the new Screen Recording option that lets you similarly record a video clip of your onscreen activity, again from within the program.

A New Feature?

Although Screen Recording is a new feature, you can also find it in PowerPoint 2013, provided you have installed all the recent updates! Learn more in our Screen Recording in PowerPoint 2013 for Windows tutorial.

Follow the steps to learn about the screen recording option in PowerPoint 2016 for Windows:
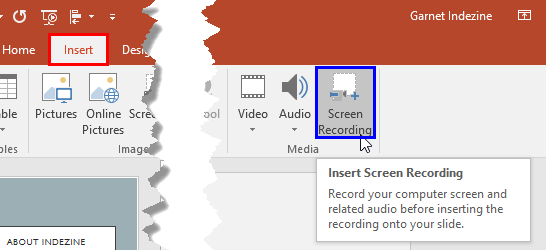
  1. Open a new presentation in PowerPoint or open a presentation where you want to add the screen recording go to the slide where you want to add it. Now, select the Insert tab of the Ribbon, as shown highlighted in red within Figure 1, below, and click the Screen Recording option, as shown highlighted in blue within Figure 1.
  2. Screen Recording option within the Insert tab
    Figure 1: Screen Recording option within the Insert tab
  3. Doing so will minimize PowerPoint and bring up a small toolbar with five options, as shown in Figure 2, below.
  4. Toolbar with options for Screen Recording
    Figure 2: Toolbar with options for Screen Recording
  5. These options are explained below as marked in Figure 2, above.
  6. A. Record

  7. Click this option to start the screen recording.
  8. B. Recording Time

  9. Shows the duration of the screen recording.
  10. C. Select Area

  11. This option is used to mark the area on the screen that you want to record the activities within.
  12. D. Audio

  13. Allows you to turn the audio on or off.
  14. E. Record Pointer

  15. By default, PowerPoint allows you to capture cursor activity. However, you can turn off this option if needed.
  16. Select options as required. Make sure that the program you want to record is active. If not, make it active by clicking its icon within the Status Bar. A little-known fact is that you can even record PowerPoint itself, including slides shown full-screen in Slide Show view. Now, click the Record button.
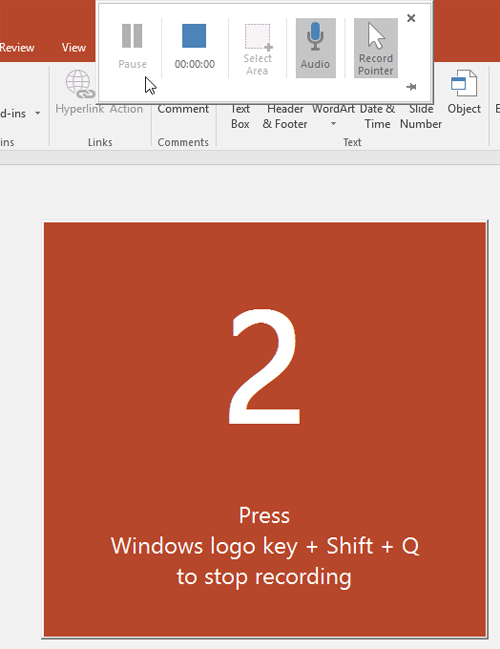
  17. This step will turn the Record button to Pause button, and will also bring up a countdown window with a message that instructs you to press Windows logo key + Shift + Q to stop recording, as shown in Figure 3, below.
  18. Screen Recording countdown message
    Figure 3: Screen Recording countdown message
  19. When the countdown finishes, start the onscreen activity that you want to record.
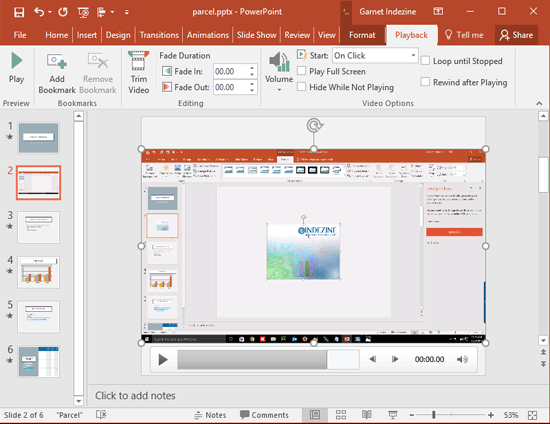
  20. When you are done with what you want to record, use the key-combination Windows + Shift + Q to stop the recording. This action will finish the recording and also insert the recorded video within your active slide in PowerPoint. Play the video to make sure everything is in place, as shown in Figure 4, below.
  21. Screen Recording inserted within the active slide
    Figure 4: Screen Recording inserted within the active slide

You can now apply all video editing options to this inserted video. Also, you can resize it as required.

Export Video on the Slide to a Separate File

Additionally, you can export it as a separate MP4 file. To do so, right-click the inserted video and select the Save Media As option, as shown in Figure 5, below. Within the resultant Save Media As dialog box, provide a name for the exported video and save it in the required folder.
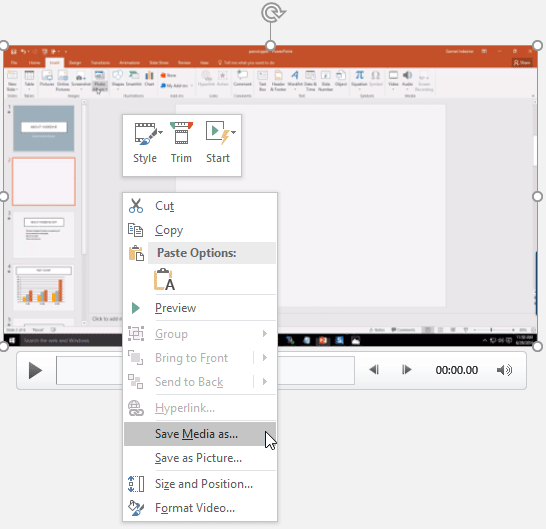
Save Media as option exports the screen recording to MP4 format
Figure 5: Save Media as option exports the screen recording to MP4 format


See Also:

14 06 01 - Screen Recording: Screen Recording in PowerPoint (Glossary Page)

Screen Recording in PowerPoint 2013 for Windows

You May Also Like: think-cell 10: Now works on Office for Mac | Fall / Autumn PowerPoint Templates


Popular Posts

Playing Video Across Slides in PowerPoint 2016 for Windows
Play a video clip across slides in PowerPoint 2016 for Windows.

Set Document Resolution in PowerPoint 2016 for Windows
Learn how to set document resolution in PowerPoint 2016 for Windows.

Creating Anchor Points for Connectors in PowerPoint 2010 for Windows
Learn how to create Anchor Points for connectors in PowerPoint 2010.

Working With Slide Numbers in PowerPoint 2016 for Windows
Learn how to add Slide Numbers on slides and Masters and more tricks on making them work to your will in PowerPoint 2016 for Windows.


Jigsaw Shapes for PowerPoint (Full Slide Jigsaws)

This entire kit contains 5 different styles of jigsaw pieces: typical jigsaws, arrows, hearts, ovals, and rounded squares. Each jigsaw shape is available in three counts: small, medium, and large. We made these available in two slide sizes for both standard (4:3) and widescreen (16:9) resolutions.

You can get this kit for only $9.99.


Microsoft and the Office logo are trademarks or registered trademarks of Microsoft Corporation in the United States and/or other countries.

Home | PowerPoint | Photoshop | PowerPoint Templates | PowerPoint Tutorials | Blog | Notes | Ezine | Media Kit | Feedback | Site Map | About Us | Contact Us

Link to Us | Privacy | Testimonials

PowerPoint Backgrounds | Christian PowerPoint Backgrounds | Business PowerPoint Presentation Templates

Plagiarism will be detected by Copyscape

©2000-2023, . All rights reserved.