We've looked at AutoCorrect and how all options you set are not only available within PowerPoint, but also in other Office programs that use AutoCorrect such as Word, Excel, and Outlook. Over a while, your custom AutoCorrect entries will become a huge asset. You'll be used to typing some characters that will automatically show up as a word or a phrase, and everything would seem awesome until your computer crashes, or if you want to move to a new computer system. Also, you may need to share your AutoCorrect entries with your colleagues, or even back up and save them for a rainy day. It's quite possible to achieve this task, but not without some help from Microsoft Word, as we shall learn in this tutorial.
Difference between Unformatted and Formatted AutoCorrect Entries
There are two types of AutoCorrect entries used by PowerPoint and other Microsoft Office programs. These are unformatted and formatted AutoCorrect entries. You may want to know how they are different?
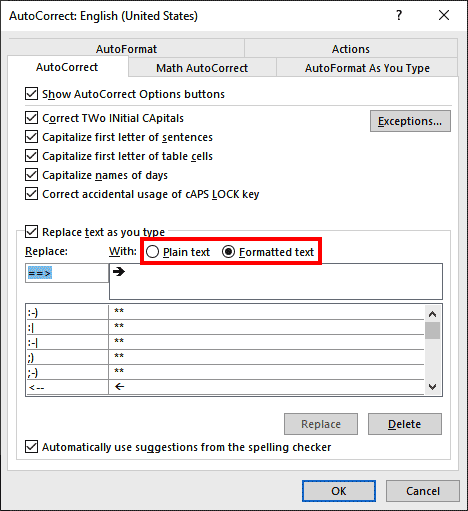
If you've used PowerPoint's AutoCorrect dialog box to create and edit AutoCorrect entries, you've only created unformatted AutoCorrect entries. On the other hand, if you've created or edited these entries in Microsoft Word, you can choose from creating both formatted and unformatted entries, as can be seen highlighted in red within the AutoCorrect dialog box in Microsoft Word, shown in Figure 1, below.

Figure 1: AutoCorrect dialog box in Word 365
While unformatted AutoCorrect entries are just plain text, a formatted AutoCorrect entry includes content including emojis, arrows, or even text that is formatted bold, italic, small caps, superscript, subscript, etc. You can find many of these AutoCorrect entries inside the AutoCorrect dialog box in Word. Strangely, you cannot see them in PowerPoint's AutoCorrect dialog box, but these AutoCorrect entries work very well within PowerPoint slides!
For example, if you type ==> in PowerPoint, this is replaced by the thick arrow symbol from the Wingdings font. This formatted AutoCorrect entry is not listed in PowerPoint's AutoCorrect dialog box, but it does work within PowerPoint.
Follow these steps to save and share your AutoCorrect entries in PowerPoint 365 for Windows:
- Make sure that Word, PowerPoint, Excel, and other Office programs are closed. Many people may have Outlook running all the time to check their emails and calendars. You must ensure that Outlook is also shut down.
- We now need to understand where Word and other Office programs save their common pool of AutoCorrect entries. We already know that these entries are of two types: formatted and unformatted. Both these types are saved in different files in completely distinct locations on your system. We will explore these options for both AutoCorrect entry types.
Unformatted Entries
- If you've never created any AutoCorrect entries outside of PowerPoint, then you can follow these steps only for unformatted entries, and that's the reason why we are exploring this option first. Follow these steps to learn more:
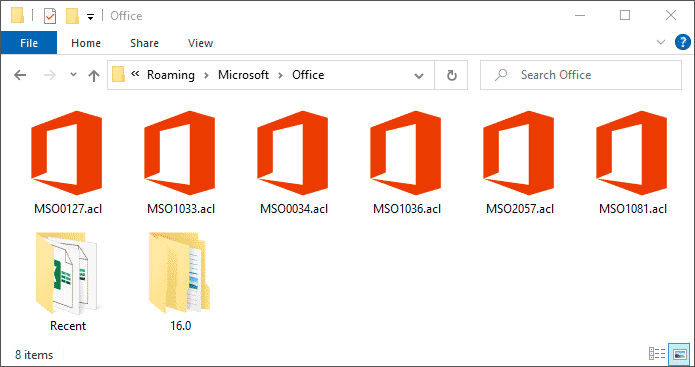
- First, ensure that no Microsoft Office program is running on your computer. Close all instances of Word, PowerPoint, Excel, Outlook, or other Office programs. On your computer, navigate to the C:\Users\˂Username˃\AppData\Roaming\Microsoft\Office folder. Substitute ˂Username˃ with your user name, and you will see a bunch of files with the ACL extension, as shown in Figure 2, below. ACL stands for AutoCorrect list, and these files contain your unformatted AutoCorrect entries.

Figure 2: ACL files in Windows Explorer -
Cannot Find the AppData Folder?
When you try to locate the folder path in the preceding section, you may be unable to locate an
AppData folder in your user folder. That's because it's a hidden folder and you can usually not see it. To view hidden folders, look at our
Show Hidden Files and Folders tutorial.
- As you can see, there are several ACL files shown in Figure 2, above. There may be fewer or more files on your computer. So, the question is, how do you know which ACL file contains your AutoCorrect entries?
- Typically, if you see a file called MSO0127.acl, it contains your Math AutoCorrect entries. More unformatted entries are contained in various other files, and these are named after the language and locale IDs. For example, if your system is set to use US English, you should be looking for a file named MSO1033.acl.
- So, how do we know that MSO1033 stands for US English? That's because the locale ID of US English is 1033. Similarly, the locale ID of UK English is 2057. You'll find a list of all Microsoft Locale IDs on this page.
- Copy the ACL file you need to another folder, an external hard drive, or a cloud location as a backup.
- When you need to copy these files to another computer, you must ideally do so immediately after you install Microsoft Office. Why? That's because it's best to do the copying before you have created any AutoCorrect entries on the destination computer since such copying will overwrite files.
- First, ensure that no Microsoft Office program is running on your computer. Close all instances of Word, PowerPoint, Excel, Outlook, or other Office programs. Next, you’ll need to navigate to the C:\Users\˂Username˃\AppData\Roaming\Microsoft\Office folder. Then, paste or drag these ACL files within this folder.
-
Backup Destination ACL Files
It's a good idea to temporarily backup the existing ACL files on the destination folder before you overwrite them with ACL files from elsewhere. You can also rename them, such as changing the name of MSO1033.acl to MSO1033.acl-bak. Once the ACL files have been copied, ensure that all your AutoCorrect entries are working. You can then delete the backed-up ACL files.
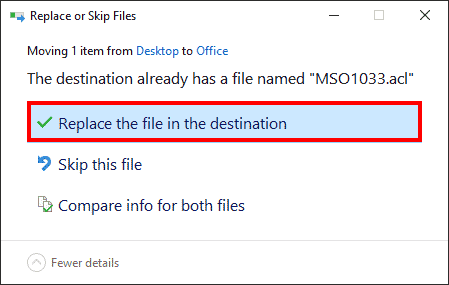
- When prompted if you want to replace existing files, click the Replace the file in the destination option, as shown highlighted in red within Figure 3, below.

Figure 3: Replace your existing file?
- So, this is how you can copy unformatted AutoCorrect entries from one computer to another. It's always a good idea to back up your AutoCorrect entries even if you don't have to copy or share them now. Next, let us explore how you can back up and restore your formatted AutoCorrect entries.
Formatted Entries
- All formatted AutoCorrect entries are saved in Microsoft Word's default template and you will need to save this Word template file by following these steps:
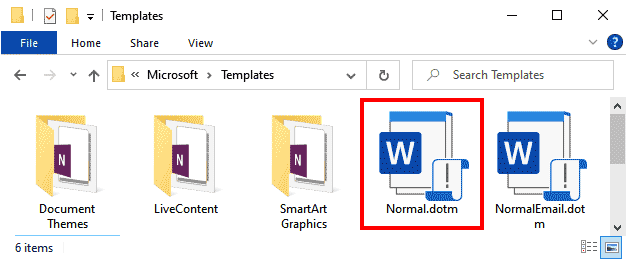
- First, ensure that no Microsoft Office program is running on your computer. Close all instances of Word, PowerPoint, Excel, Outlook, or other Office programs. Next, you’ll need to navigate to the C:\Users\˂Username˃\AppData\Roaming\Microsoft\Templates folder. Substitute ˂Username˃ with your user name, and you will see a file named Normal.dotm, as shown highlighted in red within Figure 4, below. Normal.dotm is the default Word template file.

Figure 4: Locate the Normal.dotm template file - Copy the Normal.dotm file to another folder, an external hard drive, or a cloud location as a backup.
- As with ACL files, you should copy these files to another computer immediately after you install Microsoft Office. Why? That's because it's best to do the copying before you have created any AutoCorrect entries on the destination computer since such copying will overwrite files.
- First, ensure that no Microsoft Office program is running on your computer. Close all instances of Word, PowerPoint, Excel, Outlook, or other Office programs. Next, you’ll need to navigate to the C:\Users\˂Username˃\AppData\Roaming\Microsoft\Templates folder. Then, paste or drag the Normal.dotm file within this folder.
-
Backup Destination Normal.dotm File
It's a good idea to temporarily backup the existing Normal.dotm file on the destination folder before you overwrite them with ACL files from elsewhere. You can also rename them, such as changing the name of Normal.dotm to Normal.dotm-bak. Once the Normal.dotm file have been copied, ensure that all your AutoCorrect entries are working. You can then delete the backed-up Normal.dotm file.
- When prompted if you want to replace existing files, click the Replace the file in the destination option, as shown highlighted in red within Figure 3, shown previously on this page.
- Yes, it can be little troublesome overwriting files to restore AutoCorrect entries. In the next tutorial in this series, we will explore third-party options that let you backup and restore AutoCorrect entries.


