Indezine Logo


Resize, Rotate, and Flip Videos in PowerPoint 2011 for Mac

Learn how you can resize, rotate, and flip video clips in PowerPoint 2011 for Mac. These repositioning options allow you to make your video clips stand apart.


Author:

Product/Version: PowerPoint 2011 for Mac

OS: Mac OS X


Learn PowerPoint

Learn how to register the default version of PowerPoint.


PowerPoint provides you with plenty of options to enhance your movie clip. These options include Correction Adjustments, Recoloring, Movie Styles, Movie Effects, Movie Shapes, and Movie Borders. Although these options will make your movie clips look better and focused, there are some very basic movie editing options that can be even more significant. These include how you can resize, rotate, and flip your inserted movie clips. Resizing can help you change the dimensions of your movie clips, while slight changes in rotation values can draw attention. Flip, the last of these options though is something you will almost never use. Unless you want to do something drastically different!

Whether you want to resize, rotate, or flip. The first few steps remain the same for all of these three options:
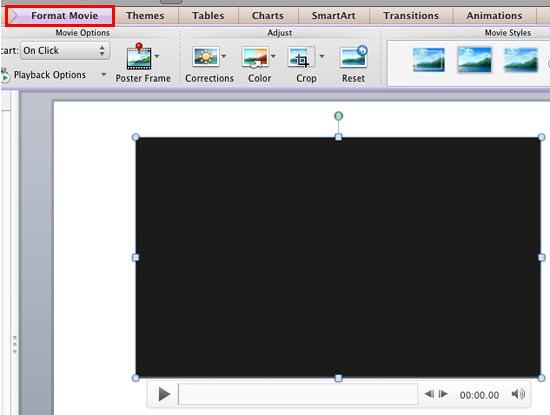
  1. Open your presentation, and navigate to the required slide where you have already inserted a movie clip. Select or double-click the movie clip to bring up the Format Movie tab of the Ribbon, as shown highlighted in red within Figure 1, below.
  2. Format Movie tab of the Ribbon
    Figure 1: Format Movie tab of the Ribbon
  3. Contextual Tab

  4. The Format Movie tab is a Contextual tab. Contextual tabs are special tabs in the Ribbon that are not visible all the time. They only make an appearance when you are working with a particular slide object which can be edited using special options.
  5. When you insert a movie clip in your slide, it may display a black rectangle on the slide, as shown Figure 1, above. If your movie clip does not show a black rectangle, then directly proceed to Resize, Rotate, or Flip sections on this page.
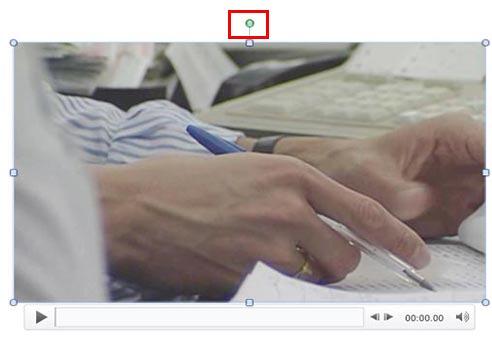
  6. If you see the black rectangle in place of the movie clip, then you will not be able to view the effect of applying resize, rotate, or flip options, unless you play the movie clip. To make sure you see a movie frame, consider adding an optional Poster Frame to your movie clip, so that way you will see a movie frame in the place of black rectangle, as shown in Figure 2, below.
  7. Movie clip with a poster frame added
    Figure 2: Movie clip with a poster frame added
  8. Now, let us learn how to resize, rotate, or flip a movie clip.

Resize

You can resize a selected movie in any of the two ways mentioned below:
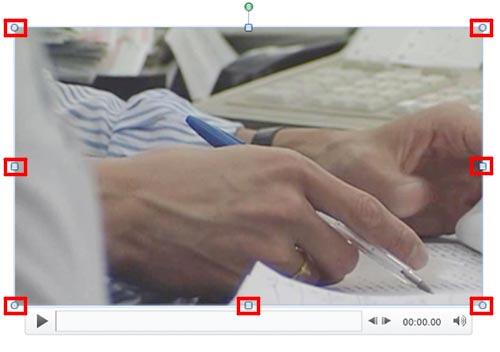
  • Click and drag any of the blueish-white selection handles that appear on the selected movie, as shown highlighted in red within Figure 3, below.
  • Drag selection handles to resize
    Figure 3: Drag selection handles to resize
  • Manipulate the Video Shape

  • If you have set your movie to play within a certain shape like a Teardrop, a Trapezoid, or a Star, then you can also drag the yellow diamond that appears along with the selection handles to manipulate the movie's edges.
  • Alternatively, locate the Size group within the Format Movie tab. Then, enter the required Height and Width values in digits, as shown highlighted in red within Figure 4, below.
  • Height and Width values entered within the Size group
    Figure 4: Height and Width values entered within the Size group
  • Inches or Centimeters?

  • Do you see the Width and Height values in centimeters rather than inches? If you want to change the unit for measurement in PowerPoint 2011 for Mac, you can choose from inches, centimeters, points, or picas. Learn more in our Change the Unit Of Measurement in PowerPoint 2011 for Mac tutorial.

To learn more about advanced options to resize the selected movie clip, follow the instructions within our Resizing Shapes tutorial.


Rotate

You can rotate a selected movie in any of the two ways mentioned below:

  • Click and drag the green rotation handle, as shown highlighted in red within Figure 2, above. Towards right or left, as required. Additionally, you can press the Shift key and drag the rotation handle to rotate in increments of 15 degrees.
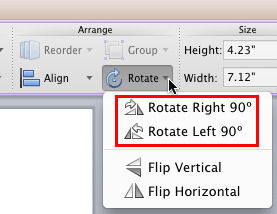
  • Locate the Arrange group within the Format Movie tab. Then, click the Rotate button to bring up the drop-down gallery, as shown in Figure 5, below. Choose any of the two to rotate left or right, as shown highlighted in red within Figure 5, below.
  • Rotate and Flip options
    Figure 5: Rotate and Flip options

To explore more advanced options to rotate selected movie, right-click the movie and, choose the Format Movie option in the resultant contextual menu, as shown in Figure 6, below.
Rotation option within the Format Movie dialog box
Figure 6: Format Movie option

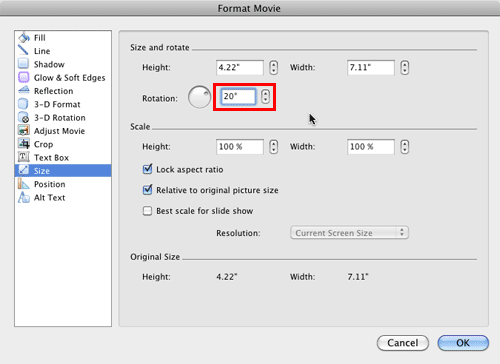
This summons the Format Movie dialog box. Make sure that the Size option is selected in the sidebar, as shown in Figure 7, below.

Rotation option within the Format Movie dialog box
Figure 7: Rotation option within the Format Movie dialog box

Change the Rotation value, as shown highlighted in red within Figure 7, above, to anything from -360o to 360o or type a zero rotation value to restore the original rotated value of the movie clip.


Flip

As with Resize and Rotate, there are two options available to Flip the picture:
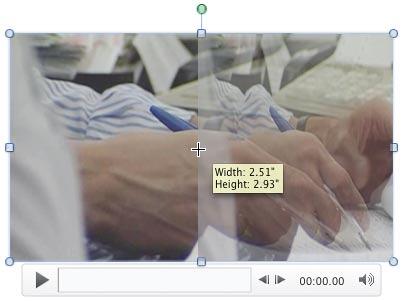
  • Click and drag one of the side (not corner) blueish-white selection handles of the movie, as shown in Figure 8, below. Note that side handles are square, unlike the corner handles which are round.
  • Drag the side handle towards the other end of the movie
    Figure 8: Drag the side handle towards the other end of the movie
  • Continue dragging even when you reach the end of the movie until you have flipped it as required, as shown in Figure 9, below. Remember that if you drag the selection handle too little or too farther, you may end up squishing the movie!
  • Flip options within the Rotate drop-down gallery
    Figure 9: Drag beyond to the other side to flip a movie
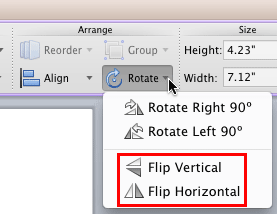
  • Locate the Arrange group within the Format Movie tab. Then, click the Rotate button to bring up the drop-down gallery, as shown in Figure 10, below. Choose any of the two Flip options, as shown highlighted in red within Figure 10, within this drop-down gallery to flip your movie vertically or horizontally.
  • Flip options within the Rotate drop-down gallery
    Figure 10: Flip options within the Rotate drop-down gallery

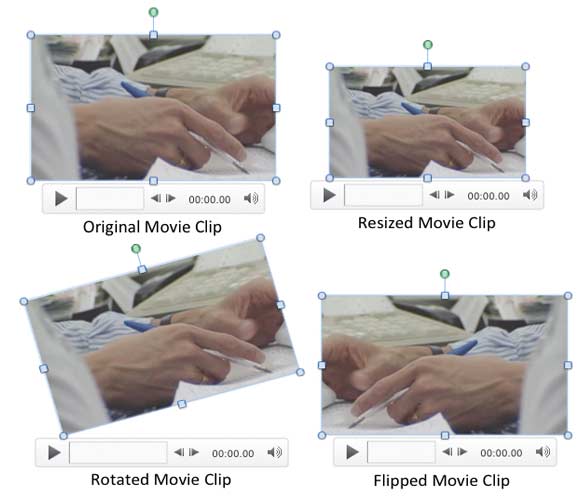
In Figure 11, below, you can see the selected movie clip in its original form as well as its variations in which the movie clip has been resized, rotated, and flipped.
Variants of the same movie clip applied with resize, rotate, and flip options
Figure 11: Variants of the same movie clip applied with resize, rotate, and flip options


See Also:

14 02 11 - Video in PowerPoint - Basics: Resize, Rotate, and Flip Videos in PowerPoint (Glossary Page)

Resize, Rotate, and Flip Videos in PowerPoint 2016 for Windows
Resize, Rotate, and Flip Videos in PowerPoint 2013 for Windows
Resize, Rotate, and Flip Videos in PowerPoint 2010 for Windows

You May Also Like: You Can Bank on Your Voice, 2nd Edition: Conversation with Rodney Saulsberry | Accounting PowerPoint Templates


Popular Posts

Creating Anchor Points for Connectors in PowerPoint 2010 for Windows
Learn how to create Anchor Points for connectors in PowerPoint 2010.

Working With Slide Numbers in PowerPoint 2016 for Windows
Learn how to add Slide Numbers on slides and Masters and more tricks on making them work to your will in PowerPoint 2016 for Windows.

Texture Fills for Slide Backgrounds in PowerPoint 2013 for Windows
Use texture fills for slide backgrounds in PowerPoint 2013 for Windows.

Adding More Guides in PowerPoint 2016 for Windows
Learn how to add more guides in PowerPoint 2016 for Windows.


Jigsaw Graphics for PowerPoint

Here are 10 jigsaw graphics containing different shapes. These graphics are available in both black and white and are contained within separate sample presentations that you download. Additionally, these jigsaw graphics are vector shapes, so you can easily edit them within your Microsoft Office program by changing fills, lines, and effects or even applying Shape Styles.

Download and use these Jigsaw Graphics in your slides for just $4.99+


Microsoft and the Office logo are trademarks or registered trademarks of Microsoft Corporation in the United States and/or other countries.

Home | PowerPoint | Photoshop | PowerPoint Templates | PowerPoint Tutorials | Blog | Notes | Ezine | Media Kit | Feedback | Site Map | About Us | Contact Us

Link to Us | Privacy | Testimonials

PowerPoint Backgrounds | Christian PowerPoint Backgrounds | Business PowerPoint Presentation Templates

Plagiarism will be detected by Copyscape

©2000-2023, . All rights reserved.