Have you ever wondered why the sites that are shown within the
Research Task Pane in Microsoft Office programs such as
Word, PowerPoint, etc. differ from computer to computer? Some computers may show extra thesauri or more options. Why does that happen? And
can you control which sites show up within your Research Task Pane? Yes, you can control to a certain extent via
Research options.
Follow these steps to explore Research options in
PowerPoint 2010 for Windows:
-
Launch PowerPoint, and access to the Review tab of the
Ribbon. Locate the Proofing group and click the
Research button, as shown highlighted in red in Figure 1.

Figure 1: Research button within the Review tab of the Ribbon
-
This action opens the Research Task Pane on the right side of the
PowerPoint 2010 interface. In Figure 2 below, you
can see the Research tools available (highlighted in blue). To customize what is available, click
Research options link at the bottom of this the Research Task Pane, as shown highlighted in red in
Figure 2.
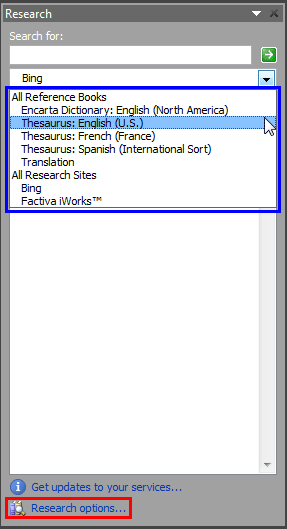
Figure 2: Research Task Pane
-
This click brings up the Research Options dialog box, as shown in Figure 3.
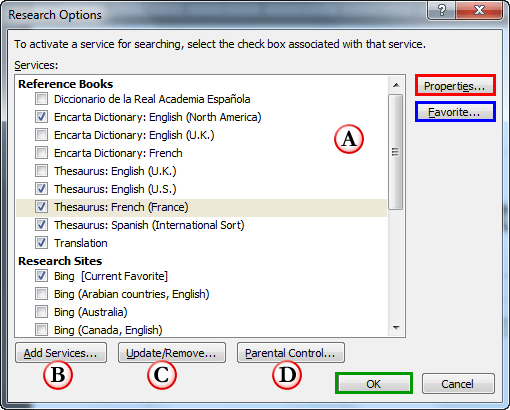
Figure 3: Research Task Pane with no results Options in this dialog box are explained below, as marked in Figure 3, above:
A. Services
- You can choose which reference sites to show by selecting or deselecting the relevant checkboxes. For example,
if you want to include both the US and UK Encarta dictionaries, select both the checkboxes. To find out more about any particular site,
select it and click the Properties button (highlighted in red within Figure 3).
This action shows the Service Properties dialog box as shown in Figure 4 that provides you with the details
of the selected site. You can also set the selected service as a favorite by clicking the Favorite button (highlighted in
blue within Figure 3).
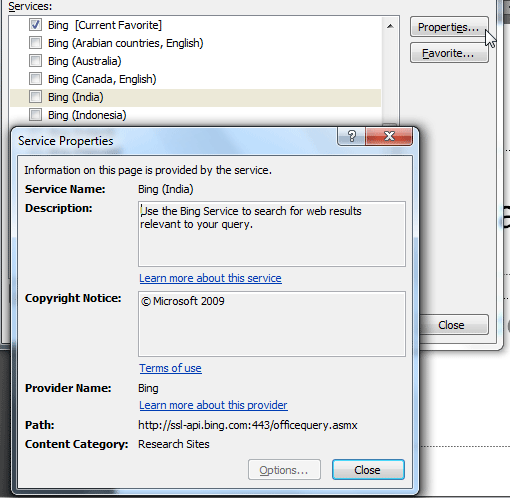
Figure 4: Service Properties dialog box for Bing (India)B. Add Services
- Click the Add Services button to summon a dialog box with the same name as shown in
Figure 5, below. Here you can select any available services (if they do show up). Alternatively, type the web address of
the service provider within the Address box, and click the Add button.
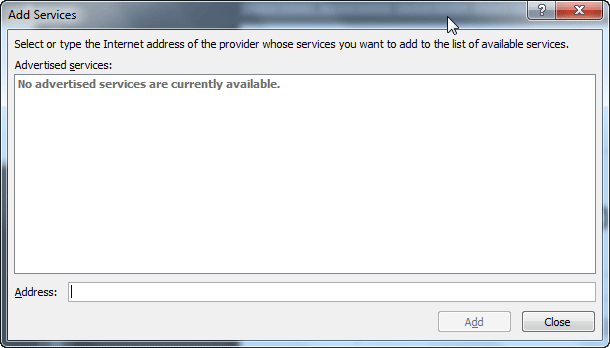
Figure 5: Add Services dialog boxC. Update/Remove
- You can update services, or even remove ones you don't use by clicking the Update/Remove… button.
This opens the Update or Remove Services dialog box, as shown in Figure 6.
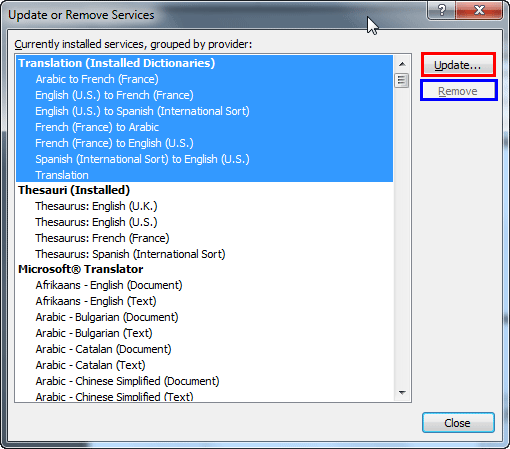
Figure 6: Update or Remove Services dialog box- Select the services and you can update it by clicking Update… button
(highlighted in red within Figure 6) or remove it altogether by clicking the
Remove button (highlighted in blue within Figure 6).
Note that the Remove button might be greyed out for some services.
D. Parental Control
- If you want to prevent any specific content from being available, you can apply a Parental lock by clicking
Parental Control button.
In Figure 7 below you can see the Research Task Pane after we enabled and disabled
some services. Compare with Figure 2, shown earlier on this page.
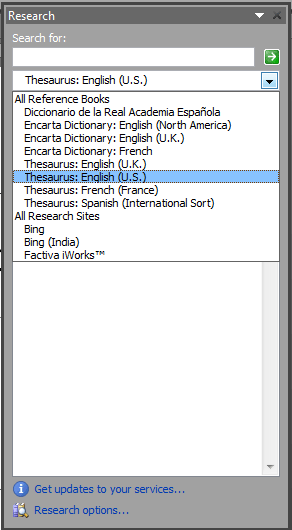
Figure 7: Research Task Pane after changing Research Options


