Sometimes you want your Text Box to be placed in an exact position on your slide. Yes, you can
select a Text Box and move it around by
dragging it with your mouse, and then let it go wherever you want it placed. However, for all practical reasons this process is
just visual and not accurate enough. Thankfully, PowerPoint provides a way to accurately position any Text Box just where you
want it located. Having said that, do not move your text boxes until they contain all the text content you need within them, or
you may find that your Text Boxes resize when you add text to them! Of course, you can control this behavior using the
Autofit option we explained to you in a
separate tutorial.
Tip: Typically Text Placeholders for regular text content or even slide titles are located in the same position
on successive slides. So, if you really do need to move a Text Placeholder, do it within the Slide Master so that this change of
position happens on all slides, providing a consistent look to your presentation. This will also prevent you from repeatedly
moving the placeholders on each and every slide on your presentation. Don't know the difference between a Text Box and a Text
Placeholder? Look at our
Text Boxes vs. Text Placeholders
tutorial.
While this tutorial shows you how to reposition a Text Box (or a shape), it can be used to reposition Text Placeholders too,
especially within the Slide Master.
Follow these steps to reposition your Text Boxes accurately within the
Slide Area in
PowerPoint 2016 for Windows:
- Open any slide which has a Text Box. Then, click on the edge of the Text Box so that it shows a solid line with selection handles
on its perimeter, as shown in Figure 1. This activates the Drawing Tools Format tab of the
Ribbon (highlighted in
red within Figure 1). Click the tab to activate it.
-
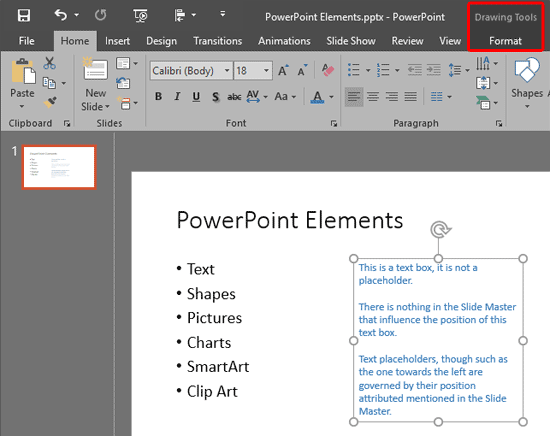
Figure 1: Drawing Tools Format tab of the Ribbon
- Within the Drawing Tools Format tab, click the dialog launcher located at the bottom right
corner of the Size group (highlighted in red within Figure 2).
-
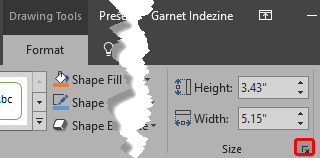
Figure 2: Dialog launcher within the Size group
- Alternatively, carefully right-click on the edge of the selected Text Box to bring up the contextual
menu you see in Figure 3. Select the Size and Position option within this contextual menu,
as shown highlighted in red within Figure 3.
-
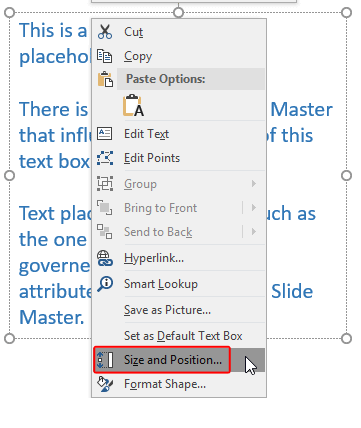
Figure 3: Format Shape option
- Either of these ways will bring up the Format Shape
Task Pane, as shown in Figure 4,
along with the Shape Options tab (highlighted in red within
Figure 4) active and the Size & Properties option (highlighted in
blue within Figure 4) selected. All the options related to Text Box position are
highlighted in green within Figure 4.
-
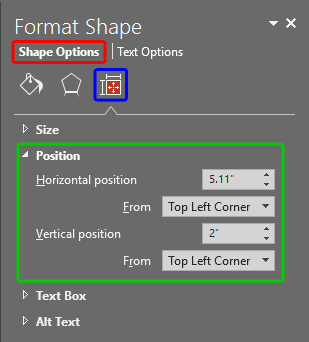
Figure 4: Format Shape Task Pane
-
The options within this Task Pane let you alter both the horizontal and vertical positions of the Text Box, as mentioned
below:
Horizontal position
- Type in a value or use the increase / decrease buttons to change the horizontal positioning of a
text box.
Vertical position
- Type in a value or use the increase / decrease buttons to change the vertical positioning of a text
box.
- The zero point for a Text Box is always calculated from either of two anchor points within the slide,
as shown in the drop-down list for both the From options. These drop-down lists have two options, as shown in
Figure 5 below:
-

Figure 5: Options within the From drop-down list to decide the anchor point for the Text Box
- If you make no choices, then by default all values are calculated from the
Top Left Corner but you can also choose to position from the Center of the slide, which you
can see in Figure 5 as the second option.
- Change the horizontal and vertical position values of the Text Box as required. You will see the new position of
the Text Box immediately.
- Based on the values you input, the selected Text Box will be repositioned as shown in Figure 6
(compare with Figure 1, shown earlier on this page).
-
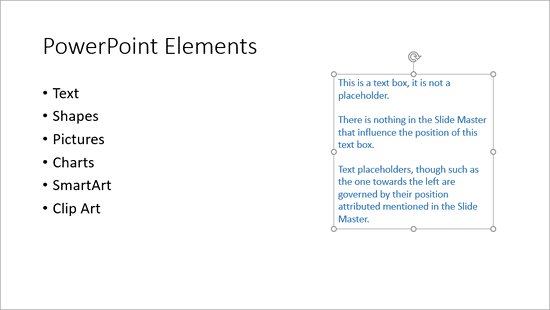
Figure 6: Text Box moved to the new position
- Make sure to save your presentation often.


