Indezine Logo


Reorder, Remove, and Edit Photos within Photo Album in PowerPoint 2013 for Windows

Reorder, remove, and edit photos within Photo Album presentations in PowerPoint 2013 for Windows. These changes can be made with a few clicks for existing Photo Album slides in PowerPoint.


Author:

Product/Version: PowerPoint 2013 for Windows

OS: Microsoft Windows 7 and higher


Learn PowerPoint

What to do if outlines from TextEdit on Mac OS X don't import in PowerPoint?


The Photo Album feature in PowerPoint is not just limited to creating presentations that contain photos. You can edit the photo content in many ways, since the Edit Photo Album dialog box provides abundant possibilities. In this tutorial, we'll explore some of these edit options. For this tutorial, we have created a sample Photo Album using several wallpaper pictures from the amazing National Geographic's Photo of the Day collection.

Don't Assume Copyrights

Using a photo from a web site such as National Geographic is intended for personal use only. Don’t assume they are free to use anywhere. Read our article on Picture Copyrights which will help you understand this concept better.

Follow these steps to explore some of the editing options within the Edit Photo Album dialog box in PowerPoint 2013 for Windows:
  1. Open your existing Photo Album presentation. Then, access the Insert tab of the Ribbon, and choose the Photo Album | Edit Photo Album option.
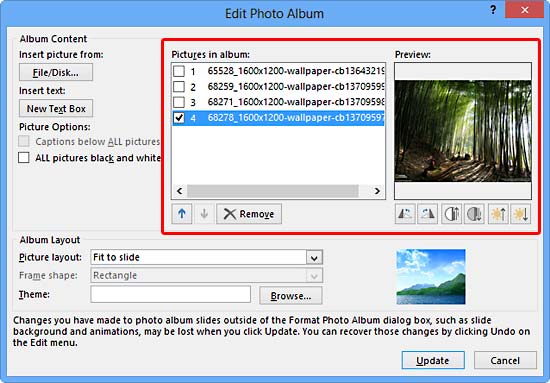
  2. The Edit Photo Album dialog box opens with your Photo Album, as shown in Figure 1. The area highlighted in red within Figure 1 includes the options you will learn about in this tutorial. These are Reorder, Remove, Rotate, Contrast, and Brightness.
  3. Edit Photo Album dialog box
    Figure 1: Edit Photo Album dialog box
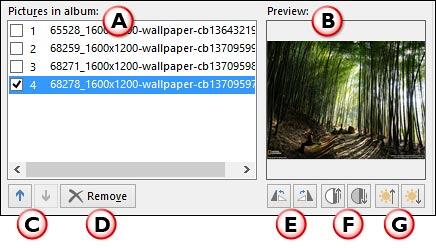
  4. Options marked in Figure 2 are explained below.
  5. Edit options
    Figure 2: Edit options
  6. A. Pictures in album

  7. This section displays the list of pictures used within the opened Photo Album presentation. Here you can select any individual photo to edit using the options we discuss next.
  8. B. Preview

  9. This section displays the preview of the photo you have selected within the Pictures in album section.
  10. C. Reorder

  11. These two buttons enable you to rearrange, i.e. move a selected photo up or down in the list.
  12. D. Remove

  13. Choosing this option deletes the selected photo from the Photo Album. However, this action does not delete the actual picture on your computer.
  14. E. Rotate

  15. These two buttons allow you to Rotate Right and Rotate Left by 900. To rotate any picture 1800, just click any of these two buttons twice.
  16. F. Contrast

  17. Use the two contrast buttons to increase and decrease contrast level.
  18. G. Brightness

  19. These two buttons increase and decrease brightness level.
  20. No Reset Options

    There are no Reset options to undo any changes you make using the edit options explained above. So, be careful before you make any of the changes. Even if you make any changes, these are not applied until you press the Update button that we explain later in this tutorial.
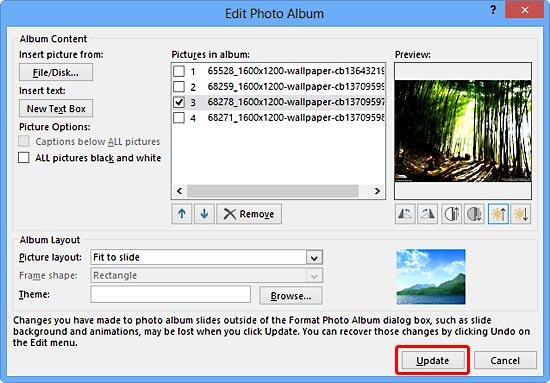
  21. In Figure 3, you can see the same selected picture (refer to Figure 1, shown earlier on this page) moved up within the list, and its brightness levels increased.
  22. Photo reordered, and brightness level increased
    Figure 3: Photo reordered, and brightness level increased
  23. When done with all edits, click the Update button (highlighted in red within Figure 3 above) to apply these edits to your Photo Album. If you do not want to make these changes, click the Cancel button to return to the Photo Album presentation without making any changes.

See Also:

Photo Album: Reorder, Remove, and Edit Photos within Photo Album (Glossary Page)

Reorder, Remove, and Edit Photos within Photo Album in PowerPoint 2010 for Windows

You May Also Like: Possibilities 02: Dashboards in PowerPoint | Vanuatu Flags and Maps PowerPoint Templates


Popular Posts

Creating Semi-Circles in PowerPoint 2013
Learn how to create a semi-circle in PowerPoint 2013.

Apply Two or More Animations to One Object at the Same Time in PowerPoint
Apply multiple animations to one slide object in PowerPoint, and make all animations play together.

Flowchart Symbols: What They Represent?
Explore various flowchart symbols, and learn about what they represent.

Types of Animation in PowerPoint 2010 for Windows
Learn about different animation types in PowerPoint 2010 for Windows.


Gears for PowerPoint (Series 01)

All these gears are native PowerPoint shapes. You can recolor them, add effects, and do more, all inside PowerPoint. Results which would have taken hours to achieve now take less than a minute! Have fun using the gear graphics, and make your audience take notice! All these gears can be rotated and resized, as required. Since they are essentially pictures, all types of edits that you can do with pictures work with them too!

Get this complete kit now, you’ll save so much time that you can use doing something else!


Microsoft and the Office logo are trademarks or registered trademarks of Microsoft Corporation in the United States and/or other countries.

Home | PowerPoint | Photoshop | PowerPoint Templates | PowerPoint Tutorials | Blog | Notes | Ezine | Media Kit | Feedback | Site Map | About Us | Contact Us

Link to Us | Privacy | Testimonials

PowerPoint Backgrounds | Christian PowerPoint Backgrounds | Business PowerPoint Presentation Templates

Plagiarism will be detected by Copyscape

©2000-2023, . All rights reserved.