Do you want to remove a sky, a wall, any backdrop, or something else in a photograph so that the slide background shows through within those removed parts of the picture? The Remove Background option may be just what you need to remove the backdrop from an inserted picture.
Note: PowerPoint does a very basic background removal for a picture. For pictures that have fine edges such as those comprising human hair, you may want to explore a dedicated image editing application such as
Adobe Photoshop.
Follow these steps to learn how the Remove Background option works in PowerPoint 2016 for Windows:
- Before you start, we assume you already have a picture on your slide. It helps if the parts of the picture you want to remove are fairly different in color than the rest of the picture, at least to begin with. As you get more proficient with PowerPoint's Remove Background option, you will be able to work with more complicated compositions. Look at our sample picture, as shown in Figure 1. You will notice that the color of the background is distinctly different than the rest of the picture.

Figure 1: Picture with a fairly distinct background and foreground areas - Select the picture to display the Picture Tools Format tab (highlighted in red within Figure 2) of the Ribbon. Activate this tab by clicking on it, and click the Remove Background button (highlighted in blue within Figure 2).

Figure 2: Remove Background button within Picture Tools Format tab of the Ribbon Note: The
Picture Tools Format tab is a
Contextual tab. Contextual tabs are special tabs in the
Ribbon that are not visible all the time. They only make an appearance when you are working with a particular slide object which can be edited using special options.
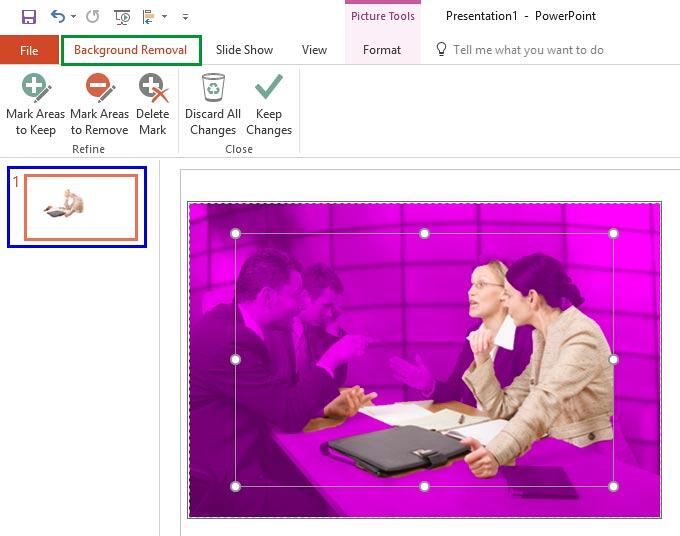
- Once you click the Remove Background button, PowerPoint makes a guess and shows the areas that it ascertains you want to remove (see Figure 3).

Figure 3: Background Removal tab on the Ribbon - In addition, note these behaviors:
- You will see a selection box, indicated by the eight handles shown in Figure 3. Four of the eight handles in the selection box are corner handles. The other four are side handles. You use these handles to resize the selection box.
- You have the new Background Removal tab on the Ribbon, highlighted in green within Figure 3. We will explain the options in this tab later within this tutorial.
- The active slide within the Slides Pane will show a preview of the picture with the background areas removed, as shown highlighted in blue within Figure 3. Don't worry, nothing is removed yet. This is just a preview.
- Figure 4 shows a zoomed in part of the picture; you can see that a major portion of the picture has been covered with a magenta overlay. This magenta overlay indicates the background areas to be removed. Only those areas that still show the original colors of the picture will be retained. As you can see in this example, except the partially visible ladies and a small portion of the table in the picture, everything else has been identified for background removal.

Figure 4: Magenta overlaid areas indicate the background selected for removal - At this stage, you have two options. The simpler option is to drag the handles of the selection box to help PowerPoint decide the areas of the picture you want to remove or retain:
- You remove more areas by resizing the selection box smaller. Click on any of the handles and drag inside the picture area. Wait for a while for PowerPoint to add more magenta areas to your picture.
- You retain areas by making the selection box larger. Click and drag any of the handles outwards you can press the Ctrl key and drag any one of the four corner handles outwards to select all areas of the picture as shown in Figure 5, below. Notice that the selection indicated by the non-magenta areas is abysmal at this point of time, and that's OK since we will modify this further.

Figure 5: Modified selection for the background removal - For simple pictures, this is all you need to do, and everything will be automatically selected. If you are happy with the results, go ahead and click the Keep Changes button within the Background Removal tab of the Ribbon. Alternatively, you can click anywhere on the slide outside the picture area to remove all magenta overlaid background areas of the selected picture. In our case, this approach does not work, and we explain how to fine-tune your selection next.
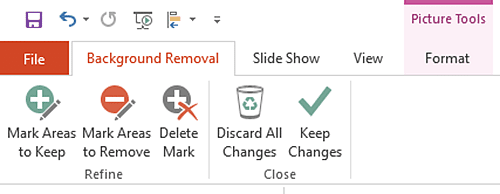
- The second, and more involved option is to manually fine-tune the selection using the options within the Refine group of the Background Removal tab that you can see in Figure 6.

Figure 6: Refine options within the Background Removal tab - These options are explained below:
Mark Areas to Keep
- Click this button and draw lines by dragging within the areas that you want retained in the picture. For some reason, diagonal, longer lines work better than horizontal or vertical lines. Lines you draw will be indicated with a plus label (see Figure 7). You can always undo your last few markings by pressing the Ctrl + Z key.
Mark Areas to Remove
- Click this button and draw lines by dragging to mark the areas you want to remove from the picture. Lines you draw will be indicated with a minus label (see Figure 7). You can always undo your last few markings by pressing the Ctrl + Z key.

Figure 7: Plus and minus labeled lines indicate the areas to be retained and removed respectively Delete Mark
- If you need to remove any of the plus or minus lines, click the Delete Mark button, and click on the line to remove it completely.
- You will see how the Refine options influence the selection. All areas to be removed have a magenta overlay that is updated dynamically, refer to Figure 7.
- Now, you can either abandon your selections, or remove the background:
- If you want to start all over again or abandon the Background Removal process, click the Discard All Changes button within the Close group in the Background Removal tab.
- If you want to go ahead with the Background Removal, click the Keep Changes button in the Background Removal tab of the Ribbon. Alternatively, you can click anywhere on the slide outside the picture area to remove all magenta areas of the selected picture.
- In the example on the left in Figure 8, you can see the picture resized, and towards the right, you can see the same picture with only the opaque glass door removed. Compare these with Figure 1, shown earlier on this page and notice the difference.

Figure 8: Two variations of the same picture showing the different areas removed


