Indezine Logo


Properties of a Presentation in PowerPoint 2010 for Windows

Learn how to view and edit file properties in PowerPoint 2010 for Windows. These properties include author info, meta data, and many more details.


Author:

Product/Version: PowerPoint 2010 for Windows

OS: Microsoft Windows XP and higher


Learn PowerPoint

Find out whether WRM Safe for XML-based PowerPoint files?


Presentation properties (metadata) are details about a presentation that include specifics such as titles, author name, subject, and keywords that identify the document. It is important to specify relevant values for the presentation's Properties fields, so that it can be easily organized and identified. Populating the Properties fields also helps you search for slides more efficiently later.

Here are some types of document properties:

i. Standard

Standard properties which are set automatically by the application itself such as: Author, Title, and Subject. You can also specify your own text values for these properties.

ii. Automatically

Automatically updated properties includes both file system properties (File Size, File Date, etc.) and statistics that are maintained for you by the application. These properties cannot be changed. You can use the automatically updated properties to identify or find documents. For example, you can search for all files created after August 3, 2005, or for all files that were last changed yesterday.

iii. Custom

Custom properties are the additional properties for your presentation. You can assign a text, time, or numeric value to custom properties, and you can also assign them the values yes or no. You can choose from a list of suggested names or define your own.

Follow these steps to view and edit current presentation properties in PowerPoint 2010 for Windows:
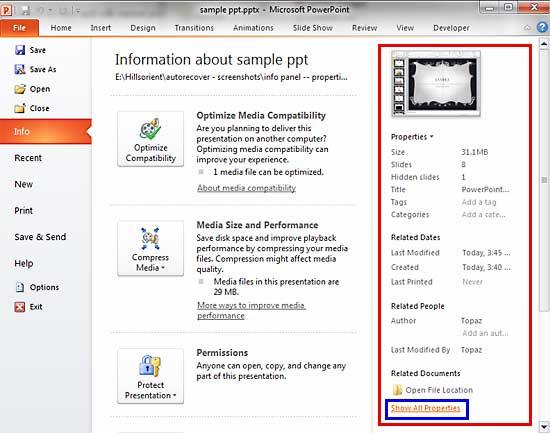
  1. Open any presentation in PowerPoint that has been saved at least once. Access the File menu, and choose the Info option to get to Backstage view, as shown in Figure 1, below. The pane on the right-side displays Properties of the current PowerPoint presentation, as shown highlighted in red within Figure 1.
  2. Properties pane within Backstage view
    Figure 1: Properties pane within Backstage view
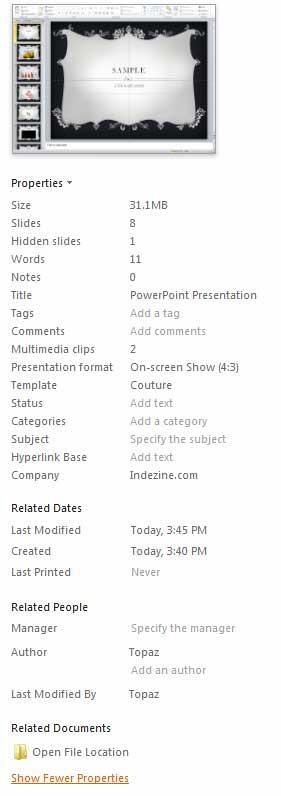
  3. Within the Properties pane, click the Show All Properties option, as shown highlighted in blue within Figure 1, above. This action displays all the properties such as: presentation Size, number of Slides, Hidden Slides, number of Multimedia Clips that the presentation contains, etc., as shown in Figure 2, below.
  4. All presentation properties displayed
    Figure 2: All presentation properties displayed
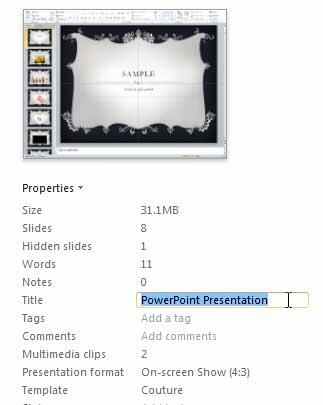
  5. Within the Properties pane, some entries are editable, and some of the others are not editable. To ascertain what you can edit, hover your mouse cursor over any detail of a property. The editable sections will show a cursor; in Figure 3, below, you can see that the Title of the presentation is editable.
  6. Presentation Title can be edited
    Figure 3: Presentation Title can be edited
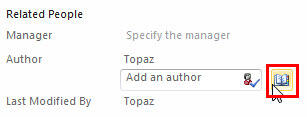
  7. Although PowerPoint automatically adds the Author name within the Properties pane, you can change the author's name as required. Additionally, you can add more Authors from your Address book. To do so, click the Search Address Book for Contacts icon placed right next to the Add an author option, as shown highlighted in red within Figure 4, below.
  8. Search address book for contacts icon
    Figure 4: Search address book for contacts icon
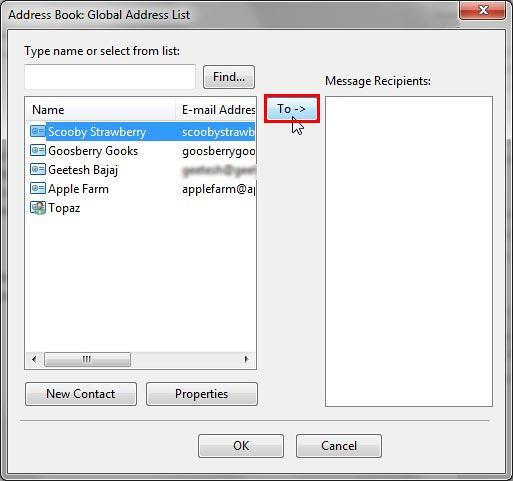
  9. Doing so opens your default Address Book dialog box, as shown in Figure 5, below. Within the dialog box select the contact you want to add as an author and click the To button, as shown highlighted in red within Figure 5.
  10. Address Book dialog box
    Figure 5: Address Book dialog box
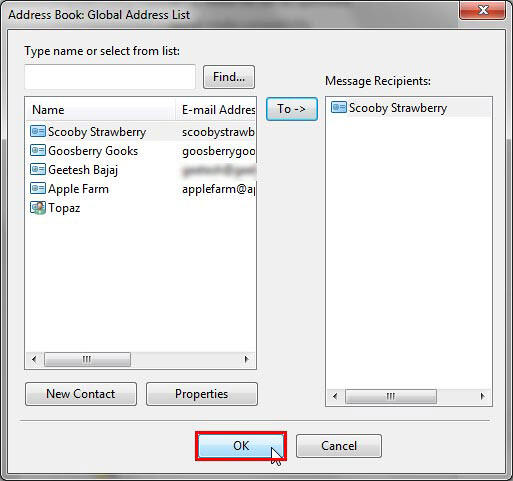
  11. This action will add the selected contact to Message Recipients, as shown in Figure 6, below. Add as many contacts as you want, and click the OK button, as shown highlighted in red within Figure 6.
  12. Contact added to Message Recipients
    Figure 6: Contact added to Message Recipients
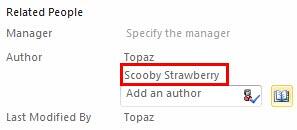
  13. Doing so adds the selected contact as an Author within the Properties pane, as shown highlighted in red within Figure 7, below.
  14. Selected contact added as author
    Figure 7: Selected contact added as an author
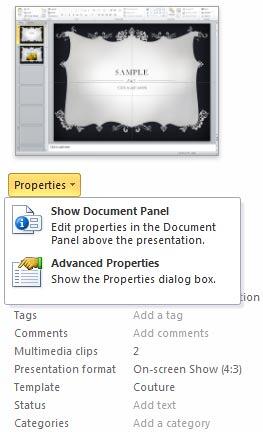
  15. Click the Properties button within the Properties pane to bring up a drop-down menu, as shown in Figure 8, below. There are two options within the drop-down menu, both of these options are explained in our Advanced Properties tutorial.
  16. Properties drop-down menu
    Figure 8: Properties drop-down menu
  17. Save your presentation often.

See Also:

16 06 01 - Properties: Properties of a Presentation in PowerPoint (Glossary Page)

Properties of a Presentation in PowerPoint 2016 for Windows
Properties of a Presentation in PowerPoint 2013 for Windows

You May Also Like: Nuts & Bolts Speed Training: Conversation with Taylor Croonquist and Camille Holden | Full Circles PowerPoint Templates


Popular Posts

Add Headers and Footers to Slides in PowerPoint 2016 for Windows
Learn how to add Headers and Footers to slides in PowerPoint 2016 for Windows.

Text Box Autofit Options in PowerPoint 2016 for Windows
Learn about Text Box autofit options in PowerPoint 2016.

Paste in Place in PowerPoint
How can you place a copied or duplicated slide object right on top of the original object in PowerPoint?

Formatting Arrows (Arrowheads) in PowerPoint 2013 for Windows
Learn how to format arrowheads for lines in PowerPoint 2013 for Windows.


Handmade Slides: Pushpins for PowerPoint

These “pushpin” graphics are already placed in PowerPoint slides. Just copy them and paste within your slides to create a look that makes a picture, shape, or anything else appear as if it has been pushed onto a surface, board, or wall with a pin! These ready-made pushpins are already within PowerPoint slides, and have been provided in five colors. Just copy them and paste them on your slides.

Download these Pushpins for just $19.99


Microsoft and the Office logo are trademarks or registered trademarks of Microsoft Corporation in the United States and/or other countries.

Home | PowerPoint | Photoshop | PowerPoint Templates | PowerPoint Tutorials | Blog | Notes | Ezine | Media Kit | Feedback | Site Map | About Us | Contact Us

Link to Us | Privacy | Testimonials

PowerPoint Backgrounds | Christian PowerPoint Backgrounds | Business PowerPoint Presentation Templates

Plagiarism will be detected by Copyscape

©2000-2023, . All rights reserved.