Indezine Logo


From Screen to Toner: Printing your Presentation - Part 1 of 4

Read an exclusive book excerpt from Visual Quickstart Guide: Microsoft Office PowerPoint 2003 for Windows.


Author:

Product/Version: PowerPoint


Learn PowerPoint

Explore Timelines that are Different – 07.


PowerPoint 2003 for Windows & Macintosh Visual Quickstart Guide This book extract from Visual Quickstart Guide: Microsoft Office PowerPoint 2003 is an Indezine exclusive with permission from Peachpit Press.

The book takes an easy, visual approach to teaching PowerPoint, using pictures to guide you through the software and show you what to do.

Authored by Rick and Rebecca Altman, the book has been completely updated for the new PowerPoint 2003. Rick Altman is host of the acclaimed PowerPoint Live user conference, an annual event that's evolved into an amazing international learning symposium.

I wish to thank Rick Altman, Damon Hampson, Kim Lombardi and Peg Dolan for facilitating the permission to extract.


Introduction
Selecting a Printer
Previewing Slides in Grayscale

Continued on Page 2 >


Introduction

In most cases, the screen is a presentation's final output device. You create your presentation, show it on a computer or projector screen, and then you're done. Often, a presentation never actually makes its way to paper.

Nevertheless, when you need to print a presentation, you need to do it correctly, and that is the focus of this chapter. Little is more frustrating than creating a presentation that looks great onscreen…and watching it come out looking like mud from your laser printer.

You use the Print dialog box (Figure 19.1) to send output to a printer or file. Here, you select what to print: slides, handouts, speaker notes, or an outline of the presentation. We'll cover all four types of output in this chapter.
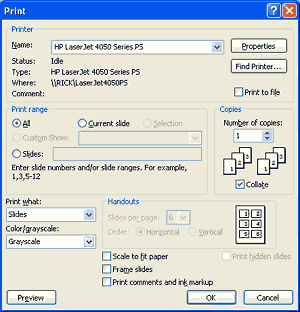
 In the Print dialog box, you can choose to print all slides, the slide currently on the screen, or a specific range of slides
Figure 19.1 The standard Print dialog box looks a bit different in PowerPoint, due to the many choices of output.

PowerPoint offers a Print Preview option (Figure 19.2), which lets you see how different types of output will look when complete. Good thing, too: In this case, we discovered that the dark bar with black text looks pretty awful and we were able to fix it before printing.
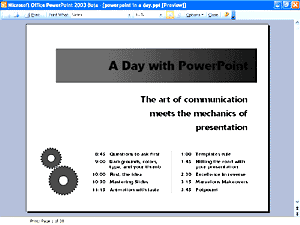
Print Preview is handy for warning you of impending disaster
Figure 19.2 Print Preview is handy for warning you of impending disaster.

Back


Selecting a Printer

The Print dialog box initially indicates the current printer. If you are connected to more than one printer and want to specify a different one, follow these steps.

To select a different printer:

  1. Choose File > Print or press Ctrl+P. The Print dialog box appears (Figure 19.1).
  2. In the Name field, choose the printer you want to use.
  3. Choose other options as desired and click OK to begin printing.

Tips

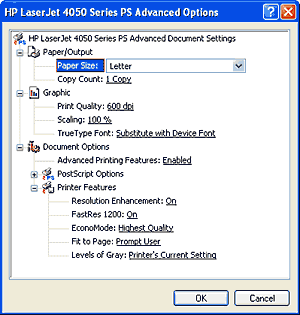
  • To set printer-specific options, click Properties in the Print dialog box (Figure 19.3).
  • You can reach the property sheet for any printer from within the Print dialog box
    Figure 19.3 You can reach the property sheet for any printer from within the Print dialog box.
  • If you change any settings in the Properties dialog box, PowerPoint remembers them until you quit the program. If you find yourself changing them often, consider changing them permanently.
  • You do that from Start > Control Panel > Printers and Faxes. Right-click the desired printer and choose Properties. The dialog box will look similar, but now you'll be changing the default permanently.

Back


Previewing Slides in Grayscale

If you plan to print your slides on a monochrome printer, you may want to preview them in grayscale beforehand. PowerPoint offers an easy way to do this.

To preview slides in grayscale:

  • Choose View > Color/Grayscale.
  • or
  • Click the Grayscale Preview button on the Standard toolbar (Figure 19.4).
  • Use this button to switch between Color and Grayscale previews
    Figure 19.4 Use this button to switch between Color and Grayscale previews.
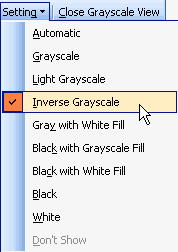
  • In either case, a submenu appears where you can choose between the three main settings: Color, Grayscale, or Pure Black and White. After you are in the preview, a Setting drop-down menu provides several options for grayscale settings (Figure 19.5).
  • Use this menu to adjust grayscale options
    Figure 19.5 Use this menu to adjust grayscale options.

Tips

  • You must have an object selected in order to use the Setting drop-down menu on the Grayscale View toolbar.
  • Changing the Settings on the Grayscale View toolbar doesn't affect the color version of the slide; it only affects the black and white for printing. You can see that this is so by leaving the Slide miniature pane open while changing the Grayscale View settings.

Back

Continued on Page 2 >


Altman/Altman, MICROSFT OFFICE POWERPT 2003 WIN: VISUAL QUICKSTART, ©2003 Reproduced by permission of Pearson Education, Inc. Publishing as Peachpit Press. ALL RIGHTS RESERVED.


You May Also Like: Presentation Skills: Conversation with Payam Bahrampoor | Costa Rica Flags and Maps PowerPoint Templates


Popular Posts

Shapes
Shapes
Learn how you can create and manipulate shapes in PowerPoint -- knowledge of working with shapes is significant because they are the building blocks of creativity in PowerPoint.

Insert Picture from the Office ClipArt Collection in PowerPoint 2013
Learn how to insert picture using Office ClipArt in PowerPoint 2013.

Snow Effect in PowerPoint
Create a snow fall effect inside PowerPoint using animation techniques.

PowerPoint Transitions: Curtains
Explore the Curtains transition effect in PowerPoint.


Polygon Center Circles for PowerPoint

These special circles have polygon centers: the centers are made of triangles, squares, pentagons, and hexagons! And based on the sides of the polygon, the rest of the circle has that many segments.

Download and use these Polygon Center Circles in your slides for just $4.99


Microsoft and the Office logo are trademarks or registered trademarks of Microsoft Corporation in the United States and/or other countries.

Home | PowerPoint | Photoshop | PowerPoint Templates | PowerPoint Tutorials | Blog | Notes | Ezine | Media Kit | Feedback | Site Map | About Us | Contact Us

Link to Us | Privacy | Testimonials

PowerPoint Backgrounds | Christian PowerPoint Backgrounds | Business PowerPoint Presentation Templates

Plagiarism will be detected by Copyscape

©2000-2023, . All rights reserved.