Among the tabs within Backstage View, we have already explored some options such as Open, New, Save, etc. In this tutorial, we will explore the Print option used to print the current presentation in the form of selected slides, notes pages, handouts, etc. Follow these steps to learn more about Print options within Backstage view in PowerPoint 365 for Windows:
- Open a presentation in PowerPoint 365 for Windows. Click the File menu, as shown highlighted in red within Figure 1.

Figure 1: File menu - This opens Backstage View. Select the Print option in the sidebar to reveal options shown in Figure 2.
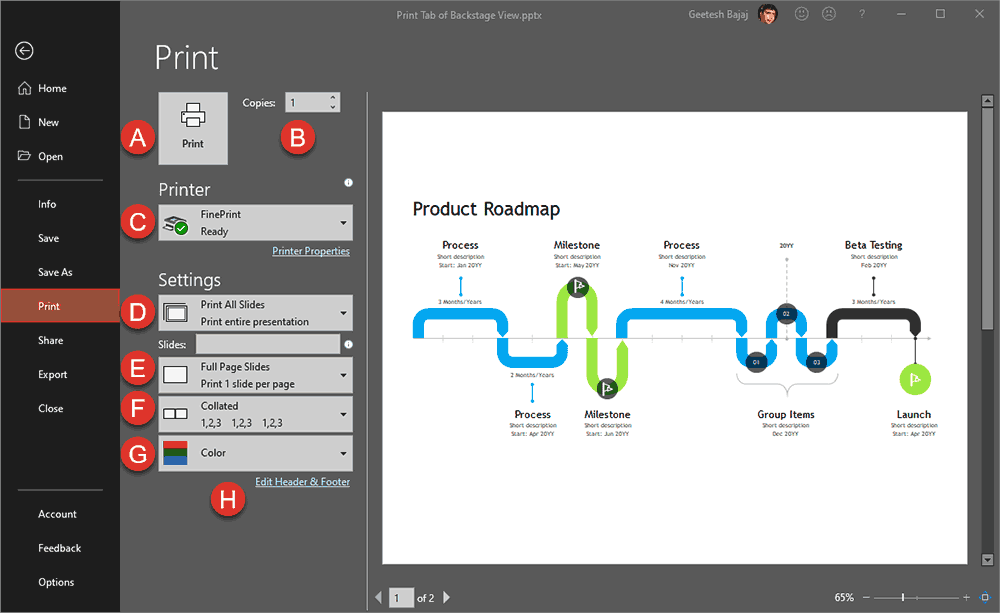
Figure 2: Print option selected within backstage view - Alternatively, the Ctrl + P keyboard shortcut replicates this step and the preceding one.
-
- Options within the Print tab of Backstage view are explained below, as marked in Figure 2, above:
A. Print
- Click on this large Print button after you have selected all other options.
B. Copies
- Specify the number of copies that you want to print.
C. Printer
- Select the printer from the drop-down list that you want to send this print job to, as shown in Figure 3. Do note that this can be a physical printer or even a virtual printer driver that creates PDF files.
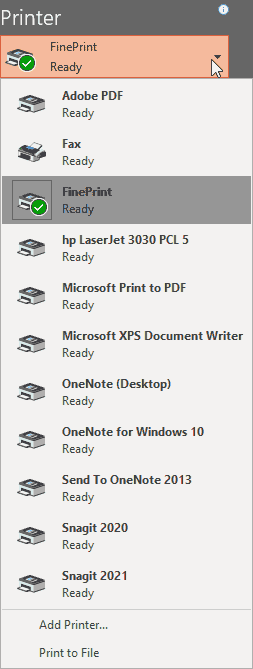
Figure 3: Printer drop-down list D. Print What
- You can click on the drop-down list to see more options, as shown in Figure 4, below. You can select whether you want to print all slides, sections, a selection of slides, just the current slide, or a custom range of slides.
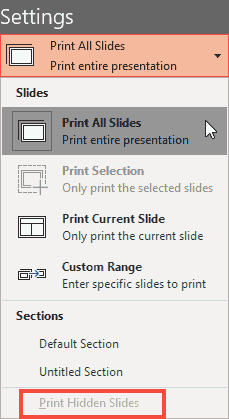
Figure 4: What do you want to print? - If you choose to print a custom range of slides, you will be able to type in individual slide numbers, as well as slide ranges, as shown in the area highlighted in red within Figure 5, below.
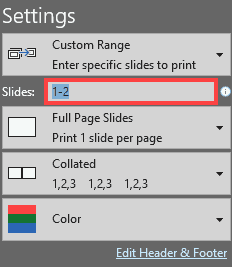
Figure 5: Slide numbers and slide ranges to print - You can also choose the Print Hidden Slides option (see area highlighted in red within Figure 4, previously on this page). If the hidden slides option is grayed out, that means you have no hidden slides in the currently open presentation.
E. Print Layout
- Click to reveal a drop-down list shown in Figure 6, below. You can opt to print regular slides, or slides within Notes pages. You can also opt to print just the text outline of your presentation. Additionally, you are also provided options to print various Handout layouts which include slide thumbnails.
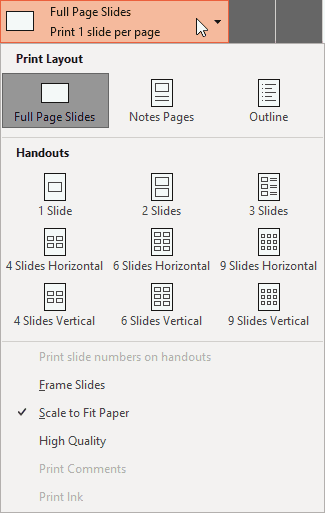
Figure 6: Slide and Handout layouts - We now explain other options shown in Figure 6. Do note that the preview shown on the right slide will auto-update as you change and choose these options:
- Frame Slides adds a dark (black) frame around slides. This option is very useful if you are printing white or light-colored slides on white paper.
- Scale to Fit Paper adjusts the size of the printed slides to match the size of the paper.
- High Quality creates a better quality print output. Do note that if you have too many slides, this option may increase printing time.
- Print Comments and Ink Markup is available as an option if your presentation has comments or any ink annotations.
F. Collated
- This option opens up a drop-down list, as shown in Figure 7, below. Collated lets you print in sequence, even if you are printing multiple copies. For example, if you need four copies of your ten-slide presentation, choosing the Collated option will print all the ten slides first, and then print the extra copies of those ten slides. If you do choose Uncollated, then four copies of the first slide will print, followed by four copies of the second slide, and so forth.
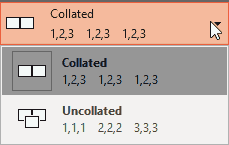
Figure 7: Collated drop-down list G. Color
- Clicking this option opens up the drop-down list that you see in Figure 8, below with three options:
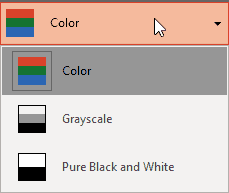
Figure 8: Color drop-down list - Color: This is the default option, and will print your slides in color, provided you selected a printer that is capable of printing in color within the Printer drop-down list (see point C). Figure 9, below shows you how a preview of a slide printed in Color looks like.

Figure 9: Color preview - Grayscale: Prints in grayscale, as shown in the preview shown in Figure 10, below.

Figure 10: Greyscale preview - Pure Black and White: Prints in just black and white and removes fills of all objects such as charts, shapes, SmartArt, etc., as shown within the preview you see in Figure 11, below.

Figure 11: Pure Black and White preview H. Edit Header and Footer
- Opens up the Header and Footer dialog box, shown in Figure 12, below. To learn about options within this dialog box, see our Add Headers and Footers to Slides in PowerPoint 365 for Windows tutorial.
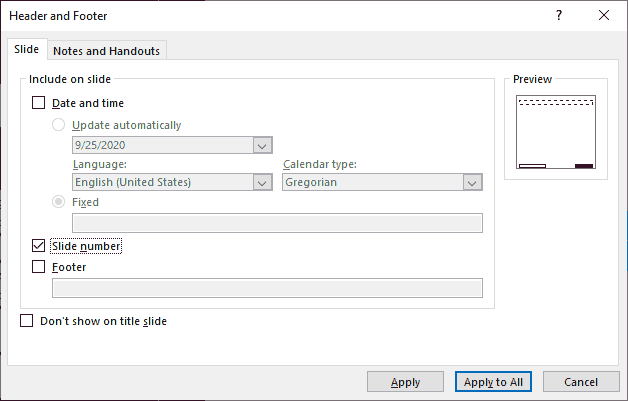
Figure 12: Header and Footer dialog box
As you make choices, you will continue seeing updated previews towards the right side. When you are ready to print, just click the prominent Print button (marked as A in Figure 2, shown previously on this page).


