Indezine Logo


Present Online in PowerPoint 2013 for Windows

Learn how to use the Present Online option in PowerPoint 2013 for Windows. This feature may now have been deprecated.


Author:

Product/Version: PowerPoint 2013 for Windows

OS: Microsoft Windows 7 and higher


Learn PowerPoint

Learn how to register the default version of PowerPoint.


Feature No Longer Available

This feature is no longer available and has been deprecated. This tutorial page is maintained as an archival record.

Many presenters connect their computers to projectors or other display devices. They then navigate through their slides as they speak to a live audience. In recent times, it's common to deliver your presentation through a webinar, with your audiences spanning different countries and time zones. You can use many webinar options, but did you know that Microsoft included a basic, free option right inside PowerPoint? This option is known as Present Online, and you'll learn the basics of using this feature on this page.

Follow these steps to use the Present Online feature in PowerPoint 2013 for Windows:

  1. Open an existing presentation in PowerPoint. Make sure your presentation is saved. Now, click the File menu, as shown highlighted in blue within Figure 1, below.
  2. File menu
    Figure 1: File menu
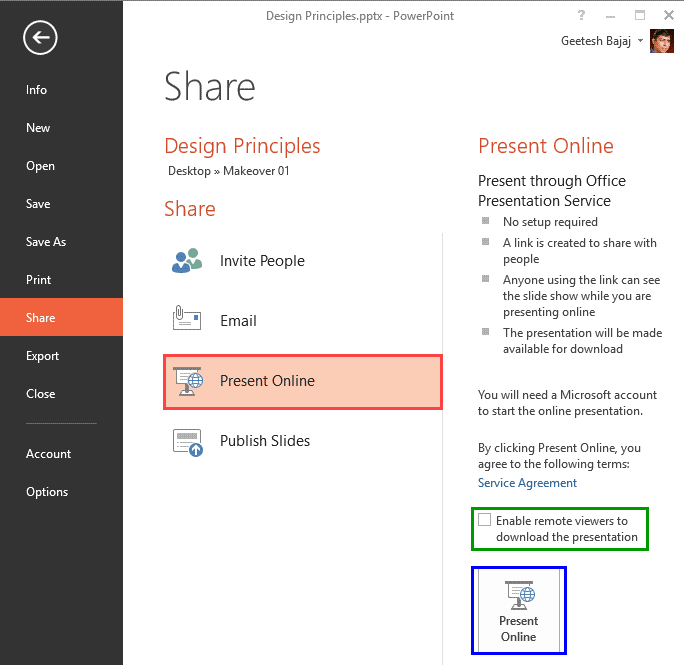
  3. Doing so opens Backstage View. Select the Share option in the sidebar to reveal options, as shown in Figure 2, below. We selected the Present Online option, as shown highlighted in red within Figure 2. This in turn reveals the Present Online options on the right side.
  4. Present Online option within Backstage view
    Figure 2: Present Online option within Backstage view
  5. Now assuming you are connected online with a fairly high-speed connection, you can click the Present Online button, as shown highlighted in blue within Figure 2, above. Before you do so, do note that you can check the Enable remote viewers to download the presentation option, as shown highlighted in green within Figure 2. This option is deselected by default, and when checked, allows your remote viewers to download a copy of your presentation.
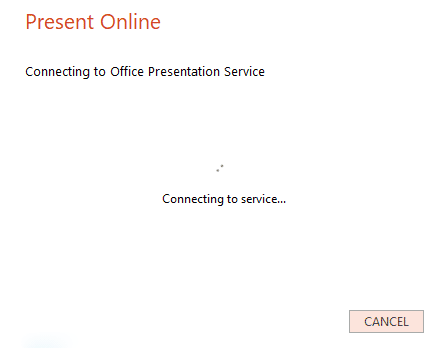
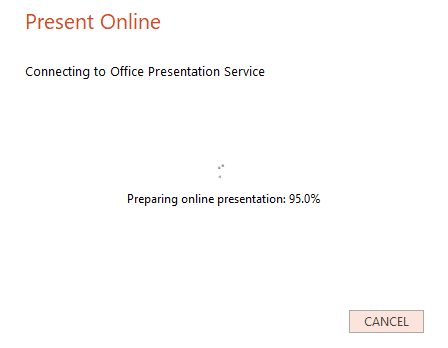
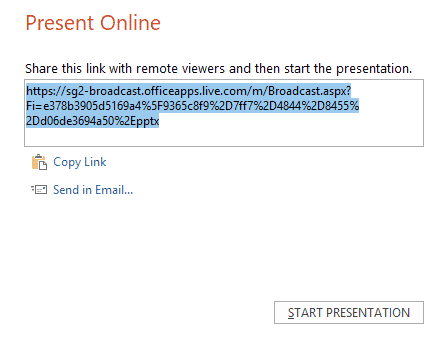
  6. When the Present Online button is clicked, PowerPoint loads up the Present Online window that connects to the Office Presentation Service, as shown in Figure 3, below. Next, it prepares an online presentation, as shown in Figure 4, further below, and finally provides you with a link to share with remote viewers, as shown in Figure 5, even further below.
  7. Connects to the Office Presentation Service
    Figure 3: Connects to the Office Presentation Service
  8. Prepares online presentation
    Figure 4: Prepares online presentation
  9. Provides a shareable link
    Figure 5: Provides a shareable link
  10. You can now share the link provided, as shown in Figure 5 with attendees. You’ll find several options:
  11. Copy Link

  12. Copies the meeting link to the clipboard so that you can send it to attendees via chat, messages, or email.
  13. Send in Email

  14. Opens your default email application with a new email composed, already containing the meeting link.
  15. Start Presentation

  16. You can click this button to start your online presentation.
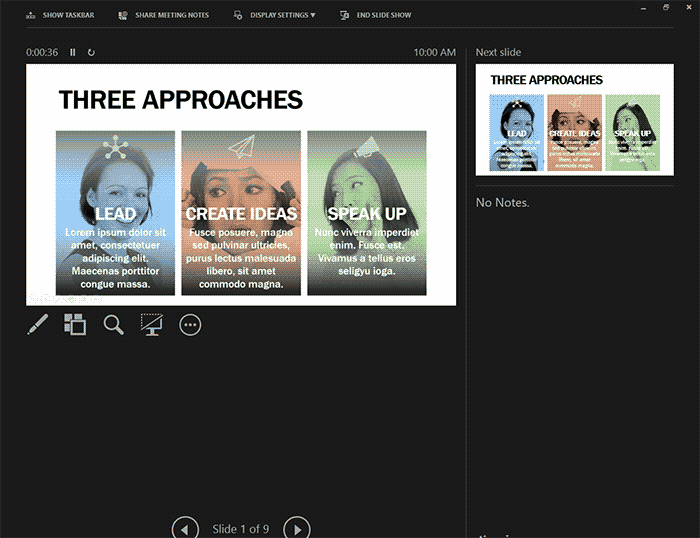
  17. When you click the Start Presentation button, PowerPoint will put you in Presenter View, almost as if you are presenting to a live audience, as shown in Figure 6, below.
  18. Presenter View while presenting online
    Figure 6: Presenter View while presenting online
  19. Meanwhile, recipients of your meeting link will see your presentation delivered via PowerPoint Online, the browser-based version of PowerPoint.
  20. You can step out of Presenter view, or even Slide Show view, by pressing the Esc key. This gets you back to Normal view, and you will see an extra tab in the Ribbon, called Present Online, as shown in Figure 7, below.
  21. PowerPoint Keyboard Shortcuts

    PowerPoint Keyboard Shortcuts

    Do you want more keyboard shortcuts?

    Explore our PowerPoint Keyboard Shortcuts and Sequences Ebook that is updated for all PowerPoint versions.

  22. Do note that your presentation is not being shown to meeting attendees now, and although your online meeting hasn't’t ended yet, you will have to play your slides again or end your online presentation, as per the options we explain next.
  23. Present Online tab of the Ribbon
    Figure 7: Present Online tab of the Ribbon

Options in this tab are explained below:

Start Slide Show

You can start (or restart) the presentation from the first slide (From Beginning button) or from the current slide (From Current Slide button). This is important because more attendees may have joined your online presentation, after you have already shown some slides.

Monitor

This drop-down list may bring up two or more options, depending upon the number of displays connected to your system.

Use Presenter View

You can opt to use Presenter View, as shown in Figure 6, previously on this page. If this option is deselected, PowerPoint shows you Slideshow view.

Share Meeting Notes

This option lets you share your meeting notes via OneNote. If you do not have OneNote installed on your computer, you may not see this option.

Send Invitations

Brings up the Present Online window, as shown in Figure 5, previously on this page.

End Online Presentation

Shuts down your online presentation. You may see the warning window, as shown in Figure 8, below.

Do you want to end the online presentation?
Figure 8: Do you want to end the online presentation?

You can press the End Online Presentation button if you do want to end, or else press the Cancel button to get back.

So as we saw, it’s easy and costs you almost nothing to use Microsoft’s Present Online feature in PowerPoint. However, the Office Presentation Service that runs these online presentations can be a little unpredictable, and may not work all the time. So as far as possible, use this option only when you have no other webinar or online meeting option available.


See Also:

16 05 01 - Share Options: Present Online in PowerPoint (Glossary Page)

Present Online in PowerPoint 2016 for Windows

You May Also Like: Consumer vs. Professional Displays for Digital Signage | De Stijl PowerPoint Templates


Popular Posts

Apply Bevel Effects to Shapes in PowerPoint 2016 for Windows
Learn how to apply bevel effects to shapes in PowerPoint 2016 for Windows.

Creating Curved Shapes in PowerPoint 2010 for Windows
Learn how to create curved shapes in PowerPoint 2010.s

Shapes
Shapes
Learn how you can create and manipulate shapes in PowerPoint -- knowledge of working with shapes is significant because they are the building blocks of creativity in PowerPoint.

Insert Picture from the Office ClipArt Collection in PowerPoint 2013
Learn how to insert picture using Office ClipArt in PowerPoint 2013.


Feature List 01 (Layout with Tabs)

The Feature List Layout comprises three sample PowerPoint presentations: one each to create a visual list for 4 features, 5 features, and 6 features. These work great when you have too much information to fit within one slide. This solution lets you use multiple slides, but the visual result is still that of one single slide!

Buy and Download Feature List 01 (Layout with Tabs) for $4.99+ (671 kb)


Microsoft and the Office logo are trademarks or registered trademarks of Microsoft Corporation in the United States and/or other countries.

Home | PowerPoint | Photoshop | PowerPoint Templates | PowerPoint Tutorials | Blog | Notes | Ezine | Media Kit | Feedback | Site Map | About Us | Contact Us

Link to Us | Privacy | Testimonials

PowerPoint Backgrounds | Christian PowerPoint Backgrounds | Business PowerPoint Presentation Templates

Plagiarism will be detected by Copyscape

©2000-2023, . All rights reserved.