PowerPoint's handout options are extensive, but not well documented. Let's explore handouts, the Handout Master, printing of handouts, and sending handout content to Microsoft Word.
Author: Geetesh Bajaj
Product/Version: PowerPoint
Introduction
About Handouts
The Handout Master
Printing Handouts
Printing to PDF
Sending Handouts to Microsoft Word
The Handout Gallery
Using Handout with Templates
Related Links
Beyond slides, PowerPoint offers both handouts and notes. These can be viewed, edited or printed along with a presentation. For many PowerPoint users, both handouts and notes are under-used features. That in itself is very unfortunate, because both these elements can make the entire presentation experience more complete and enriched. In this article, we'll look at handouts.
Handouts are basically thumbnails of slides printed together on a sheet of paper. Such layouts can be customized to suit specific requirements. By default, PowerPoint offers choices to include 1, 2, 3, 4, 6 and 9 slide thumbnails per handout page. Some layouts, such as the one for 3 thumbnails also provide some space next to the thumbnail for notes to be written/printed. PowerPoint 97 provides layouts for only 2, 3 and 6 slides per handout page whereas PowerPoint 2000 and newer versions allow 2, 3, 4, 6 and 9 slides per handout page.
Handouts are often printed to be sent for review to those who matter before an actual presentation is shown to an audience. Plus, during the presentation itself, printed handouts can be distributed to the audience.
However, printing handouts is not always a solution, especially if you need to email it to someone. In such a case, one can save handouts as a PDF (Portable Document Format) file. We'll examine this option later in this article.
Masters are boilerplates, and everything is duplicated based on elements existing in the master. Thus, if you position any logo in the Handout Master, you can be reasonably sure that all handouts in that particular presentation will contain the logo in the same position.
Unlike slides, handouts are almost always intended for print, so it might be a good idea to edit the Handout Master based on that assumption. You need to be sure of using content that prints well to both black and white or colored output.
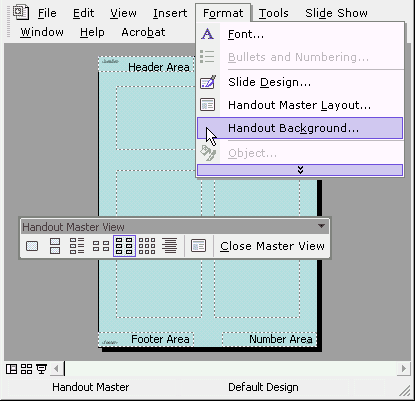
To edit the Handout Master, chose the View | Master | Handout Master option. Within the handout edit area you'll find 4 editable regions on the four corners of the page, as shown in Figure 1, below. These are header, footer, number and date. All these four regions can be edited as required and since all edits are being done on the Handout Master, you will be able to see results in every printed handout.

Figure 1: Handout Master
A lesser-known feature that many users are not aware of is that you can even edit the main handout page area. For instance, you can insert the company logo as a watermark behind the slide thumbnails or even change the background color of the entire handout area. Figure 1, above, shows the Handout Master with a teal background. Do note that it's usually not a good idea to have a colored handout background unless you are creating PDFs from handouts.
To change the background within the Handout Master, follow these steps:
It's fairly easy to print handouts. Within PowerPoint's Print dialog box, you'll find some options that are specific to printing handouts. First, choose the File | Print (Ctrl + P) to open the Print dialog box. Most options related to handouts are located in the lower half of this dialog box, as shown in Figure 2, below.

Figre 2: Options related to handouts

Figure 3: 1 slide per page

Figure 4: 2 slides per page

Figure 5: 3 slides per page

Figure 6: 4 slides per page

Figure 7: 6 slides per page

Figure 8: 9 slides per page
You may want to experiment printing to various layouts as PDFs rather than conventional printing to save papers and trees. That's what we tackle next.
PDF is a great way to distribute your PowerPoint handouts electronically. It's also a great way to print test handouts without using real paper.
Printing to PDF output is a fairly simple job. You use the PDF printer driver rather than your regular printer driver. You are usually asked to provide a filename and location and the PDF printer driver outputs a PDF within the chosen folder location.
The most popular PDF printer driver is part of Adobe Acrobat program. Yes, that's the full Acrobat program rather than just the free Adobe Acrobat Reader program.
Other alternative PDF printer drivers come from several sources. Some of these are even open source and/or freeware. Usually, a search for free pdf or free pdf print driver in a search engine like Google should provide some links.
Microsoft MVP Mickey Stevens adds some Mac-specific info here:
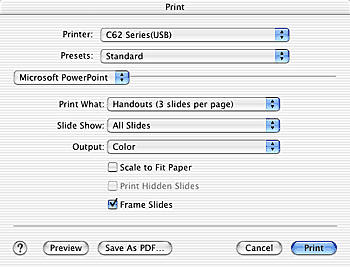
It's even easier to print to PDF using PowerPoint X on Mac OS X, because Mac OS X has a built-in PDF-writing engine. In PowerPoint, go to File | Print, then choose Microsoft PowerPoint from the pop-up menu and choose to print Handouts. Then, just click the Save as PDF button to save your work.
Here's a screen-shot of the dialog box you see on Mac OS X, as shown in Figure 9, below.

Figure 9: Save as PDF
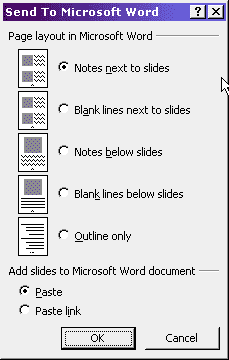
The ultimate handout customization can be done in Microsoft Word rather than PowerPoint. Word, with its advanced layout and document editing features is miles ahead of PowerPoint in this respect. To send PowerPoint handouts to a Word document, choose File | Send To | Microsoft Word. This action will open the Send to Microsoft Word dialog box, shown in Figure 10 below, where you can choose from five different layouts. Choose the layout that is closest to your preferred layout, since so much more customization can done within Microsoft Word as well. You can also opt to paste slide thumbnails into Word or just paste links that can update the Word document when your actual PowerPoint presentation changes.

Figure 10: Send to Microsoft Word dialog box
Word affords many possibilities. For instance, you can add extra pages that welcome the audience, provide contact information and specifications or pricelists for products or services. All pages along with the handouts can be made into booklets that can be handed to the audience.
From within Word, you can again opt to print to your regular printer or PDF.
We've put up some formatted and designed handout samples in a Handout Gallery.
PowerPoint templates are recognizable as files with the POT file extension. Unfortunately, even though you can save the Handout Master as part of a POT file, PowerPoint provides no easy way to apply a template-contained handout design to existing presentations.
Ideally, you should be able to choose from these options:
Format | Apply Design (PowerPoint 97)
Format | Apply Design Template (PowerPoint 2000)
Format | Slide Design (PowerPoint 2002)
PowerPoint should apply all Masters stored within the template including the Handout Master. Unfortunately, PowerPoint only applies Slide and Title Masters this way. To apply a Handout Master stored within the same template, you'll have to double-click the template file (POT) from within Windows Explorer and insert slides from the presentation to which the Handout Master styles need to be applied!
The Save Trees add-in ensures that users can print only handouts of the presentation.
You May Also Like: Using the Chains Feature in ToolsToo v10: Conversation with Gil Segal | Artists PowerPoint Templates


Microsoft and the Office logo are trademarks or registered trademarks of Microsoft Corporation in the United States and/or other countries.