Learn how to create an autorun PowerPoint presentation.
Author: Echo Swinford
Product/Version: PowerPoint
Content on this page is not recent and has been retained for historical reasons.
 Echo Swinford began making slides as a medical meeting planner in 1997 and just never stopped. She uses PowerPoint as the basis for webcasts, CDs, and online applications.
Her website, Echo's Voice is graced by dozens of downloadables and helpful documents, and she has been a member of the Microsoft PowerPoint MVP team since 2000.
This article also forms Part I of the PowerPoint 2002 to EXE procedure. Read Part II here.
In PowerPoint 2003
In PowerPoint 2002 (aka PowerPoint XP)
Microsoft released a new PowerPoint Viewer in October 2003. Unlike the old Viewer, this new Viewer supports the animations and transitions used in PowerPoint 2002 and 2003.
Some functionality the old Viewer had has been lost. Microsoft PowerPoint MVP Sonia Coleman has specific information on the new Viewer available at her site.
If you have PowerPoint 2003, creating an autorun CD is very easy: just use the Package for CD option on the File menu.
You don't have to worry about downloading and installing the New Viewer. It's included in the PowerPoint 2003 installation.
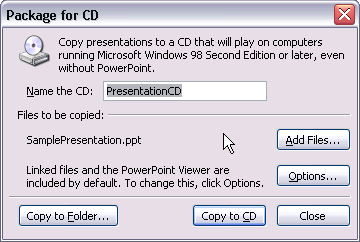
When you choose the File | Package for CD option, you will see a dialog box, as shown below.

This dialog box provides the Copy to Folder option that copies content to your hard drive. You can also choose the Copy to CD option. As you can see, linked files and the PowerPoint Viewer are included by default, regardless of which Copy option you choose.
Choose the Add Files option if you have other files or presentations you want to include on the CD and they're not already linked to your presentation.
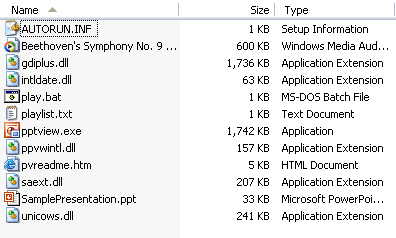
If you look in the folder where you saved the package, you will see something similar to what you see in the figure below.

The SamplePresentation.ppt file is the file we elected to Package for CD. The Beethoven's Symphony WMA file is a sound linked to SamplePresentation.ppt. The Package for CD process pulled that sound file into the package folder and fixed up any linking issues so the sound will play properly when we move the files in this folder to the CD.
gdiplus.dll
intidate.dll
pptview.exe
ppvwintl.dll
pvreadme.htm
saext.dll
unicows.dll
are all the files the PowerPoint Viewer needs to run.
autorun.inf
play.bat
playlist.txt
are all files dealing with the autorun CD aspect of the CD.
Since you have PowerPoint 2003, you can just burn all these files to your CD, and you're good to go.
If you're using PowerPoint 2002 (aka PowerPoint XP), creating an autorun CD becomes a bit more tricky than it is for 2003 with its Package for CD option.
You can use the same technique you'd use for PowerPoint 97 and 2000, but the older PowerPoint Viewer won't display any new animations or transitions you may have used in PowerPoint 2002. To counter this problem, you may want to use the new Viewer. However, setting up an autorun for the new Viewer is different than it is for the old Viewer.
The first step is to download and install the new PowerPoint Viewer from
The next step is to open your presentation in PowerPoint 2002, and use the File | Pack and Go option.
We're not big fans of Pack and Go, but we've been seeing a lot of posts in the newsgroup lately where people are trying to use it in PowerPoint 2002 along with the new Viewer. Here's the deal—the new Viewer was released, oh, 18 months after PowerPoint 2002 was released, and it was not designed to work with Pack and Go. So Pack and Go doesn't recognize the new Viewer.
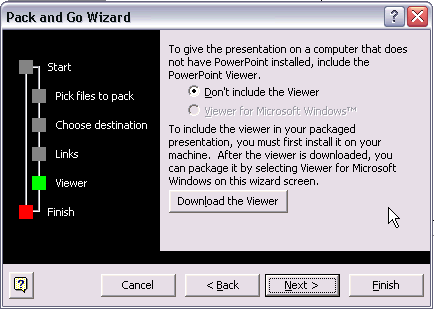
When you run the Pack and Go Wizard in PowerPoint 2002, you have to tell it not to include the PowerPoint Viewer, because if you do, it will use the old PowerPoint Viewer (assuming you have it installed, of course).
When you get to the screen in the Pack and Go Wizard, when it asks about the Viewer, your option to include it may be greyed out. That's fine. If it's not greyed out, don't choose it anyway! Remember, you don't want to include the older Viewer here. Don't bother downloading it from that button, either because you'll still get the old Viewer.

In the folder where you save the Packed and Gone files to, you'll have 2 files: PNGSETUP.EXE and Prez0.ppz. Double-click PNGSETUP.EXE to unpack the Pack and Go.
Basically, what this does is resolve any linking issues you may have. That way, if you have, for instance, linked sounds, those sounds will play when you create your autorun CD.
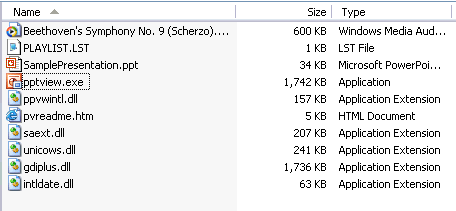
You'll end up with your presentation file (.PPT), any linked sound or multimedia files (.WMA, in our case), and a playlist.lst file, which Pack and Go created.
You still need the new PowerPoint Viewer, though. Head to where you installed the Viewer—probably somewhere like C:\Program Files\Microsoft Office\PowerPoint Viewer, and copy these 7 files:
gdiplus.dll
intidate.dll
ppview.exe
ppvwintl.dll
pvreadme.htm
saext.dll
unicows.dll
Paste them in the folder where you unpacked your Pack and Go. The contents of your folder will probably look something like what you see in the figure, shown below.

Now, if you look back up at the 2003 instructions, you'll see a playlist.txt (not playlist.LST), an autorun.inf, and a play.bat file in addition to these files. We have to create the inf/bat files and modify the existing lst file.
First the LST file. Open your LST file in Notepad, and you'll see it says something like this:
/s "SamplePresentation.ppt"
If you were able to look at the playlist.txt file created by PowerPoint 2003's Package for CD option, you'd see something like this one:
SamplePresentation.ppt
The difference is the /s (and the quotation marks).
/s tells the new Viewer to begin with a splash screen. You don't want that, so remove the /s. Removing the /s also means you can remove the quotation marks at the beginning and end of your presentation name.
If your playlist will have more than one presentation in it, it should just be a list of presentations like this:
Presentation1.ppt
holiday.ppt
2004 Monthly Calendar.ppt
Acme Sporting Goods.ppt
Make the changes, then save the file using the File | Save As option. Name it playlist.txt, because the new Viewer uses a TXT file, not a LST file like you already have. You can delete the LST file after you create the playlist.TXT file.
Create an autorun.INF file by opening Notepad and typing in the following text:
[autorun]
open=pptview.exe /L "playlist.txt"
The /L tells the new Viewer to read the playlist, which is contained in the file playlist.txt. Do a File-->Save As. Name the file Autorun.INF
Now for the play.bat file.
Open Notepad and type in the following text:
@pptview.exe /L "playlist.txt"
Choose the File | Save As option, and name the file play.bat. Save it in the folder with all the rest of the unpacked files and Viewer files.
We don't think you must have a BAT file on your autorun CD. This BAT file will run your CD automatically, even if autorun has been turned off on the recipient's CD drive (which may irritate them). However, since the Package for CD option creates the BAT file, so we may as well, too.
That's it. You're finished! Using your CD burning software, burn the contents of this folder to your CD. Don't put the files inside a folder on the CD, just put everything on the root of your CD.
If you want to test the files before you burn them to the CD, you can double-click the play.BAT file. It should open the PPT Viewer with your first presentation.
You can create a standalone EXE by taking this technique further. Read Part II
You May Also Like: 5 Slide Design Tips to Take Home From a Successful IPO Presentation Project | Thai Design PowerPoint Templates


Microsoft and the Office logo are trademarks or registered trademarks of Microsoft Corporation in the United States and/or other countries.