PowerPoint provides several bullet styles
that you can choose from, but they do look a little canned since almost every PowerPoint slide these days uses the same bullet
styles! You could get rid of bullets altogether and use small sentences/paragraphs instead, or maybe you could explore picture
bullets, to insert any picture as your bullet. Of course, for picture bullets to work, your picture needs to be small, no larger
than a medium-sized dot. And it helps if it has transparent areas. If all this talk about the size and transparency of a picture
bullet makes you curious, don't worry because we explain it all!
So what does a picture bullet look like? Look at Figure 1, where the first bullet uses PowerPoint's default
bullet style. The second and third bullets use picture bullets from PowerPoint's built-in picture bullets collection.

Figure 1: Picture bullets in PowerPoint
Tip: Do you want to use pictures as bullets in all slides? The instructions on this page are for working with
individual slides in
Normal View. To apply these
changes to all slides, follow the same steps within the
Slide Master View.
To add these picture bullets in PowerPoint 2016, follow these
steps:
- Open any presentation or create a new one. Then navigate to the slide where you want to add picture bullets. Select the
bulleted text as explained below:
- If you want to make changes to just one bullet in the
text placeholder (or text box),
select that individual line.
- If you want to make these changes to all the bullets in the
text placeholder (or text box), you
can select the entire placeholder by clicking on the edge of the placeholder (see Figure 2).

Figure 2: Entire placeholder with bulleted text selected- Access the Home tab of the
Ribbon and click the arrow beside the
Bullets button (highlighted in blue within Figure 3). This brings up
the Bullets drop-down gallery, as shown in Figure 3. Within this drop-down gallery, choose
the Bullets and Numbering option (highlighted in red within Figure 3).

Figure 3: Bullets drop-down gallery- This will open the Bullets and Numbering dialog box, as shown in Figure 4.
Make sure that the Bulleted tab of this dialog box is selected. Click the Picture
button, as shown highlighted in red within Figure 4.
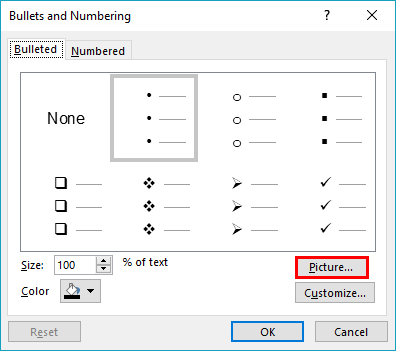
Figure 4: Bullets and Numbering dialog box- This bring up the Insert Pictures dialog box, as shown in Figure 5. Within this
dialog box you'll find three options to get a picture:
From a File
- Using this option, you can
insert a picture that has been stored in your
computer locally.
Online Pictures
- This option allows you to take picture from an online picture service provider such as
Bing Image Search, and also your
OneDrive account.
From Icons
- This option opens Insert Icons dialog box which contains icons of different category.
You can select any of them based on your requirement.
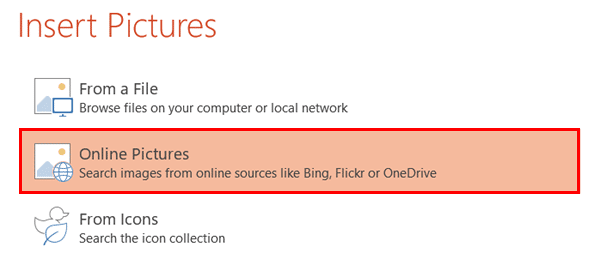
Figure 5: Insert Picture dialog box- For this tutorial, we chose the Online Pictures option, shown highlighted in
red within Figure 5, above. We are searching pictures using the
Bing Image Search service. Next, you can type in keyword(s) within the box placed next to the service you want to
insert the picture from, and press the Enter key.
- As you can see in Figure 6, the keyword "apple" shows results for that search term. Now
select the desired picture bullet, and click the Insert button. as shown highlighted in
red within Figure 6.

Figure 6: Search result- This will take you back to your slide where individual bullets are changed for the selected text, as shown in
Figure 7. You can compare Figures 2 and 7 to see the changes.

Figure 7: Bullets now use pictures


