Indezine Logo


Picture Borders in PowerPoint 2016 for Windows

Learn how to add and edit picture borders in PowerPoint 2016 for Windows. A border can be a thin outline or even a thicker frame for the picture.


Author:

Product/Version: PowerPoint 2016 for Windows

OS: Microsoft Windows 7 and higher


Learn PowerPoint

How to create Simple Quizzes in PowerPoint


In PowerPoint, the Picture Border option adds an outline or even a beautiful frame to your picture. Once you insert a picture on your slide, you can apply various Adjust Picture options. You can also apply any of the preset Picture Styles available for the picture.

In this tutorial, we'll explore how to add a border to an inserted picture in PowerPoint 2016 for Windows:
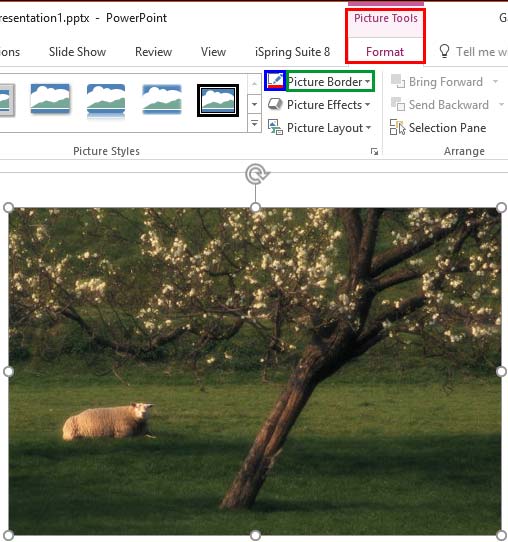
  1. Open your presentation and select the picture that you want to apply the border to. This brings up the Picture Tools Format tab on the Ribbon (highlighted in red within Figure 1). Activate this contextual tab by clicking it.
  2. Picture Border button within the Picture Tools Format tab
    Figure 1: Picture Border button within the Picture Tools Format tab
  3. Note: The Picture Tools Format tab is a Contextual tab. These tabs are special tabs in the Ribbon that are not visible all the time. They only make an appearance when you are working with a particular slide object which can be edited using special options.
  4. Now, you can add the border to your selected picture using any of the following approaches:
  5. Apply a Picture Style that includes a border, and edit it later, as required.
  6. Click the Picture Border button, as shown highlighted in blue within Figure 1, above. This adds a thin border using the first Accent color of the active Theme (or the most recently selected picture border color or shape outline color).
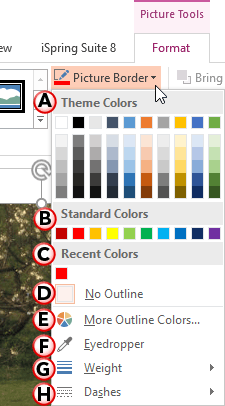
  7. Click the Picture Border button, as shown highlighted in green within Figure 1, above. This opens the Picture Border drop-down gallery that you can see in Figure 2. Select any of the options within this drop-down gallery that are explained next.
  8. Picture Border drop-down gallery
    Figure 2: Picture Border drop-down gallery
  9. Let us explore all options within the Picture Border drop-down gallery, as marked in Figure 2:
  10. A. Theme Colors

  11. Here you can select any of the colors which are from the active Theme of the presentation. You can also select any of the 5 tints or shades for any Theme color. Learn more about Themes here.
  12. B. Standard Colors

  13. Here you can choose from any of the ten standard colors. These ten standard colors are just choices of colors that PowerPoint believes to be widely used. You don't have to limit yourself to either the Theme colors or Standard colors, as we'll show you in the next options. It's a good design idea to use Theme colors as far as possible.
  14. C. Recent Colors

  15. Here you can find the colors most recently used. If you have just launched PowerPoint and created a new presentation, the Recent Colors option may be entirely absent since you haven't selected any color recently!
  16. D. No Outline

  17. Choose this option to remove the picture border altogether from your selected picture.
  18. E. More Outline Colors

  19. This option is to summon the Colors dialog box, which helps you to create your own new color for the picture border. To learn more about how to work with the More Outline Colors option, read our Add Solid Fills to Shapes in PowerPoint 2016 for Windows tutorial. Explore step 3E in that tutorial. Even though the option explained in that tutorial is More Fill Colors, the Colors dialog box options work similarly for More Outline Colors option too.
  20. F. Eyedropper

  21. This option enables you to pick an exact color from anywhere, sometimes even from somewhere outside PowerPoint. Explore our Eyedropper Option in PowerPoint 2016 tutorial to learn more.
  22. G. Weight

  23. Change the thickness of the border from hairline to a chunky, thick line. Learn more about line thickness in our Formatting Line Weight and Thickness for Shapes in PowerPoint 2016 for Windows tutorial. Although the linked tutorial is about shape borders, the procedure explained in the tutorial applies to picture borders as well.
  24. H. Dashes

  25. These are different dash types for the picture border. Learn more about these options in our Formatting Line Dashes for Shapes in PowerPoint 2016 for Windows tutorial.
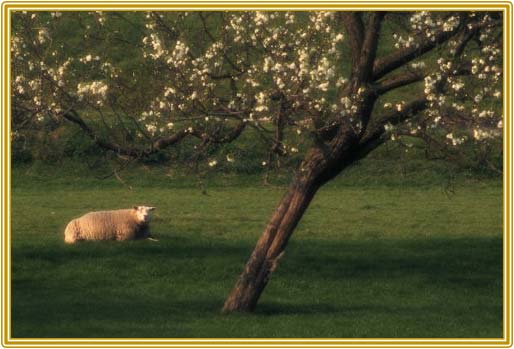
  26. Once you have added/edited the picture border, remember to save your presentation. In Figure 3, you can see a border added to the selected picture. Compare Figures 1 and 3.
  27. Picture border added and enhanced
    Figure 3: Picture border added and enhanced

See Also:

Pictures Appearance: Picture Borders (Glossary Page)

Picture Borders in PowerPoint 2013 for Windows
Picture Borders in PowerPoint 2011 for Mac
Picture Borders in PowerPoint 2010 for Windows

You May Also Like: Differences in PowerPoint Usage in Microsoft Teams and Zoom: Conversation with Dave Paradi | States of India PowerPoint Templates


Popular Posts

Creating Anchor Points for Connectors in PowerPoint 2010 for Windows
Learn how to create Anchor Points for connectors in PowerPoint 2010.

Working With Slide Numbers in PowerPoint 2016 for Windows
Learn how to add Slide Numbers on slides and Masters and more tricks on making them work to your will in PowerPoint 2016 for Windows.

Texture Fills for Slide Backgrounds in PowerPoint 2013 for Windows
Use texture fills for slide backgrounds in PowerPoint 2013 for Windows.

Adding More Guides in PowerPoint 2016 for Windows
Learn how to add more guides in PowerPoint 2016 for Windows.


Pictures in Presentations

Is a picture is worth a thousand words? You probably have heard this adage so often that we decided not to repeat this phrase throughout this book! Now here’s some more info: the human brain uses a larger part of its area to store visual information rather than textual content. And that’s possibly because a picture describes so much more than text.

Go and get a copy of our Pictures in Presentations ebook.


Microsoft and the Office logo are trademarks or registered trademarks of Microsoft Corporation in the United States and/or other countries.

Home | PowerPoint | Photoshop | PowerPoint Templates | PowerPoint Tutorials | Blog | Notes | Ezine | Media Kit | Feedback | Site Map | About Us | Contact Us

Link to Us | Privacy | Testimonials

PowerPoint Backgrounds | Christian PowerPoint Backgrounds | Business PowerPoint Presentation Templates

Plagiarism will be detected by Copyscape

©2000-2023, . All rights reserved.