Learn how to create graphic elements with shapes with Barbara Brundage. This section is an excerpt from her book, Photoshop Elements 4, The Missing Manual.
Author: Barbara Brundage
Product/Version: PowerPoint
 This book extract from Photoshop Elements 4: The Missing Manual is an Indezine exclusive with permission from O'Reilly Media, Inc.
Barbara Brundage, the author of the book has been a member of Adobe's pre-release groups for Elements 3 and 4.
The excerpts chosen to be published on Indezine aim to show how easy it is to create graphic elements with shapes in Photoshop Elements 4.
We wish to thank Theresa Pulido and Dawn Mann for facilitating the permission to extract.
Drawing with Shapes
Rectangle and Rounded Rectangle
Ellipse
Polygon
Line Tool
Wow, so many brush options, and Adobe still isn't done—there's yet another way to draw things in Elements. Elements includes a Shape tool, which lets you draw geometrically perfect shapes, regardless of your artistic ability. And not just simple shapes like circles and rectangles. You can draw animals, plants, starbursts, picture frames all sorts of things, as shown in Figure 11-20. This tool should appeal to anyone whose grade school masterpieces always seemed to get put up on the wall behind the piano somewhere.

Figure 11-20: Here are just a few of the shapes that you can draw with Elements, even if you flunked art class in elementary school. These objects look much more impressive once you gussy them up with Layer styles.
Turning yourself into an artist by using the Elements' Shape tool is easy. Just follow these steps:
You can add shapes to any file that you can open in Elements.
Click the Shape tool in the Toolbox or press U. The Shape tool is sometimes a little confusing to newcomers to Elements because the icon reflects the shape that's currently active—so you may see a rectangle, a polygon, or a line, for instance. The little cartoon speech balloon of the Custom Shape tool is the icon Elements initially presents you with.
Click the shape you want in the Options bar. You can choose a rectangle, a rounded rectangle, an ellipse, a polygon, a line, or a custom shape. (If you choose the Custom shape, you have many different shapes to choose from.) All the shapes, and their accompanying options, are described in the following sections.
Choose a color by clicking the color square in the Options bar or use the foreground color (page 184). If you click the Options bar color square, you see the Color Picker (page 185). If you click the arrow to the right of the square, you get the Color Swatches palette instead (page 189).
If you have special requirements, like a rectangle that's exactly 1" × 2", click the arrow next to the shape thumbnail for the Shape Options palette and enter the size of your shape.
There's also an Options bar setting that lets you apply a layer style (see page 325) as you draw your shape. Just click the drop-down arrow on the right side of the Style box and choose the style you want from the pop-out palette. To go back to drawing without a style, choose the rectangle with the diagonal red line through it.
Notice that how you drag the cursor affects the final appearance of the shape. The way you drag determines the proportions of your figure. If you're drawing a fish, you can drag so that it's long and skinny or short and fat. Even with practice, it may take a couple of tries to get exactly the proportions you want.
Note: If you're trying to create exact copies of a particular shape, use the Shape Selection tool, described later, to create duplicates of the first shape.
The Shape tool automatically puts each shape on its own layer. If you don't want to do that, or you need to control how shapes interact, you can use the squares in the middle of the Options bar. They're the same as the ones for managing selections (page 109). Use them to add more than one shape to a layer, subtract a shape from a shape, keep only the area where shapes intersect, or exclude the areas where they intersect.
You can also turn any shape from a vector image (infinitely resizable) into a raster image (drawn pixel by pixel) by clicking the Simplify button in the Options bar. The box “Rasterizing Vector Shapes” on page 304 tells you everything you need to know about the difference between vector and raster images.
The following sections describe all of the main shape categories and their special settings.
The Rectangle and the Rounded Rectangle tools work pretty much the same way and are very popular for creating Web page buttons. They both have Shape options settings in the Options bar for:
Choose Unconstrained to draw a rectangle of whatever dimensions you want. How you drag determines the proportions of your shape.
To draw a square instead of a rectangle, click this radio button before you start, or just hold down the Shift key as you drag.
This setting makes Elements draw your shape the size you specify. Just enter the dimensions you want in inches, pixels, or centimeters.
Use this setting if you know the proportions you want your rectangle to have, but not the exact size. Just type in the proportions. So if you enter a length of 2 and a height of 1, no matter where you drag, the shape is always twice as long as it is high.
This setting lets you draw your shape from its center instead of from a corner. It's useful when you know exactly where you want the shape but aren't sure exactly how big it needs to be.
This setting makes sure that the edge of your rectangle falls exactly on the edge of a pixel. You'll get crisper-looking edges with it turned on. It's available only for the Rectangle and Rounded Rectangle tools.
Most of the Shape tools have similar options. The Rounded Rectangle has one option of its own, though: Radius. Radius is the amount, in pixels, that the corners are rounded off. A higher number means more rounding.
The Ellipse has the same Shape Options as the Rectangle tool. The only difference is that you can opt for a circle instead of a square. The Shift key constrains the Ellipse to a circle.
You can draw any kind of polygon using this tool. You set the number of sides yourself in the Options bar.
The shape options in the Options bar pull-down menu are a bit different for this tool:
This setting sets the distance from the center to the outermost points.
If you don't want sharp edges at the corners, choose Smooth Corners.
This setting inverts the angles to create a star-like shape, as shown in Figure 11-21.
If you're drawing a star, this sets how much (in percent) you want the sides to indent.
Use Smooth Indent if you don't want sharp angles on your star.
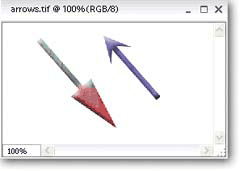
Use this tool for drawing straight lines and arrows. Specify the weight (the width) of the line in pixels in the Options bar. If you want an arrowhead on your line, the Shape options give you some settings for adding one to your line as you draw:
Do you want the arrowhead at the start or the end of the line you draw? Tell Elements your preference with this setting.
This setting determines how wide and how long you want the arrowhead to be. The measurement unit is the percentage of the line width, so if you enter a number lower than 100, your arrowhead is narrower than the line it's attached to. You can pick values between 10 percent and 5,000 percent.
Use this setting if you want the sides of the arrowhead indented. The number determines the amount of curvature on the widest part of the arrowhead. See Figure 11-22. Pick a setting between -50 percent and +50 percent.
There are also arrows available in the Custom Shape tool if you want something fancier.

Figure 11-21: Top: A hexagon drawn with the Shape tool
Bottom: Turning on the Star option inverts the angles on a polygon, so that instead of drawing a hexagon, you create a star.

Figure 11-22: Two arrows drawn with the Line tool
Left: An arrow with no concavity.
Right: An arrow with concavity set to 50 percent. Both arrows have Layer styles applied to them so they don't look so flat. You can read more about how to do that in the next chapter.
You May Also Like: Presentation Skills: Conversation with Payam Bahrampoor | Geometric PowerPoint Templates


Microsoft and the Office logo are trademarks or registered trademarks of Microsoft Corporation in the United States and/or other countries.