Indezine Logo


Using the Morph Transition with Curve Shapes in PowerPoint

Quickly create animations using the Curve line tool and the Morph transition in PowerPoint. This is so much easier since the Morph transition automatically creates the tweening effects for you.


Author:

Product/Version: PowerPoint

OS: Microsoft Windows and Mac OS X


Learn PowerPoint

New Features in PowerPoint: Doing more with Embedded 3D animations


We already looked at getting started with the Morph transition in PowerPoint. In this next tutorial of the Morph transition series, we will look at using the Curve line tool to create some drawings. These drawings can be duplicated on subsequent slides, and edited slightly in each slide. The results can differ depending upon what you draw. While it will be great if you have artistic skills to draw within PowerPoint, it doesn't matter if you cannot draw.

Please view the video below, or follow the step-by-step instructions on this page. You can also download the sample file used for this tutorial.

This tutorial is the second part of our series on using the Morph transition effect. Yes, you can change the size, color, or other attributes of shapes such as ovals or rectangles from one slide to another using the Morph transition effect. Using the Morph Transition with Curve Shapes in PowerPoint

Does Every PowerPoint User Have Access to Morph?

Now, the Morph transition effect is not available to everyone. This new transition effect is only available to PowerPoint 365 users on both Windows and Mac platforms. In other words, these are users who have a current Office 365 subscription. Additionally, perpetual versions such as PowerPoint 2019 and 2021, and some phone and tablet platforms, and also selected accounts of PowerPoint for the Web support the Morph transition to some extent. Plus, some older versions of PowerPoint, such as PowerPoint 2016 allow playback of Morph transitions, but do not provide editing options.

Follow these steps for a quick walkthrough of using the Curve line tool with the Morph transition effect:

  1. Open an existing presentation, and add a new slide. Alternatively, create a new presentation and work with a clean slide that has no content. In either case, change the slide layout to Blank, as shown in Figure 1, below.
  2. Start with a blank slide
    Figure 1: Start with a blank slide
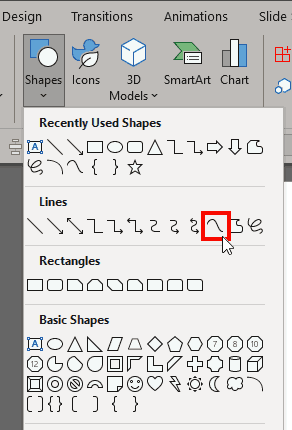
  3. Now, access the Insert tab of the Ribbon, and click the Shapes button to bring up the Shapes gallery, as shown in Figure 2, below. Select the Curve line tool, as shown highlighted in red within Figure 2.
  4. Shapes gallery
    Figure 2: Shapes gallery
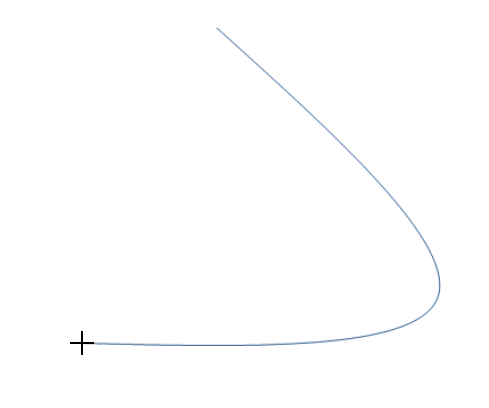
  5. Click on the slide, let off the mouse button but continue moving your mouse (don't click any mouse button while moving) in a 135 degree direction, towards the south-east, and click once, and then continue westwards (left). You'll end up with a shape, as shown in Figure 3, below.
  6. Move cursor to the south-east
    Figure 3: Move cursor to the south-east, click, and move westwards
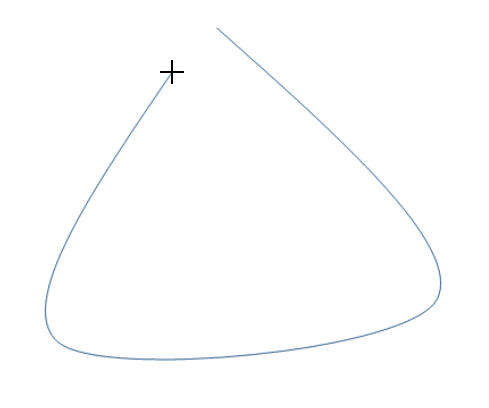
  7. Without leaving your mouse cursor, move westwards in a horizontal line for the same distance as previously moved, and click again, and then continue to the north-east, so as to end up with a shape, as shown in Figure 4, below.
  8. Move cursor to the west
    Figure 4: Move cursor to the west, click, and move north-east
  9. Now, move the cursor to the position from where you started drawing this shape until you see a live preview of a filled shape, as shown in Figure 5, below. Click to create a closed shape.
  10. Move cursor to close the shape
    Figure 5: Move cursor to close the shape
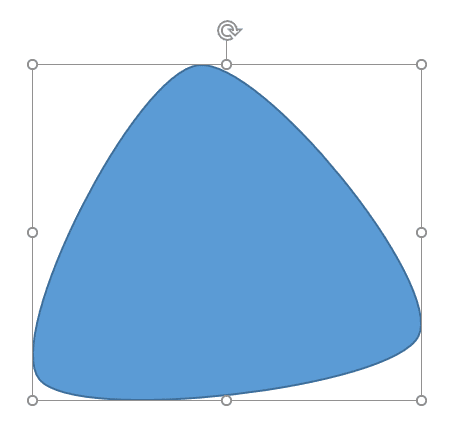
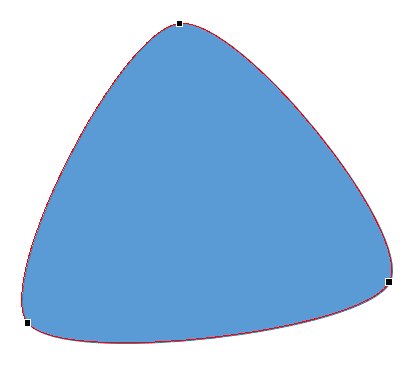
  11. You will end up with a closed shape, as shown in Figure 6, below.
  12. A closed shape drawn with the Curve line tool
    Figure 6: A closed shape drawn with the Curve line tool
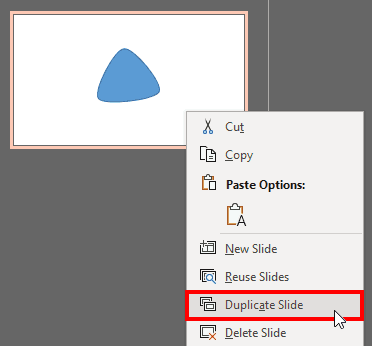
  13. Next, select the slide within the Slides Pane, and press Ctrl + D. Alternatively, right-click the slide within Slides Pane, and choose the Duplicate Slides option from the resultant contextual menu, as shown highlighted in red within Figure 7, below. Doing so will create a duplicated slide.
  14. Duplicate slide
    Figure 7: Duplicate slide
  15. PowerPoint Keyboard Shortcuts

    PowerPoint Keyboard Shortcuts

    Do you want more keyboard shortcuts?

    Explore our PowerPoint Keyboard Shortcuts and Sequences Ebook that is updated for all PowerPoint versions.
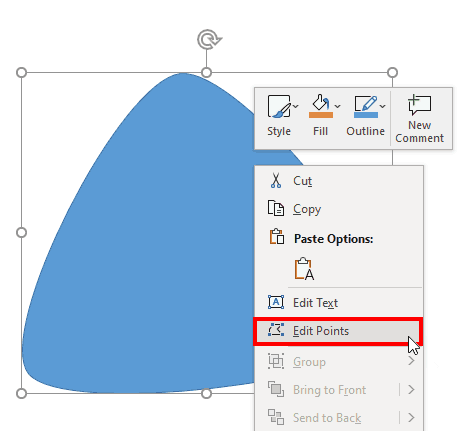
  16. Now, select the shape on the duplicated slide and right-click. In the resultant contextual menu, choose the Edit Points options, as shown highlighted in red within Figure 8, below.
  17. Edit Points
    Figure 8: Edit Points
  18. Doing so reveals the points (or vertexes) for the selected shape, as shown in Figure 9, below. Now, there are two elements you can edit here. You can either select the points, and drag them as needed. You can also click on any of the segments, which are the lines between two points, and drag them inwards or outwards as needed.
  19. Edit Points mode
    Figure 9: Edit Points mode
  20. Edit Points

  21. Did you know that PowerPoint has illustration capabilities built-in? This article won't get into too many details, but if you are interested, look at these pages in our Presentation Glossary:
  22. Edit Points for Shapes
    Add or Delete Points (Vertexes) for Shapes
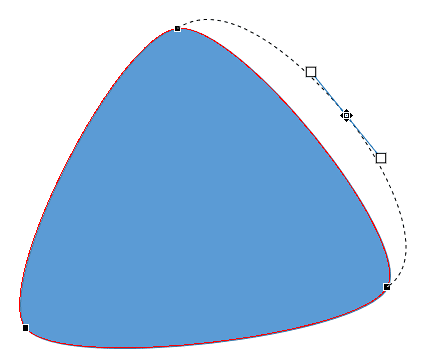
  23. We clicked on one of the segments, as shown in Figure 10, below, and successfully dragged this segment outwards.
  24. Drag a segment outwards
    Figure 10: Drag a segment outwards
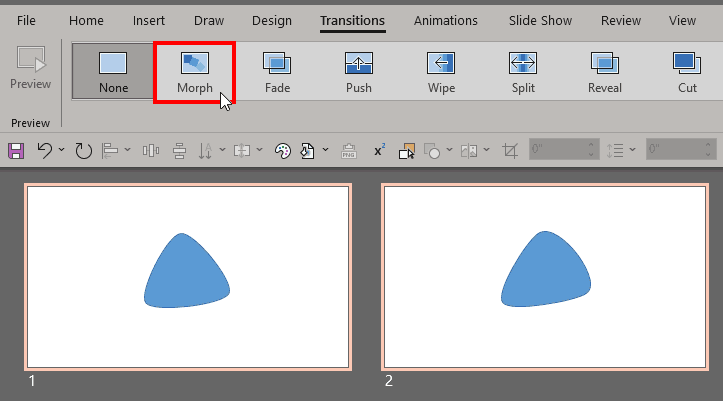
  25. Now access Slide Sorter view, and select both slides. Next, access the Transitions tab of the Ribbon, and select the Morph transition effect in the Transitions gallery, as shown highlighted in red within Figure 11, below.
  26. Choose the Morph transition effect
    Figure 11: Choose the Morph transition effect
  27. Save your presentation, and test the Morph transition effect by playing the slides in Slide Show view.
  28. Of course, this is just the beginning. You can use the Curve line and Edit Points tools to create and edit any shape you want. In fact, you can create multiple shapes on each slide, duplicate the slide, and make edits to the shapes as needed—and then tween them all to look like they are animated using the Morph transition effect.

People Also Ask:

How do you draw a curve in PowerPoint?

To draw a curve in PowerPoint, you access the Home of Insert tabs of the Ribbon, and then bring up the Shapes gallery. Within this gallery, you locate the Lines category, and click on the Curve option. Click once to establish the start point of your curve. Then drag and draw as needed. To end the curve, double-click to create an open shape. To create a closed shape, click as near as possible to the point where you started from.

How do I morph one shape into another in PowerPoint?

When it comes to PowerPoint slides, animating and transforming slides is one of the areas in which this software excels. The process involved with transforming a shape into another shape or setting up objects' movements is something that any experienced computer user will be familiar with.

Why is there no morph in PowerPoint?

You need to have at least PowerPoint 2019, 2021, or 365 to use the Morph transition effect. Users of some older versions may be able to view Morph effects but cannot add or edit them.

13 10 02 - Morph in PowerPoint: Using the Morph Transition with Curve Shapes in PowerPoint (Glossary Page)

You May Also Like: 3D Content Guidelines for Microsoft: Conversation with Michelle Maislen and Jeremy Kersey | Recycle PowerPoint Templates


Popular Posts

Changing Location of Slide Numbers in PowerPoint 2010
Learn how to change location of slide numbers in PowerPoint 2010.

Text Alignment within Table Cells in PowerPoint 2013 for Windows
Learn about the options for text alignment within Table cells in PowerPoint 2013 for Windows.

Keyboard Shortcuts for PowerPoint 2011 for Mac
Explore keyboard shortcuts in PowerPoint 2011 for Mac.

Insert Video from Facebook in PowerPoint 2016 for Windows
Learn how to insert video from your Facebook account in PowerPoint 2016 for Windows.


Pictures in Presentations

Is a picture is worth a thousand words? You probably have heard this adage so often that we decided not to repeat this phrase throughout this book! Now here’s some more info: the human brain uses a larger part of its area to store visual information rather than textual content. And that’s possibly because a picture describes so much more than text.

Go and get a copy of our Pictures in Presentations ebook.


Microsoft and the Office logo are trademarks or registered trademarks of Microsoft Corporation in the United States and/or other countries.

Home | PowerPoint | Photoshop | PowerPoint Templates | PowerPoint Tutorials | Blog | Notes | Ezine | Media Kit | Feedback | Site Map | About Us | Contact Us

Link to Us | Privacy | Testimonials

PowerPoint Backgrounds | Christian PowerPoint Backgrounds | Business PowerPoint Presentation Templates

Plagiarism will be detected by Copyscape

©2000-2023, . All rights reserved.