Do you need to share your presentations with others? If yes, it's a good idea to make sure that your presentations are set to be read-only before you share them. To make your file read-only, you should look at the Mark as Final option in PowerPoint. Note that this option is not as restrictive as password-protecting a PowerPoint presentation. The Mark as Final option tries to prevent users from typing, editing commands, and proofing. All editing options are disabled or turned off. However, do remember that Mark as Final is not a security feature, and can be easily reversed by the recipient of your file.
Mark as Final in Previous Versions
Presentations that have been marked as final in PowerPoint 2013 will not be read-only if they are opened in PowerPoint 2007 and prior versions.
Follow these steps to learn how to use the Mark as Final option in PowerPoint 2013 for Windows:
- Open an existing presentation. If you want to apply Mark as Final to a copy of the presentation, it is a good idea to choose the Save As command and then work on a copy of the file.
- Access the File tab of the Ribbon to bring up Backstage view, and make sure that the Info Pane is open, as shown in Figure 1, below.
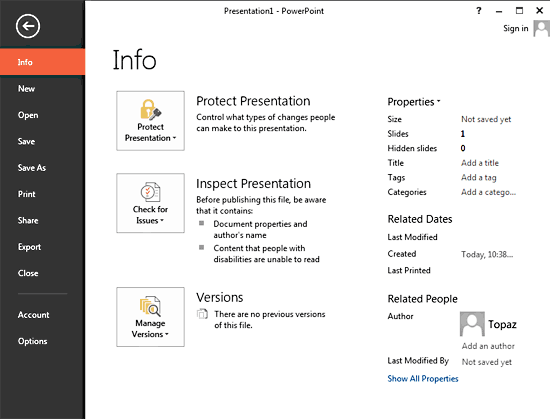
Figure 1: Info Pane- Click the Protect Presentation button to bring up the drop-down menu, as shown in Figure 2, below. Within the drop-down menu, select the Mark as Final option.
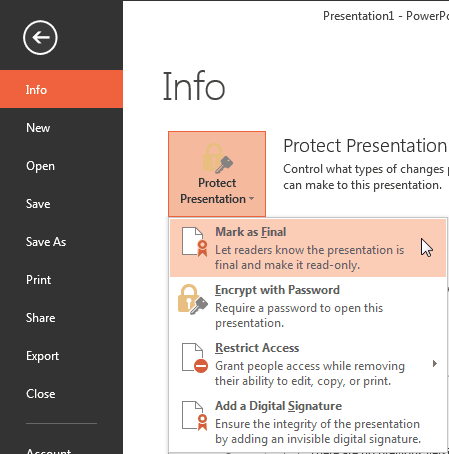
Figure 2: Mark as Final option- This action summons the message window, as shown in Figure 3, below. Click the OK button to mark the open presentation as Final. Remember that this action marks and saves the open presentation as final, and no new copies are created.

Figure 3: Message window- This step will take you back to Normal View, and another message window appears simultaneously, as shown in Figure 4, below. You will be informed that this presentation has been marked as Final. All you need to do now is to click the OK button. If you don't want to see this message again, remember to select the Don't show this message again check-box.

Figure 4: Confirmation of marked as final- In Normal View, you will see two indications that will make it clear that the file has been marked as final:
- There's a Mark as Final icon in the Status Bar at the bottom left area, as shown highlighted in red within Figure 5, below.
- A yellow strip right above the Slide Area, as shown highlighted in blue within Figure 5, below, indicates that this presentation discourages editing.
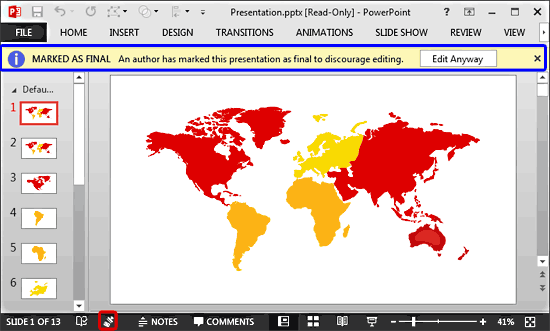
Figure 5: Presentation marked as final
- To further confirm the Mark as Final state, click any of the tabs of the Ribbon, and you'll find that almost all options are grayed out. This means you can no longer edit the presentation. Figure 6, below, shows the Home tab of the Ribbon with editing options greyed out.
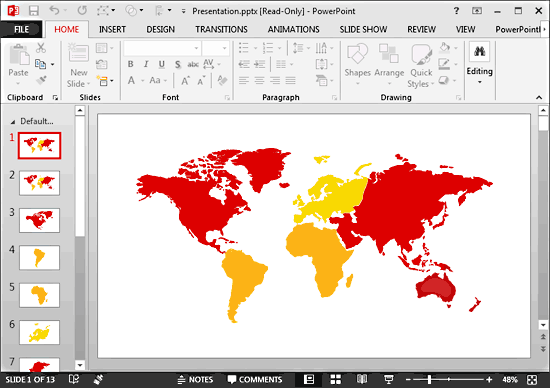
Figure 6: Options within Home tab grayed out- Now, if you check within the Info pane, you'll see that the Protect Presentation area indicates the active presentation as marked as final (the yellow box), as shown in Figure 7, below. Also, note that the title bar of the application that says Read-Only.
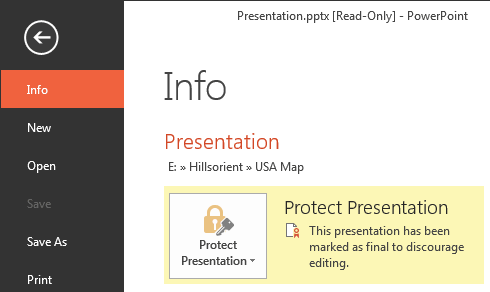
Figure 7: Protect Presentation area indicates the active presentation as marked as final- If you want to remove the Mark as Final attribute, please explore our Remove Mark as Final Option in PowerPoint 2013 tutorial.


